Carcass Featured Projects
Carcass Builds
Want more content like this?
Join the PowerNation Email NewsletterVideo Transcript
(Jeremy)>> You're watching Powernation!
(Jeremy)>> Today on Carcass it's all about trimming the fat, but first we've got to work on some of those curves. We'll show you a method to add some flare to your project's body panels.
(Jimmy)>> Then we'll shed some weight using a low density material that you can mold into multiple forms and is exceptionally durable. [ Music ] [ engine revving ] [ Music ]
(Jimmy)>> What's up everybody! Welcome to Carcass! Today on our Road Course Camaro we're gonna be making some modifications in the performance and the aesthetic department. On the last episode we got our rear wheel fitment down and the tire sticks out about an inch and a half, which is okay, but we need to find some way to cover it up. Otherwise, it's gonna look goofy sticking outside the quarter panel.
(Michael)>> And we could use the traditional metal flare, but instead we've decided to make our entire quarter panel out of carbon fiber. What that's gonna do is save us weight and give us a better look. What we need to do first is shape our flares here so we have a mold to lay our carbon fiber on.
(Jimmy)>> So for right now we're just gonna prep the panels with a d/a sander, and then we'll show you a really cool material that's very easy and fast to make complex shapes. I'm gonna grab the sanders and we'll get started. [ sander buzzing ] [ Music ] [ sander buzzing ]
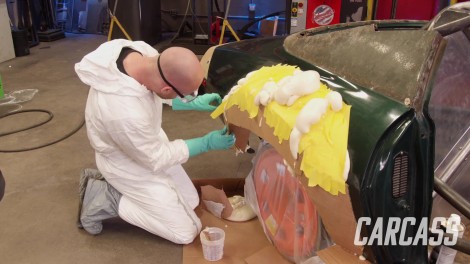
(Jimmy)>> We've got the quarter panels prepped, and now I'm gonna give the gameplan as to what we're trying to do. To get the shape of our flare we're gonna be using a two part expandable foam. You just mix these two together, and then it should expand to 18 times its liquid volume. This stuff is really awesome because once you get it on the quarter panel it's really fast and easy to make very complex curves with just some basic tools. The problem is we need to find some way to contain the liquid while it's expanding. So, we're just gonna be using some cardboard. Then we took a hot glue gun from our paintless dent repair kit, but anything from your local hobby store or arts and crafts type store would work just fine. So, we sanded the panel just to give the foam a little bit of bite, but there's no real science to this. So, we're just gonna start cutting and start gluing. [ Music ]
(Jimmy)>> Get some glue on there. Let this dry for a second. The goal with the cardboard is to make the foam structure bigger than the final shape of the flare. That way we can slowly remove material until we get the desired shape. [ Music ]
[ Music ]
(Jimmy)>> The foam is mixed in a one-to-one ratio, and we have only about 60 seconds until we have to start pouring. Then we wait. Alright, ready for the chaos? [ Music ]
[ Music ] So obviously we had a little bit of a leak. Good news is with this foam there is now no leak because it expands and fills the gap. So we were gonna do this in two pours anyway. So, I'm just gonna get the rest of this done, and then I can peel everything off and see what it looks like. So now it's best if you can pull the tape and cardboard off while this stuff is still warm cause if it fully cures then you're gonna rip the cardboard, and it's gonna get stuck to the foam, and it just makes more of a mess than if you can get to it early on. [ Music ] [ tape ripping ] [ Music ]
(Jimmy)>> I have the foam on the quarter panel, and now it's time to shape it, and I'm pretty much gonna do that with only two different tools. This is a reciprocating saw blade with tape as a handle. This is a die grinder with a scuffing disc, and these are just gonna mow through it. This makes an absolute mess. So, if you don't want dust on something now's a good time to cover it up. Otherwise, we'll get this going. [ Music ] [ saw blade scraping ] [ grinder buzzing ] [ Music ] [ sandpaper scratching ]
(Jimmy)>> As you can see, I've removed quite a bit of foam with the saw blade and the scuff disc, and then I went over it with some 36-grit sandpaper to take care of some of the sharper edges and just smooth this thing out. So, at this point what we have to do is the final shaping, and I'll go ahead and smear this entire thing with body filler. Then we'll really focus on trying to make a smooth transition up on to the quarter panel. Another thing I want to focus on is retaining this vertical edge all the way around the wheel opening. That's really gonna define the whole thing and give it a factory kind of lip here. That'll look really good when it's all finished. So, I just have to mix up a ginormous amount filler and smear this whole thing. [ Music ] I mixed the filler in several batches just so it wouldn't start to cure on me before I could get it onto the flare. [ Music ] [ sandpaper scratching ]
(Jimmy)>> So I've got this shaped using 36 grit on a block. I'll probably go up higher in grit just to get this a little bit smoother, but we're ready to move on to the next steps, which is priming this and making fiberglass molds.
(Jeremy)>> Up next, we start the process of making the fiberglass molds on our '72 Camaro race car.
[ sandpaper scratching ]
(Jeremy)>> Alright guys, we have both sides of the Camaro basically matching as far as the bulge goes on the quarter panels. We've one through the foam. We've done some body filler work, and then we put both sides into primer. What I'm doing on my side is just hitting down the primer, or knocking it down, with some 400 grit. What Jimmy's doing on his side of the quarter is applying some wax. Now I know it's really odd to be waxing over the top of primer but there's a specific reason he's doing this. As we move on to the next step, which is fiberglass, we're gonna wanna make sure that fiberglass mold can release from the car and not have any issues. Now this isn't the only thing he's gonna be doing to help it release, but while he gets this side really slicked out I'm just gonna keep sanding on my side.
(Jimmy)>> I'll go ahead and hit this quarter panel with two to three coats of wax before brushing on some PVA release agent, which will also help aid in the release of the mold. The type of wax we are using is specific to composite part fabrication and mold making. However, you could use other types of wax for this. The PVA is meant to be a thin film. So, we'll go ahead and spread this out evenly. [ Music ]
Next up is the gel coat, which provides the tooling surface of the mold, and this needs to be applied in two thick coats. [ Music ]
[ Music ] We've got a few coats of gel coat on the quarter panel now and this stuff has cured for quite a while. We had a little bit of an issue with some wrinkles up here and we think it may just be a variation in the thickness cause this stuff is pretty sensitive to how thick you can lay it on the panel, especially when brushing. This isn't a big enough problem that we want to peel all of this off and start over, and we can fix this later on. So, for right now we're just gonna start cutting some fiberglass, kinda lay it out, and then we'll get some resin on it. [ Music ] We are using chop strand mat fiberglass along with a polyester resin. When the polyester resin gets applied it breaks down the binder in the mat, which makes it extremely pliable to form around complex shapes. [ Music ]
[ Music ]
To saturate the mat with resin it's best to use a stippling action with the brush instead of trying to use brush strokes, which can separate the mat and make a mess. [ Music ] So, with this chop strand fiberglass there's one trick if you're using two pieces, which we didn't have to do two pieces for this panel, but we just wanted to illustrate how this works. If you have two pieces that you need to overlap it's best to rip the edge. That way when they lay against each other they lay into one another and form a flat transition, versus if you have two pieces that are overlapped it's just gonna double your thickness and that transition's gonna be a little bit funky. So, ripping it is the best way to do it. [ Music ]
I'm good up front here. [ Music ]
[ Music ]
We've got four layers of fiberglass on the two coats of gel coat, and we've let this cure for 24 hours. Now can pop this thing off and see what our mold looks like, and hopefully we get a clean release.
(Jeremy)>> There you go! [ plastic cracking ] [ Music ]
(Jimmy)>> We got our fiberglass mold. So, I'm gonna trim this up, and then we'll start laying some carbon. Coming up, we show you a few methods on how to make super strong carbon fiber body panels.
(Jimmy)>> I'm just about ready to make some carbon body panels for our '72 Camaro race car and I'm gonna be using two methods to do so. Method number one, I'll be using the mold of our passenger rear quarter panel. Method two, I'm gonna be using the actual door off of our car, and the main difference between these two methods is basically how much work is on the front end versus the back end. When you're using a mold you have to make the mold using gel coat and fiberglass on the front end, but on the back end you really should be able to pop the panel out, trim it, and you're done. However, the other method we're using the actual door. So, there's no real prep work involved but at the end we're gonna have to finish the outer surface to make it look nice. One thing that is similar between these two right now is they have a few coats of wax and a few coats of PVA release agent. So right now I just have to cut the carbon and we'll start laying it in. [ Music ] When cutting carbon fiber make sure you have a nice, sharp pair of scissors, and also cut your pieces a little bigger than the mold and trim accordingly. I try to shoot for about an inch to two inches of overhang all around. [ Music ]
[ Music ]
The resin we're using for the actual body panels is epoxy based. We mix this four to one with the specified hardener. Mix her up. [ Music ] We'll use spreaders to saturate the fabric. [ Music ]
[ Music ] We're using two layers of carbon fiber and one layer of fiberglass. There's not much of a weight difference between the two. However, we want the look of the carbon fiber on the outside. Another benefit of using both carbon fiber and fiberglass is that fiberglass is much cheaper than carbon fiber fabric, which will help lower the costs. [ Music ]
Alright, we got the quarter all saturated with epoxy. So we're gonna let that cure, and we'll start working on the door. [ Music ]
[ Music ]
[ Music ]
[ Music ]
(Jeremy)>> With our carbon fiber cured, now we can start bonding it to the panels.
(Jimmy)>> So we've had some time to let these body panels cure. So we're gonna get the quarter panel out of the mold, get the door skin off the door, and once I pop this you'll see just how different it is. [ Music ] [ plastic popping ] [ Music ]
(Jimmy)>> So we got a pretty good release there. As you can see this surface is perfectly smooth, or it just takes on the surface of the mold. So all we have to do to this is trim it up, wash the PVA off, give it a quick sand, and then we'll clear coat it. For the door, let's get that off and take a look. [ Music ] [ plastic pop ] [ Music ]
(Jimmy)>> Alright, so there's our door skin. The door wasn't really damaged at all, but this surface now has got the texture of the weave of the carbon. So now what I'll have to do is actually use epoxy to level this entire surface, and then we'll go and use the epoxy and body work this panel to make sure it's straight. And that's really the downside is there's no prep work up front, but you have to spend a lot of time sanding this thing to get it straight. So the easiest way to do that is get this bonded to the door. Obviously you can see this is super flimsy. Once we bond it to the door it'll give us a nice rigid surface to sand against. So I have to cut this skin off, gut the door, and then we'll get this panel bonded on. [ grinder buzzing ]
(Jimmy)>> The doors are put together by having the door skin's edge rolled over onto the door frame. So, I'm just grinding until I can see two distinct layers of steel, and then I'll move on to the next section. I've got the door skin separated from the door frame and there's a couple of interesting things about this now that it's apart. The first one is there's a lot of rust in the lower portion of this door, and the more interesting thing is there's a lot of these little holes that have been filled with body filler. The reason why they are there is because this door must have gotten punched pretty hard. The old school dent pullers, you'd have to drill a hole in the panel, use a tech screw and slide hammer to pull them. So this door's been wrecked pretty good along with a lot of the other body panels we've been noticing on the car. Again, it just goes to show this car's a really good candidate for a race car because if you wanted to do some high-end build all of this stuff would have to be replaced anyway. So I'm gonna get the door gutted, and then we'll get to bonding. [ saw buzzing ]
(Jimmy)>> A lot of the weight inside the door comes from the side impact bar, and once I cut it out I'll go back and just grind the sharp edges smooth. [ saw buzzing ] [ grinder buzzing ]
(Jimmy)>> Then I'll flip the door over and cut the inner portion of the door frame as the window will no longer be there and none of the other components need to be installed. [ saw buzzing ] [ Music ]
[ grinder buzzing ]
(Jimmy)>> To bond the carbon skin to the door frame I'm using windshield glue, but you could use any type of panel bond to do this as well. [ Music ] So now we're on to one of the last steps, which is pouring more epoxy on top of this panel. It's gonna be the same epoxy that we used for the fabric. We're just gonna lay some on here, and there's no real trick to it. It's gonna run off the panel. We just need to build up some thickness so we can come back and sand everything smooth. [ Music ] I'm using a modified spreader with some teeth cut in it, which will somewhat spread the epoxy but not completely wipe it off the panel. [ Music ]
The epoxy on the door skin here needs to cure, and then the final steps will be to sand it and give it a final trim to fit the car. And then it will look like this driver's side door, which is finished. It's got that nice carbon fiber look, and it's all slicked out. These doors used to weigh somewhere around 115 pounds and now they're down to the 30 to 35 pound range, which is a huge weight reduction. We also have a bunch of other parts in progress like the passenger side front fender, rear quarter. I've also got the deck lid here, which isn't just a skin but it's also the underside structure. So this thing is nice and rigid, and I bet this thing doesn't even weigh five pounds. So when it's all said and done I think we'll have saved maybe 500 or 600 pounds. We've got a bunch of other parts to do, the hood included, which is a huge piece, and that's gonna be a huge performance benefit. And I think we'll see the results on track, but in the meantime I've got plenty of work to do. So, I'm gonna get at it.
Show Full Transcript
(Jeremy)>> Today on Carcass it's all about trimming the fat, but first we've got to work on some of those curves. We'll show you a method to add some flare to your project's body panels.
(Jimmy)>> Then we'll shed some weight using a low density material that you can mold into multiple forms and is exceptionally durable. [ Music ] [ engine revving ] [ Music ]
(Jimmy)>> What's up everybody! Welcome to Carcass! Today on our Road Course Camaro we're gonna be making some modifications in the performance and the aesthetic department. On the last episode we got our rear wheel fitment down and the tire sticks out about an inch and a half, which is okay, but we need to find some way to cover it up. Otherwise, it's gonna look goofy sticking outside the quarter panel.
(Michael)>> And we could use the traditional metal flare, but instead we've decided to make our entire quarter panel out of carbon fiber. What that's gonna do is save us weight and give us a better look. What we need to do first is shape our flares here so we have a mold to lay our carbon fiber on.
(Jimmy)>> So for right now we're just gonna prep the panels with a d/a sander, and then we'll show you a really cool material that's very easy and fast to make complex shapes. I'm gonna grab the sanders and we'll get started. [ sander buzzing ] [ Music ] [ sander buzzing ]
(Jimmy)>> We've got the quarter panels prepped, and now I'm gonna give the gameplan as to what we're trying to do. To get the shape of our flare we're gonna be using a two part expandable foam. You just mix these two together, and then it should expand to 18 times its liquid volume. This stuff is really awesome because once you get it on the quarter panel it's really fast and easy to make very complex curves with just some basic tools. The problem is we need to find some way to contain the liquid while it's expanding. So, we're just gonna be using some cardboard. Then we took a hot glue gun from our paintless dent repair kit, but anything from your local hobby store or arts and crafts type store would work just fine. So, we sanded the panel just to give the foam a little bit of bite, but there's no real science to this. So, we're just gonna start cutting and start gluing. [ Music ]
(Jimmy)>> Get some glue on there. Let this dry for a second. The goal with the cardboard is to make the foam structure bigger than the final shape of the flare. That way we can slowly remove material until we get the desired shape. [ Music ]
[ Music ]
(Jimmy)>> The foam is mixed in a one-to-one ratio, and we have only about 60 seconds until we have to start pouring. Then we wait. Alright, ready for the chaos? [ Music ]
[ Music ] So obviously we had a little bit of a leak. Good news is with this foam there is now no leak because it expands and fills the gap. So we were gonna do this in two pours anyway. So, I'm just gonna get the rest of this done, and then I can peel everything off and see what it looks like. So now it's best if you can pull the tape and cardboard off while this stuff is still warm cause if it fully cures then you're gonna rip the cardboard, and it's gonna get stuck to the foam, and it just makes more of a mess than if you can get to it early on. [ Music ] [ tape ripping ] [ Music ]
(Jimmy)>> I have the foam on the quarter panel, and now it's time to shape it, and I'm pretty much gonna do that with only two different tools. This is a reciprocating saw blade with tape as a handle. This is a die grinder with a scuffing disc, and these are just gonna mow through it. This makes an absolute mess. So, if you don't want dust on something now's a good time to cover it up. Otherwise, we'll get this going. [ Music ] [ saw blade scraping ] [ grinder buzzing ] [ Music ] [ sandpaper scratching ]
(Jimmy)>> As you can see, I've removed quite a bit of foam with the saw blade and the scuff disc, and then I went over it with some 36-grit sandpaper to take care of some of the sharper edges and just smooth this thing out. So, at this point what we have to do is the final shaping, and I'll go ahead and smear this entire thing with body filler. Then we'll really focus on trying to make a smooth transition up on to the quarter panel. Another thing I want to focus on is retaining this vertical edge all the way around the wheel opening. That's really gonna define the whole thing and give it a factory kind of lip here. That'll look really good when it's all finished. So, I just have to mix up a ginormous amount filler and smear this whole thing. [ Music ] I mixed the filler in several batches just so it wouldn't start to cure on me before I could get it onto the flare. [ Music ] [ sandpaper scratching ]
(Jimmy)>> So I've got this shaped using 36 grit on a block. I'll probably go up higher in grit just to get this a little bit smoother, but we're ready to move on to the next steps, which is priming this and making fiberglass molds.
(Jeremy)>> Up next, we start the process of making the fiberglass molds on our '72 Camaro race car.
[ sandpaper scratching ]
(Jeremy)>> Alright guys, we have both sides of the Camaro basically matching as far as the bulge goes on the quarter panels. We've one through the foam. We've done some body filler work, and then we put both sides into primer. What I'm doing on my side is just hitting down the primer, or knocking it down, with some 400 grit. What Jimmy's doing on his side of the quarter is applying some wax. Now I know it's really odd to be waxing over the top of primer but there's a specific reason he's doing this. As we move on to the next step, which is fiberglass, we're gonna wanna make sure that fiberglass mold can release from the car and not have any issues. Now this isn't the only thing he's gonna be doing to help it release, but while he gets this side really slicked out I'm just gonna keep sanding on my side.
(Jimmy)>> I'll go ahead and hit this quarter panel with two to three coats of wax before brushing on some PVA release agent, which will also help aid in the release of the mold. The type of wax we are using is specific to composite part fabrication and mold making. However, you could use other types of wax for this. The PVA is meant to be a thin film. So, we'll go ahead and spread this out evenly. [ Music ]
Next up is the gel coat, which provides the tooling surface of the mold, and this needs to be applied in two thick coats. [ Music ]
[ Music ] We've got a few coats of gel coat on the quarter panel now and this stuff has cured for quite a while. We had a little bit of an issue with some wrinkles up here and we think it may just be a variation in the thickness cause this stuff is pretty sensitive to how thick you can lay it on the panel, especially when brushing. This isn't a big enough problem that we want to peel all of this off and start over, and we can fix this later on. So, for right now we're just gonna start cutting some fiberglass, kinda lay it out, and then we'll get some resin on it. [ Music ] We are using chop strand mat fiberglass along with a polyester resin. When the polyester resin gets applied it breaks down the binder in the mat, which makes it extremely pliable to form around complex shapes. [ Music ]
[ Music ]
To saturate the mat with resin it's best to use a stippling action with the brush instead of trying to use brush strokes, which can separate the mat and make a mess. [ Music ] So, with this chop strand fiberglass there's one trick if you're using two pieces, which we didn't have to do two pieces for this panel, but we just wanted to illustrate how this works. If you have two pieces that you need to overlap it's best to rip the edge. That way when they lay against each other they lay into one another and form a flat transition, versus if you have two pieces that are overlapped it's just gonna double your thickness and that transition's gonna be a little bit funky. So, ripping it is the best way to do it. [ Music ]
I'm good up front here. [ Music ]
[ Music ]
We've got four layers of fiberglass on the two coats of gel coat, and we've let this cure for 24 hours. Now can pop this thing off and see what our mold looks like, and hopefully we get a clean release.
(Jeremy)>> There you go! [ plastic cracking ] [ Music ]
(Jimmy)>> We got our fiberglass mold. So, I'm gonna trim this up, and then we'll start laying some carbon. Coming up, we show you a few methods on how to make super strong carbon fiber body panels.
(Jimmy)>> I'm just about ready to make some carbon body panels for our '72 Camaro race car and I'm gonna be using two methods to do so. Method number one, I'll be using the mold of our passenger rear quarter panel. Method two, I'm gonna be using the actual door off of our car, and the main difference between these two methods is basically how much work is on the front end versus the back end. When you're using a mold you have to make the mold using gel coat and fiberglass on the front end, but on the back end you really should be able to pop the panel out, trim it, and you're done. However, the other method we're using the actual door. So, there's no real prep work involved but at the end we're gonna have to finish the outer surface to make it look nice. One thing that is similar between these two right now is they have a few coats of wax and a few coats of PVA release agent. So right now I just have to cut the carbon and we'll start laying it in. [ Music ] When cutting carbon fiber make sure you have a nice, sharp pair of scissors, and also cut your pieces a little bigger than the mold and trim accordingly. I try to shoot for about an inch to two inches of overhang all around. [ Music ]
[ Music ]
The resin we're using for the actual body panels is epoxy based. We mix this four to one with the specified hardener. Mix her up. [ Music ] We'll use spreaders to saturate the fabric. [ Music ]
[ Music ] We're using two layers of carbon fiber and one layer of fiberglass. There's not much of a weight difference between the two. However, we want the look of the carbon fiber on the outside. Another benefit of using both carbon fiber and fiberglass is that fiberglass is much cheaper than carbon fiber fabric, which will help lower the costs. [ Music ]
Alright, we got the quarter all saturated with epoxy. So we're gonna let that cure, and we'll start working on the door. [ Music ]
[ Music ]
[ Music ]
[ Music ]
(Jeremy)>> With our carbon fiber cured, now we can start bonding it to the panels.
(Jimmy)>> So we've had some time to let these body panels cure. So we're gonna get the quarter panel out of the mold, get the door skin off the door, and once I pop this you'll see just how different it is. [ Music ] [ plastic popping ] [ Music ]
(Jimmy)>> So we got a pretty good release there. As you can see this surface is perfectly smooth, or it just takes on the surface of the mold. So all we have to do to this is trim it up, wash the PVA off, give it a quick sand, and then we'll clear coat it. For the door, let's get that off and take a look. [ Music ] [ plastic pop ] [ Music ]
(Jimmy)>> Alright, so there's our door skin. The door wasn't really damaged at all, but this surface now has got the texture of the weave of the carbon. So now what I'll have to do is actually use epoxy to level this entire surface, and then we'll go and use the epoxy and body work this panel to make sure it's straight. And that's really the downside is there's no prep work up front, but you have to spend a lot of time sanding this thing to get it straight. So the easiest way to do that is get this bonded to the door. Obviously you can see this is super flimsy. Once we bond it to the door it'll give us a nice rigid surface to sand against. So I have to cut this skin off, gut the door, and then we'll get this panel bonded on. [ grinder buzzing ]
(Jimmy)>> The doors are put together by having the door skin's edge rolled over onto the door frame. So, I'm just grinding until I can see two distinct layers of steel, and then I'll move on to the next section. I've got the door skin separated from the door frame and there's a couple of interesting things about this now that it's apart. The first one is there's a lot of rust in the lower portion of this door, and the more interesting thing is there's a lot of these little holes that have been filled with body filler. The reason why they are there is because this door must have gotten punched pretty hard. The old school dent pullers, you'd have to drill a hole in the panel, use a tech screw and slide hammer to pull them. So this door's been wrecked pretty good along with a lot of the other body panels we've been noticing on the car. Again, it just goes to show this car's a really good candidate for a race car because if you wanted to do some high-end build all of this stuff would have to be replaced anyway. So I'm gonna get the door gutted, and then we'll get to bonding. [ saw buzzing ]
(Jimmy)>> A lot of the weight inside the door comes from the side impact bar, and once I cut it out I'll go back and just grind the sharp edges smooth. [ saw buzzing ] [ grinder buzzing ]
(Jimmy)>> Then I'll flip the door over and cut the inner portion of the door frame as the window will no longer be there and none of the other components need to be installed. [ saw buzzing ] [ Music ]
[ grinder buzzing ]
(Jimmy)>> To bond the carbon skin to the door frame I'm using windshield glue, but you could use any type of panel bond to do this as well. [ Music ] So now we're on to one of the last steps, which is pouring more epoxy on top of this panel. It's gonna be the same epoxy that we used for the fabric. We're just gonna lay some on here, and there's no real trick to it. It's gonna run off the panel. We just need to build up some thickness so we can come back and sand everything smooth. [ Music ] I'm using a modified spreader with some teeth cut in it, which will somewhat spread the epoxy but not completely wipe it off the panel. [ Music ]
The epoxy on the door skin here needs to cure, and then the final steps will be to sand it and give it a final trim to fit the car. And then it will look like this driver's side door, which is finished. It's got that nice carbon fiber look, and it's all slicked out. These doors used to weigh somewhere around 115 pounds and now they're down to the 30 to 35 pound range, which is a huge weight reduction. We also have a bunch of other parts in progress like the passenger side front fender, rear quarter. I've also got the deck lid here, which isn't just a skin but it's also the underside structure. So this thing is nice and rigid, and I bet this thing doesn't even weigh five pounds. So when it's all said and done I think we'll have saved maybe 500 or 600 pounds. We've got a bunch of other parts to do, the hood included, which is a huge piece, and that's gonna be a huge performance benefit. And I think we'll see the results on track, but in the meantime I've got plenty of work to do. So, I'm gonna get at it.