Carcass Featured Projects

Carcass Builds

Parts Used In This Episode

Hoosier Tire
A7 TIres
Konig Wheels
F3S Satin Charcoal Wheels
PEM Racing
Quality Drive Shaft

Video Transcript

[ Jimmy ] You're watching Powernation!

[ Jimmy ] Today on Carcass Project UnSanctioned takes on its biggest transformation and we put on some final upgrades. [ Jeremy ] Then we take it out on the track and run through all the gears. [ Music ] [ engine revving ] [ Music ] [ Jimmy ] What's up everybody, welcome to Carcass. If you've been following along with us we have been building our E-46 into a multi-purpose track car. Something that can hit the hill climbs, the autocross, and even the road course. We've done a ton of work to get it to this point and if you haven't followed along with us we'll catch you guys up. We started off the same way we build all of our track cars, by removing all the interior making way for a roll cage. After some planning we bent up a main hoop and added all of our down bars to give the E-46 some added stiffness and help keep us safe. Up next was removing the stock inline six, sourcing a junkyard LS, deleting the active fuel management, and replacing a bunch of wearable parts. We set it in between the frame rails with the help of a kit from Summit Racing. Upgraded fuel injection was bolted on and we fired up the LC-9. The rear suspension was removed, support plates were added, and a set of coil overs were installed. To help us stop big brakes rounded off all of the chassis improvements. Lastly the fenders were cut, flares were riveted on, and a wing was added to help the BMW stick to the track. [ Jeremy ] That brings us to where we stand today. We've got some big things we want to tackle. We're gonna change the inside color of the car and cover up all of this bare metal. We're also gonna do something pretty drastic on the outside. You guys'll see that coming up here in a little bit, and then at the end of all of this we're actually gonna go out and drive this car on the track. Like I said, we've got a lot of work to do. Right now we are just prepping around the weld areas on the cage, and then we'll get inside here and scuff the rest of the car up, mask it all off, and paint the inside. In these welded areas it leaves it a little bit dirty when you weld. What we're trying to do is knock all of that off and give it a clean surface for the paint to stick to. [ Music ] [ vacuum humming ] [ Music ] [ Jeremy ] Using scotchbrite pads. What this does is put good etches into all of the surfaces. If it's the cage or if it's in the floor. That gives the paint something to bite and stick to. It makes our paint last longer. Especially when you're dealing with intrusion bars like this a lot of times you have to crawl over them. You constantly are rubbing against the top bar here. Make sure it's prepped well so the paint sticks really well and stays on there a long time. [ compressed air hissing ] [ Music ] [ vacuum humming ] [ Music ] [ Jeremy ] Next step here is we're gonna clean everything up with some cleaner/degreaser. Final step before we move on to masking and then we can lay down some paint. [ Music ]

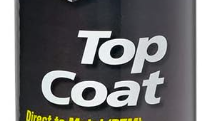
[ paper crackling ] [ Music ] [ paper crackling ] [ Music ] [ paper crackling ] [ Music ] [ Jeremy ] Well the car's all masked off. Now it's time to paint. What we're gonna be painting the inside with is POR-15. This is their topcoat. It's a direct to metal coating. So there's no need to prime anything. We're gonna throw our masks on and we do have an exhaust fan here in the shop. We'll flip that on and get as much paint in here as possible and make it look good and last a long time. [ Music ]

[ Music ]

[ Music ]

[ Music ]

[ Music ] We've given the paint ample time to dry and we did a really good coating on all the bare metal parts of the roll cage. So that should be protected for quite some time. On the inside we gave it a little bit of a dusting. We did that on purpose. We did that because it'll go with the theme of the car once we do the transformation of the color on the outside. From here we're just gonna unmask it and see how we did. [ Music ] Coming up, we change the color of the BMW and take a trip down memory lane to Miss Libby's art class.

[ Jeremy ] Hey everybody, welcome back. Well the interior of the BMW went through its color change. Now it's time to focus on doing the same thing to the outside of the car but we do have a couple of things we have to do. Go ahead and hang the doors back on the car. We'll get rid of that big wang in the back, and then we'll get this thing prepped and ready. [ Music ] [ ratchet clicking ] [ Music ] [ ratchet clicking ] [ Music ] [ ratchet clicking ] [ Music ]

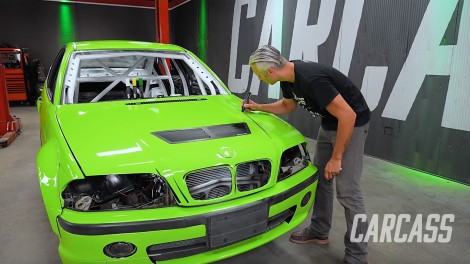
[ Music ] [ Jimmy ] We have all the body panels back on our BMW and we're ready to make a big transformation. We have Jimmy and Micah from Graphic Effects and they are ready to put the wrap on our BMW. [ Jeremy ] The original plan for the car was to paint it but to keep the costs down we did decide to go with a wrap. These guys will have this knocked out in a couple of hours. So there's a huge time savings there as well, and by chance if we happen to get into a corner out on the track and have some body repairs to do it's as simple as taking the wrap off, fixing what we need to fix, and then just putting another sheet right back over the top. These guys are ready to get started. So we're just gonna let them do their thing. [ Music ]

[ Jimmy ] Another great benefit to a wrap is because our car was in pretty poor condition to start with it would take a lot more work to get it to a point where it could be painted versus this wrap was done in just a few hours. [ Music ] [ Jeremy ] For the color that we choose for the BMW we wanted something that really stood out on the racetrack and it's really gonna highlight what we have planned for later. [ Music ]

[ Music ]

The guys over at Graphic Effects knocked this thing out of the park but now it's our turn. We're gonna take some artistic liberties here. Got a paint marker and let's see what we can get into. [ Music ]

[ Music ]

[ Music ] Doing a process like this it really comes down to your artistic discretion. What we're doing is using some paint markers to highlight all of the door jambs and the big areas around the wheels and tires to give this car a three dimensional look. It really gives the car an animated appearance while it's flying around the track. [ Music ]

With that final line I think we'll call this good. We might do a little bit more here and there but for now we've got a whole car to put together. [ Jimmy ] Stay tuned, we add a few more upgrades to round out our race car.

[ Jeremy ] Guys it's reassembly time. We've got the wrap all done and now we're gonna put the car together. First thing we're gonna do is install the driveshaft that we had made to fit our five speed transmission. Since we did an engine and transmission swap and everything is in a different location we need to have a custom driveshaft made. We've shown you guys how to do this before. We took our measurements and went over to the guys at PEM Racing and they whipped us up a driveshaft with the correct slip yoke to fit our TKX, and they even put on the flange in the back to match the adapter we're running on our stock differential. This is a very simple install. Slide it into the transmission and put a couple bolts back here. [ Music ]

[ Music ] [ ratchet clicking ] [ Music ]

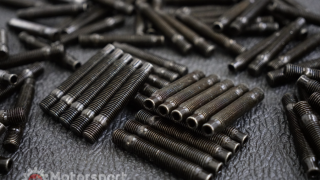
[ Jimmy ] Next thing on the list here is to install our wheels and tires. If you know about BMWs you know that they use these lug studs which I find to be a pain in the butt to use. So we went to our friends at Motorsport Hardware and they sent us their 86mm race stud kit. This is a 12mm Grade-12.9 fastener with a tensile strength of up to 180,000 p-s-i. So we know it's gonna hold up to the rigors of track use. They come with this black zinc coating, which is gonna help protect it from the elements. These can also accept up to a 25mm spacer so we can really dial in that wheel and tire fitment. The best part is they're keyed for a five millimeter allen. So it makes installation really simple. [ Music ]

[ Music ] Go with a little blue thread locker and make sure these stay put. [ Music ]

[ ratchet clicking ] [ Jimmy ] Per the instructions from Motorsport Hardware we're gonna torque these down to 25 pound feet. [ Music ] [ beep ] [ Music ] [ beep ] [ Music ] [ beep ] [ Music ] [ Jimmy ] For our wheels our friends at Konig sent us their F-3-S, which is a fully forged split five spoke wheel finished in satin charcoal. Ours is an 18 by 10.5 inch wide wheel and because they are fully forged it means they are extremely strong and they can make lightweight. This wheel in particular coming in at about 18 and a half pounds. We've wrapped these in Hoosier A-7s in a 295/30-18, and we're gonna hold it all on with Motorsports Hardware steel race nuts. [ Jeremy ] And to continue on with assembly we're gonna move inside here and get our racing seats installed. Jimmy's already got the brackets made. So all we have to do is get these in and bolt them down. [ Music ] [ ratchet clicking ] [ Music ]

[ Jimmy ] Get some new headlights in here. [ Music ]

[ ratchet clicking ] [ Music ] [ Jeremy ] Let's get the grille inserts in here and then we're almost done. [ Music ]

What do you think? [ Jimmy ] Almost ready to hit the track. [ Jeremy ] Couple more things to do. Get the steering in it, do the quick wiring job, and then we'll be out onto the racetrack ripping around. Up next, Project UnSanctioned hits the track.

[ engine starting ] [ engine rumbling ]

[ engine rumbling ]

[ engine rumbling ] [ Jimmy ] Welcome back everybody. Today we are at Polecat Training Center and today is the day that we are going to test out our BMW. Jeremy's in the hot seat and gonna lay some laps down to test out all the parts that we've thrown at this thing. How you feeling? [ Jeremy ] It's gonna be different than the Camaro but I think it'll do go. [ Jimmy ] It'll be cool to see you out here laying it down. See what kind of times you can put in. [ Jeremy ] And everybody should see it because it's bright green. [ Jimmy ] Sticky tires on it and it should be fast. [ Jeremy ] I'll get my stuff on and let's go see how it handles. [ engine revving ] [ Music ] [ engine revving ] [ Music ] [ Jeremy ] The car's extremely sticky for what it is. This is lap number one. It's a lot lighter than the Camaro. Power to weight ratio here is way different. Just got a baby LS compared to what the Camaro was. A lot more shifting in this car too to keep it in the r-p-m range. Definitely fun. These tires are insanely sticky. [ Music ] [ engine revving ] [ Jeremy ] Gotta get used to the track again. Sun's shining and it's a nice day that's for sure. Try not to string it out too much. All of our engine parts should be spot on. It's really fun to drive. Jimmy did a great job setting up the driver ergonomics. Everything inside here is great. Lap number one it did great. Doesn't run hot, 195 degrees. I don't think you can get much better than that. The simplicity and easiness of an LS definitely a fun track car. Lap two is gonna be faster though. There's two different routes to take coming up here on turn three, four, somewhere around there. You can go straight and hit the long straightaway or you get to the top of the hill and take the hard left hander, which is a little more fun I think. The car can definitely handle this. Kinda go in and out, in and out of these corners. Try to hit my apex right. Listen to the tires slightly self clearance here a little bit. Come out of this I've got a super hard 90-degree left hander. I think third gear's where I need to be. [ engine revving ] [ Jeremy ] And the brakes. Big brakes are a must on a track car and the EBC brakes we have are just dynamite. I've got no problems slowing this car down at all. You can really let the car do its thing and just hang on it. Let the brakes do all the work, especially when you're coming into the corners. Hey, we've got some turkeys in the corner! They're checking everything out like, what's going on! Ain't nothing better than a five speed manual transmission. You could just have so much fun with a manual. You feel like you're part of the car, and it's an extension of your body really. This thing sticks to the ground, holy cow! This is so much fun. [ Music ] See if I can hang this corner and stay in third. Oh yeah, no problem! [ engine revving ] [ Music ]

[ Jimmy ] What do you think? [ Jeremy ] Power to weight ratio, just the combination of brakes, wheels, tires, suspension, the junkyard engine that we ran through. This probably could compete with the Camaro just in pure fun factor. [ Jimmy ] The value versus how much fun you have this was a much cheaper car to build. Pretty fast still. [ Jeremy ] Very fast, and just a hoot out here. [ Jimmy ] We've had a great day out here at Polecat Training Center, and this is actually our last project. We want to thank you guys for the last five seasons of Carcass and tuning in. We'll see you guys around. [ Jeremy ] Hopefully you learned something. We'll catch you guys around the bend. [ engine starting ] [ engine revving ]
Show Full Transcript