Classic Trucks! Builds
Want more content like this?
Join the PowerNation Email NewsletterVideo Transcript
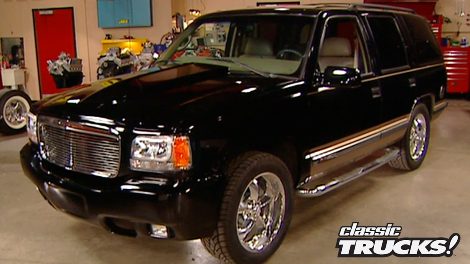
Welcome to trucks. Last week, we started a project called Facelift on this 97 GMC Yukon. Why?
Well, because new vehicles are really expensive. That's why a lot of people are interested in taking something that's a few years old, taking the money they save
and upgrading that vehicle into something that they really want, you know, give it a face lift. So the purpose of this project is not only to show you what's out there, but hopefully give you some ideas on what to do to it. Now, we've already upgraded to 20 inch wheels and tires and they look much better.
Then we put on some performance brakes to help us stop.
Then we went under the hood, put on a performance air intake, put on a cat back exhaust system
and then we upgraded the computer. So we got some more power coming out of that engine.
Then we went inside here and upgraded the dash and gauges.
Now it's time to get serious. We're gonna take all this old stock Yukon
sheet metal
and swap it for this.
Yeah, that's right. Your eyes do not deceive you. This is the front sheet metal of a 2000 Cadillac Escalade. Now, I know what you're thinking. 00, wait a minute.
How are you gonna put the front end of a 2000 Cadillac on a 97 GMC. Yukon.
Well, believe me, it's not that tough because underneath this sheet metal,
the Yukon is almost exactly the same vehicle as the Cadillac and swapping a hood and front end and tail lights from one vehicle to the next.
That's the oldest customizing trick in the book. But in the old days you had to get all this stuff at a junkyard. Not anymore. This is a kit, let's check it out. Now, this whole conversion kit comes from style and concepts
and it includes two new stick
front fenders,
the whole grill assembly,
got the bumper and the bumper cover
and you can get a stock style flat hood or
you can step up to the steel cow induction hood. Now, this is gonna look really cool. Now, everybody knows that the stock Cadillac grill is very nice, but I
mean, we don't wanna leave anything stock. So we're gonna punch that up a little bit with this billet grill insert and that is gonna look really sweet with that cow induction hood.
Now, of course, you get all the bracketry and all the lights to hook this stuff up and make it look right
now just in case you're wondering
this stuff does not come from styling concepts all beautifully painted like this
you're on your own for that.
So, we went down to our local auto body America and had them paint this. Now, if you're looking for some quality work at a reasonable price, they're definitely worth checking out. Well, these are the parts
now, we need to make some room for them.
The first thing to go was that old grill guard because it's obviously not the look we're after,
but it will make a nice piece to take to the swap meet.
All right, next we're gonna get rid of this hood, so we got some room to work here. Now, keep in mind
you're gonna have to reuse your hinges and your latch and that spring. So for now, we're just gonna take this hood off and set the whole thing aside.
The next step is to remove the grill and headlights just like the hood. You're gonna be reusing most of your stock mounting hardware. So make sure you keep it organized.
We'll follow that by unbolting the front bumper and adding it to the swap meat pile.
Ok. Now that we're on a roll, it's time to do something about these front fenders and I know you're thinking, uh, just unbolt them and get rid of them. Right.
It's not quite that easy.
Now, there's a bunch of stuff mounted to these fenders that needs to come off before you can lift the fender out like this. ECM. Here, there's a bunch of things on the passenger side.
Look at this,
you have this wiring harness connected to the fender that all needs to be popped off before you can lift this fender out.
Also, don't forget there are some mounting bolts inside the door jam there.
Now, before you toss these old fenders in the swap meat pile, there's a few things you need to take off first, all of these captive nuts, all these plastic retainers that need to come off and go on the new fenders.
Now we're ready to start putting that thing back together using these new Cadillac parts.
Now, the fenders, well, they're just gonna slide right into place where the old fenders were,
however,
be prepared to do a little tweaking a little fitting here. Make sure your seams are lining up. Don't expect a replacement panel just to drop into place and
magically line up. It just doesn't happen that way.
Now you're gonna have to tweak and fit each one just a little bit.
Make sure everything is perfect and it's your attention to detail here.
That's gonna decide just how nice this is gonna look, boy, this isn't bad.
All right, with the new fenders on, all lined up looking good. It
is time for this grill, but like I said before,
we're not putting it on looking like this,
you're gonna find out what this saws all is for right after the break.
Welcome back to trucks.
Now, what we're doing today is putting a 2000 Cadillac Escalade front end
on a 97 GMC Yukon. And I'm using a kit that I got from style and concepts.
And this is gonna make the truck look a lot smoother, a lot cleaner, a lot cooler than
just an average old Yukon. But the cool thing about this is
you can do this to just about any late model GM truck. It's something that the average guy can do in his garage.
And the best part is
this is a heck of a lot cheaper than going out and buying the Cadillac Escalade.
Now, we've got the fenders on and they're fitting good looking nice. Got the headlights on. Now it's time for the grill, but first
we get to do some cutting
so out comes the saws all so we can cut out the stock Cadillac center section,
then mount the billet grill insert into the grill shell.
Ok. With that taken care of, you are probably wondering just what this looks like. Let's take a look. Oh, yeah, that is nice. Now, we're gonna set this whole grill assembly aside for now because I need to install the bumper first.
Installing the new bumper is very simple. All you have to do is bolt the new brackets on in place of the stalkers.
Then the new bumper assembly bolts to the brackets
using the factory hardware.
Finally with a bumper in place, we can mount the grill assembly
and slide in the marker lights.
Now, just like the rest of this project, be prepared to spend a little time tweaking and fitting this
to where everything lines up and looks good.
Now, once you've checked your lights to make sure everything's working properly,
there we go,
turn signals. The last thing to do on this conversion is put on a cow induction hood.
It uses all the factory hinges and latch. So you just bolt it on and adjust your gaps and heck, you're done.
Well, there it is, man, what a difference that front end makes. This looks like a totally different vehicle than what we rolled in here. And that is exactly the point. Now, I've got just a couple more things to put on this project to really finish it off. Come on
the first are these custom fits that of Lloyd mats and we got them from styling concepts. Now, these are gonna allow us to get rid of these really nasty
stock mats
and also this black is gonna be a really nice offset for all this beige carpet that's in that truck.
Now, you can get your mats in whatever color you want
with whatever logo that you want.
And of course, this application has two front mats,
a one piece mat for the rear passenger area
and then a big mat for the cargo area. And of course, putting these in is just a matter of putting them in
the last piece we got from styling concepts is this polished aluminum gas door. Now, it bolts right in place of your stock door
and makes a nice subtle difference in the look of your truck.
And finally to squeeze just a little bit more power out of that engine,
we're gonna swap in some royal purple synthetic oil.
Well, there you have it.
Project facelift. Yeah, quite a bit different than what we originally rolled in here.
Now, the only thing I have left to do is to pull off this trim. Take it back down to auto body America haven't pink, this all black. So it all matches. It's nice. Evil. Heck, Katherine won't even recognize her truck. Then when she gets into it and drives it, she's gonna find, it performs better
and it stops better. So if you've got an old truck and you're kind of tired of the way it looks ready to upgrade it a little bit.
You may wanna think about giving it a facelift.
You know, one thing that gets every gearhead going is diecast replicas, whether it's the little ones or the big ones doesn't matter. We love this stuff. And the first name that you think of when somebody says Diecast is
Hot Wheels. Matter of fact, I bet every person watching this show right now, male or female grew up playing with hot Wheels and dreaming what it would be like to drive a cool car or truck like this.
Well, believe it or not, the guys at hot wheels thought the same thing.
So
they took a truck
designed by Nathan Pro,
the Diora two
and decided to build a full size working replica for the 35th anniversary of hot wheels. So
we headed off to SA
to see if we could hunt this thing down.
But
can
we
get?
Now? Of course, SA
is loaded with all kinds of cool cars and trucks and parts.
But as hard as it was, we couldn't let ourselves get distracted. No,
we were on a mission.
Finally, we spotted it tucked away in the hot wheels booth and surrounded by a whole bunch of hot wheels enthusiasts.
Fortunately, we got the Hot Wheels girls to create a diversion
so we could meet up with Hot wheels, Guru Carson Lev,
and he could give us the scoop on this unique truck for the 35th anniversary, which is this year, we took the di
two,
we actually scaled it up from this model, made a real car.
Now, just in case you're wondering how to get in this thing,
a
push of a button and the whole
in
lifts up like a giant clamshell. And then of course, you just crawl in
inside, you'll find full instrumentation and even a DVD player that all opens with the door
and a lot of other interesting stuff.
Now, what's the, what's the red button here? Is that
it's
a really, really secret, I'd like to tell you, but
there's two buttons and we'll talk about that later. It's very,
very, very, just not
tell secrets.
But wait, wait. What about the body?
Well, it's basically a, one of a kind hand built fiberglass cab forward style truck sitting on custom 24 inch wheels with twin surfboards mounted on the tunnel cover,
sitting under a custom wing in the very rear is a very healthy, supercharged Cadillac North Star engine.
I think we have a star. You know, it is a, it's a huge find when you do this. It seems like.
Sounds nice. Huh?
I never heard of Cadillac North Star. Sound that good man.
About this time, my good buddy and fellow hot wheels nut, Funkmaster Flex showed up.
So we walked him through the dia
too.
I love the color.
Then we talked Carson out of some hot wheel shirts
and for a short period of time, we were official Hot Wheels guys, son. I'm putting mine on right now.
Get us,
get us right.
J
That's
a long time.
It's a good look
for
us.
Have you ever wondered how companies that make aftermarket parts? Actually show off those parts.
Advertising is one way
but one of the best ways is to build a truck utilizing those parts
and then run it off to some big shows like the
SEMA show
that way people can actually see how those parts look and fit and function. Now, a great example of that is this 2003 Ford F 150 Super crew
that was put together by DZ to showcase their parts. Let's take a look at it
up front. You have the stainless steel Euro grill guard to protect your front end and add some tubular styling
to protect the front of the hood and keep the bugs out of your face. You have what they call the contoured hood shield
down the side. The tubular look continues with these four inch oval side steps
and in the bed is one of the most popular products DZ makes
the aluminum diamond plate toolbox, which is available to fit just about whatever rig you're driving
inside. You find the new DZ dash forms which is a cover that goes over your existing dash to add a little punch to the interior,
you can get it in carbon fiber, brushed aluminum or wood grain like this one.
And on the floor, are there new all weather tread mats to keep your carpets clean?
Of course, this truck features other products too, like a lift and wheels and tires and a custom hood.
And those come from places like Fab
Tech and Goodyear and Weld racing and Good Mark. And that's cool because the whole idea here is to show you how good your truck can look. And if you like what you see
now you've got a reason to pick up ad Z catalog.
All right, we've been talking about street and show trucks a lot today. So it's only fair that I roll in some cool stuff for you off road guys. Now, this is a kit from R CD suspensions
and this will lift your Ford Ranger five inches up in the air.
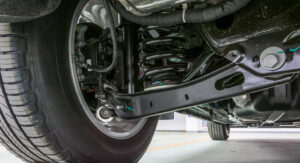
Now, the kit includes new steering knuckles,
bracketry, hardware shocks and a couple of heavy duty front cross members.
Pretty much the stuff that you would expect to see in a quality suspension lift. But what makes this one different
is that it does away with your factory torsion bar front suspension, which was always hanging down in the way bad ground clearance
and in its place fits state of the art bill, steam coil over shocks, which will give you a better suspension on road and a far better suspension off road. So if you're ready to get serious about your Ford Ranger,
give our CD suspension a call and get going
for those of you driving a diesel truck, they wanna get more performance and power out of it,
but don't want to spend a lot of time and money doing it.
I got a couple of products here from Bully Dog that you need to take a look at.
The first one is called the torque dog
and it's a performance module that you just plug in gives you up to 80 extra horsepower and up to 100 and 75 extra foot pounds of torque. Very simple installation.
Now, they've also got the rapid flow air intake system,
which basically replaces your very restrictive stock air intake with a high flow filter system once again giving you more power in just a few minutes. So if you want the best bang for your diesel buck
bully dog can help you with that. We'll see you next week.
Show Full Transcript
Well, because new vehicles are really expensive. That's why a lot of people are interested in taking something that's a few years old, taking the money they save
and upgrading that vehicle into something that they really want, you know, give it a face lift. So the purpose of this project is not only to show you what's out there, but hopefully give you some ideas on what to do to it. Now, we've already upgraded to 20 inch wheels and tires and they look much better.
Then we put on some performance brakes to help us stop.
Then we went under the hood, put on a performance air intake, put on a cat back exhaust system
and then we upgraded the computer. So we got some more power coming out of that engine.
Then we went inside here and upgraded the dash and gauges.
Now it's time to get serious. We're gonna take all this old stock Yukon
sheet metal
and swap it for this.
Yeah, that's right. Your eyes do not deceive you. This is the front sheet metal of a 2000 Cadillac Escalade. Now, I know what you're thinking. 00, wait a minute.
How are you gonna put the front end of a 2000 Cadillac on a 97 GMC. Yukon.
Well, believe me, it's not that tough because underneath this sheet metal,
the Yukon is almost exactly the same vehicle as the Cadillac and swapping a hood and front end and tail lights from one vehicle to the next.
That's the oldest customizing trick in the book. But in the old days you had to get all this stuff at a junkyard. Not anymore. This is a kit, let's check it out. Now, this whole conversion kit comes from style and concepts
and it includes two new stick
front fenders,
the whole grill assembly,
got the bumper and the bumper cover
and you can get a stock style flat hood or
you can step up to the steel cow induction hood. Now, this is gonna look really cool. Now, everybody knows that the stock Cadillac grill is very nice, but I
mean, we don't wanna leave anything stock. So we're gonna punch that up a little bit with this billet grill insert and that is gonna look really sweet with that cow induction hood.
Now, of course, you get all the bracketry and all the lights to hook this stuff up and make it look right
now just in case you're wondering
this stuff does not come from styling concepts all beautifully painted like this
you're on your own for that.
So, we went down to our local auto body America and had them paint this. Now, if you're looking for some quality work at a reasonable price, they're definitely worth checking out. Well, these are the parts
now, we need to make some room for them.
The first thing to go was that old grill guard because it's obviously not the look we're after,
but it will make a nice piece to take to the swap meet.
All right, next we're gonna get rid of this hood, so we got some room to work here. Now, keep in mind
you're gonna have to reuse your hinges and your latch and that spring. So for now, we're just gonna take this hood off and set the whole thing aside.
The next step is to remove the grill and headlights just like the hood. You're gonna be reusing most of your stock mounting hardware. So make sure you keep it organized.
We'll follow that by unbolting the front bumper and adding it to the swap meat pile.
Ok. Now that we're on a roll, it's time to do something about these front fenders and I know you're thinking, uh, just unbolt them and get rid of them. Right.
It's not quite that easy.
Now, there's a bunch of stuff mounted to these fenders that needs to come off before you can lift the fender out like this. ECM. Here, there's a bunch of things on the passenger side.
Look at this,
you have this wiring harness connected to the fender that all needs to be popped off before you can lift this fender out.
Also, don't forget there are some mounting bolts inside the door jam there.
Now, before you toss these old fenders in the swap meat pile, there's a few things you need to take off first, all of these captive nuts, all these plastic retainers that need to come off and go on the new fenders.
Now we're ready to start putting that thing back together using these new Cadillac parts.
Now, the fenders, well, they're just gonna slide right into place where the old fenders were,
however,
be prepared to do a little tweaking a little fitting here. Make sure your seams are lining up. Don't expect a replacement panel just to drop into place and
magically line up. It just doesn't happen that way.
Now you're gonna have to tweak and fit each one just a little bit.
Make sure everything is perfect and it's your attention to detail here.
That's gonna decide just how nice this is gonna look, boy, this isn't bad.
All right, with the new fenders on, all lined up looking good. It
is time for this grill, but like I said before,
we're not putting it on looking like this,
you're gonna find out what this saws all is for right after the break.
Welcome back to trucks.
Now, what we're doing today is putting a 2000 Cadillac Escalade front end
on a 97 GMC Yukon. And I'm using a kit that I got from style and concepts.
And this is gonna make the truck look a lot smoother, a lot cleaner, a lot cooler than
just an average old Yukon. But the cool thing about this is
you can do this to just about any late model GM truck. It's something that the average guy can do in his garage.
And the best part is
this is a heck of a lot cheaper than going out and buying the Cadillac Escalade.
Now, we've got the fenders on and they're fitting good looking nice. Got the headlights on. Now it's time for the grill, but first
we get to do some cutting
so out comes the saws all so we can cut out the stock Cadillac center section,
then mount the billet grill insert into the grill shell.
Ok. With that taken care of, you are probably wondering just what this looks like. Let's take a look. Oh, yeah, that is nice. Now, we're gonna set this whole grill assembly aside for now because I need to install the bumper first.
Installing the new bumper is very simple. All you have to do is bolt the new brackets on in place of the stalkers.
Then the new bumper assembly bolts to the brackets
using the factory hardware.
Finally with a bumper in place, we can mount the grill assembly
and slide in the marker lights.
Now, just like the rest of this project, be prepared to spend a little time tweaking and fitting this
to where everything lines up and looks good.
Now, once you've checked your lights to make sure everything's working properly,
there we go,
turn signals. The last thing to do on this conversion is put on a cow induction hood.
It uses all the factory hinges and latch. So you just bolt it on and adjust your gaps and heck, you're done.
Well, there it is, man, what a difference that front end makes. This looks like a totally different vehicle than what we rolled in here. And that is exactly the point. Now, I've got just a couple more things to put on this project to really finish it off. Come on
the first are these custom fits that of Lloyd mats and we got them from styling concepts. Now, these are gonna allow us to get rid of these really nasty
stock mats
and also this black is gonna be a really nice offset for all this beige carpet that's in that truck.
Now, you can get your mats in whatever color you want
with whatever logo that you want.
And of course, this application has two front mats,
a one piece mat for the rear passenger area
and then a big mat for the cargo area. And of course, putting these in is just a matter of putting them in
the last piece we got from styling concepts is this polished aluminum gas door. Now, it bolts right in place of your stock door
and makes a nice subtle difference in the look of your truck.
And finally to squeeze just a little bit more power out of that engine,
we're gonna swap in some royal purple synthetic oil.
Well, there you have it.
Project facelift. Yeah, quite a bit different than what we originally rolled in here.
Now, the only thing I have left to do is to pull off this trim. Take it back down to auto body America haven't pink, this all black. So it all matches. It's nice. Evil. Heck, Katherine won't even recognize her truck. Then when she gets into it and drives it, she's gonna find, it performs better
and it stops better. So if you've got an old truck and you're kind of tired of the way it looks ready to upgrade it a little bit.
You may wanna think about giving it a facelift.
You know, one thing that gets every gearhead going is diecast replicas, whether it's the little ones or the big ones doesn't matter. We love this stuff. And the first name that you think of when somebody says Diecast is
Hot Wheels. Matter of fact, I bet every person watching this show right now, male or female grew up playing with hot Wheels and dreaming what it would be like to drive a cool car or truck like this.
Well, believe it or not, the guys at hot wheels thought the same thing.
So
they took a truck
designed by Nathan Pro,
the Diora two
and decided to build a full size working replica for the 35th anniversary of hot wheels. So
we headed off to SA
to see if we could hunt this thing down.
But
can
we
get?
Now? Of course, SA
is loaded with all kinds of cool cars and trucks and parts.
But as hard as it was, we couldn't let ourselves get distracted. No,
we were on a mission.
Finally, we spotted it tucked away in the hot wheels booth and surrounded by a whole bunch of hot wheels enthusiasts.
Fortunately, we got the Hot Wheels girls to create a diversion
so we could meet up with Hot wheels, Guru Carson Lev,
and he could give us the scoop on this unique truck for the 35th anniversary, which is this year, we took the di
two,
we actually scaled it up from this model, made a real car.
Now, just in case you're wondering how to get in this thing,
a
push of a button and the whole
in
lifts up like a giant clamshell. And then of course, you just crawl in
inside, you'll find full instrumentation and even a DVD player that all opens with the door
and a lot of other interesting stuff.
Now, what's the, what's the red button here? Is that
it's
a really, really secret, I'd like to tell you, but
there's two buttons and we'll talk about that later. It's very,
very, very, just not
tell secrets.
But wait, wait. What about the body?
Well, it's basically a, one of a kind hand built fiberglass cab forward style truck sitting on custom 24 inch wheels with twin surfboards mounted on the tunnel cover,
sitting under a custom wing in the very rear is a very healthy, supercharged Cadillac North Star engine.
I think we have a star. You know, it is a, it's a huge find when you do this. It seems like.
Sounds nice. Huh?
I never heard of Cadillac North Star. Sound that good man.
About this time, my good buddy and fellow hot wheels nut, Funkmaster Flex showed up.
So we walked him through the dia
too.
I love the color.
Then we talked Carson out of some hot wheel shirts
and for a short period of time, we were official Hot Wheels guys, son. I'm putting mine on right now.
Get us,
get us right.
J
That's
a long time.
It's a good look
for
us.
Have you ever wondered how companies that make aftermarket parts? Actually show off those parts.
Advertising is one way
but one of the best ways is to build a truck utilizing those parts
and then run it off to some big shows like the
SEMA show
that way people can actually see how those parts look and fit and function. Now, a great example of that is this 2003 Ford F 150 Super crew
that was put together by DZ to showcase their parts. Let's take a look at it
up front. You have the stainless steel Euro grill guard to protect your front end and add some tubular styling
to protect the front of the hood and keep the bugs out of your face. You have what they call the contoured hood shield
down the side. The tubular look continues with these four inch oval side steps
and in the bed is one of the most popular products DZ makes
the aluminum diamond plate toolbox, which is available to fit just about whatever rig you're driving
inside. You find the new DZ dash forms which is a cover that goes over your existing dash to add a little punch to the interior,
you can get it in carbon fiber, brushed aluminum or wood grain like this one.
And on the floor, are there new all weather tread mats to keep your carpets clean?
Of course, this truck features other products too, like a lift and wheels and tires and a custom hood.
And those come from places like Fab
Tech and Goodyear and Weld racing and Good Mark. And that's cool because the whole idea here is to show you how good your truck can look. And if you like what you see
now you've got a reason to pick up ad Z catalog.
All right, we've been talking about street and show trucks a lot today. So it's only fair that I roll in some cool stuff for you off road guys. Now, this is a kit from R CD suspensions
and this will lift your Ford Ranger five inches up in the air.
Now, the kit includes new steering knuckles,
bracketry, hardware shocks and a couple of heavy duty front cross members.
Pretty much the stuff that you would expect to see in a quality suspension lift. But what makes this one different
is that it does away with your factory torsion bar front suspension, which was always hanging down in the way bad ground clearance
and in its place fits state of the art bill, steam coil over shocks, which will give you a better suspension on road and a far better suspension off road. So if you're ready to get serious about your Ford Ranger,
give our CD suspension a call and get going
for those of you driving a diesel truck, they wanna get more performance and power out of it,
but don't want to spend a lot of time and money doing it.
I got a couple of products here from Bully Dog that you need to take a look at.
The first one is called the torque dog
and it's a performance module that you just plug in gives you up to 80 extra horsepower and up to 100 and 75 extra foot pounds of torque. Very simple installation.
Now, they've also got the rapid flow air intake system,
which basically replaces your very restrictive stock air intake with a high flow filter system once again giving you more power in just a few minutes. So if you want the best bang for your diesel buck
bully dog can help you with that. We'll see you next week.