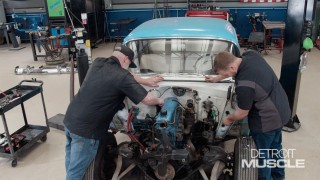
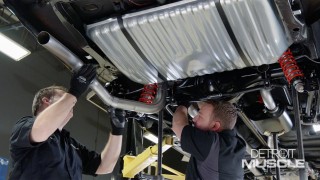
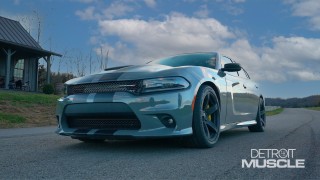
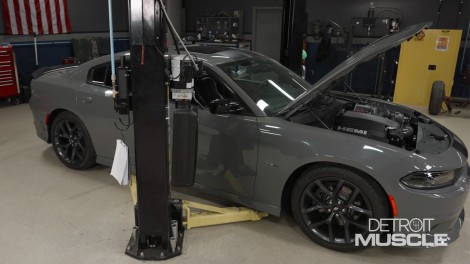
Detroit Muscle Featured Projects

Detroit Muscle Builds

Parts Used In This Episode

Summit Racing
Magnaflow XMOD Series Performance Exhaust System
Summit Racing
RideTech HQ Coilove Shocks

Video Transcript

[ Tommy ] You're watching Powernation!

[ Tommy ] Today on Detroit Muscle we're going to make our 2019 Dodge Charger sing a whole other tune. You're gonna like what it sounds like. [ Music ] [ engines revving ] [ Music ] [ Tommy ] Welcome to Detroit Muscle. Today we're working on just that, a late model supercharged Hemi. I know it sounds pretty sweet. Now we just finished up installing our ProCharger and this little air compressor is definitely gonna motivate it. Now we're wanting to free up a little bit more horsepower all the while setting the tone. When we took this Charger out for its maiden voyage one thing that we did notice was it had what a lot people call that exhaust drone. I'll tell ya that is something that is not enjoyable. It kinda sounds like someone's beating on the car, pounding on your ear drums. The culprit to all that noise nonsense is right up here. If you'll notice there aren't any mufflers and there should be. Now what sets in place of those is just some standard ole aluminumized pipe that someone has welded into place. The dead giveaway is how there's a dramatic difference between the diameter of these two tubings. What we're gonna be doing is swapping out all of this exhaust system. There's nothing really wrong with it. It doesn't have any leaks, but our issue is the noise and the drone this car has. Especially now since this Hemi's being force fed by that supercharger all that stuff is gonna be magnified once it comes out the tailpipe. What's cool about this next setup that we're gonna be installing is it's all tuneable to your liking. [ Music ] [ drill humming ] [ Tommy ] Got it! The goal here is to separate this forward pipe from this mid-pipe. The way I'm planning to do that is using one of these. How well this is gonna go, I'm gonna stay after it until I succeed! These Hemis have a distinctive sound all of their own. To that trained ear we can tell them ever they just pull up into the parking lot. With our car it had what I'm gonna call some primitive alterations that kinda set it apart but not in a good way. Our cure for the ailments of this thing is to be using an XMod kit that we picked up from Magnaflow. One thing I really enjoy about products from those guys is they've done their research and homework to make installation relatively a breeze. Later on we're gonna get into the goodies of that XMod kit but first things first, let's get this X-pipe installed. Now this kit is designed to fit the 5-7, 6-2, and 6-4 Hemis but the only difference is the 5-7 requires these smaller neck down tubes instead of the larger ones. 5-7 has a two and a half where the 6-2/6-4 has a two and three quarter. All we have to do is slap these up here but you've gotta remember your clamps. Rookie! You don't want to cinch your clamps down all at once. You need that adjustability to it. I'm gonna go ahead and install these little cross braces basically to hold the things where they need to be. This helps align things as you start assembling this exhaust kit. No reason to cinch them all the way down. Just mock them up. Right in this box is where all the magic happens with that XMod system. If you'll notice it looks like you've got a couple of options. If you're looking for the iconic deep tone that Magnaflow offers this would be the choice that you'd want to make. If you're going a bit more wild and crazy, looking for a bit more aggressive straight tube, that'll do the trick. Also pay attention to the fancy little box here. The way it's engineered it allows you to have a place to put everything. So if you want to adjust your exhaust tone you've got a place to keep up with everything, which is pretty handy. All we've got to do is start putting some of these tubes into place and we can hear this thing fire up. [ Music ]

Our Charger came from the factory with adaptive exhaust. What that refers to is there is a little valve in the exhaust system that whenever you stomp on the gas it lets more music come out the tailpipe, and this kit is designed to accommodate that. It has this cool little bracket and assembly that allows you to do what it did from the factory, but if you want it to be a little bit more loud meaning it's loud all the time they have something to accommodate that. You get to tune it however you want to. Now with our situation we're gonna go ahead and install this valve. [ Music ] [ ratchet clicking ] [ Music ]

[ metal clanging ] [ Music ] [ drill humming ] [ Tommy ] Now it's time to see why we do all this hard work. To show off just a little. [ Music ] [ engine revving ] [ Tommy ] Next we're gonna be setting the standard, but it's a little lower.

[ Tommy ] So far with our late model Charger R/T project we've bolted on a supercharger to accommodate that Hemi and set the tone coming out the tailpipes with that custom stainless steel exhaust. The next thing that we want to get into is setting the attitude a bit closer to the ground all the while increasing the fun factor sitting behind the wheel. Now I'm not sayin' a stock Charger out the box looks bad or anything. I'm saying there's usually room for improvement. If you'll look at the distance from the top of the tire to the quarter panel here on the rear versus the front you can see that it's quite a bit higher back there. What I'm wanting to do is lower it all the way around about an inch or so, maybe a little more in the back, to give it that racy look. Now that I've pleaded my case it's time to get these hands dirty. [ Music ] Before I get too carried away I want to use a tape measure and actually see what the car is sitting at right now. That way later once I change the suspension I'll know precisely how much I lowered it. [ Music ] [ drill humming ] [ Music ]

[ Tommy ] The way we plan to dramatically improve the steering and handling of this Charger is using these RideTech HQ coilovers that we found at Summit Racing. It has Fox Factory internal valving, Hyperco shocks, and cool anodized coating from one end to the other. Plus they have 24 positions that you can adjust the rebound. You guys saw how simple it was to get this thing out. This upgrade makes a dramatic improvement and it really isn't all that complicated. [ Music ] [ drill humming ] [ Music ] [ drill humming ] [ Tommy ] If that front suspension impressed you because of how smoothly it went this back is gonna be even easier. One thing that's really nice about this setup is you don't have to sacrifice your ride quality for this improved handling. Oftentimes that seems to be the case. [ drill humming ] [ Music ]

[ Tommy ] Woo! [ Music ]

Getting this old spring out is really the trickiest part. Now we've got to install our little bushings that go in each end, or each side better yet, of your lower mount. That isn't all that big of a deal but you've got to make sure whenever you slide this into that lower control arm you don't drop them out of there. [ Music ]

[ drill humming ] [ Music ] [ Tommy ] That's a little bit lower than what I was looking for up here on the front side. Back here on the back it's pretty close. I need to do a quick measurement just to see what the difference is because the beauty with this type of suspension is it's adjustable. All we have to do is spin those little rings at the bottom of the coils. Yeah, we're on our way. [ Music ] I'm gonna grab the spring and keep my thumb on this lower ring and twist it all to keep up with each revolution. As I turn that around as we make a complete turn that's equal to about an eighth of an inch. At some point there will be too much stress on this little nut and you'll end up having to use a tool. That's a good forearm workout. This is what I was referring to. This little end here hooks into let's call it the ear of the nut, and if you need to you can put a three-eighths drive ratchet on this end and work it. No more tension than we've got we can probably do it by hand. We're at nine. We just need to make one more full revolution. For those of you who are freaking out because I'm using an impact to cinch these down I'm just barely cinching them down. I'm not really driving them home. I'll come back and torque them once we got all the suspension dialed into what I need. The conclusion, we've lowered the car three quarters of an inch here on the front and an inch out back. I know that's not a dramatic amount. However, those subtle little changes can really elevate a car. Now we've still got some fancy wheels and tires ordered that we're planning to install on them but they're not here yet. Once we get them and put them on if we need to make some adjustments we can. I have to say right now I like what I see. [ Peyton ] Remember when Buick entered the muscle car movement, no? Well you might want to stay tuned.

[ Tommy ] What would you guess is the fastest four seater of the muscle car era? GTO, Boss Mustang? It's got to be a Hemi car right? Nope, would you believe the one that beat them all was a Buick! The car was the '70 GS Stage-1. [ Peyton ] At least that's what Muscle Car Review claimed back in 1984, and it raised the eyebrows and blood pressure of many folks, especially Chrysler fans. The rankings were based on a compilation of elapsed times recorded by major car mags back in the day. [ Tommy ] Motortrend clocked a 13.38 e-t at 105 miles per hour on the quarter mile, edging out a '68 Hemi Charger's 13.5. Zero to 60 took just five and a half seconds. They called it an engineering tour-de-force without a taste of Geritol. [ Peyton ] The Stage-1 option was a bargain at just $200 bucks. It transformed the already potent 455 into a deadly weapon. Buick added a high lift camshaft with longer duration, and heads had a higher 10.5 to one compression and were machined with larger ports. Plus the intake and exhaust valves were oversized as well as the tail pipes. [ Tommy ] Initial timing on the quick curve distributor was set at 10 degrees instead of six, and a heavy duty radiator was thrown in to handle the extra heat from the motor. [ Peyton ] Twin hood scoops fed cool air through Styrofoam sealed ports directly into the air cleaner. This was a stock GS but Stage-1s got a Rochester Quadrajet with bigger jets. [ Tommy ] Buick claimed the Stage-1 only added 10 horsepower but that was just to beat the insurance rap. Total output was boosted from 350 to well over 400. [ Peyton ] Now horsepower is one thing but torque is what gets you off the line faster, and this beast was a torque monster. Try 510 foot pounds and it made it all at just 2,800 r-p-m. [ Tommy ] The Stage-1 option also got you a positive traction rear end with 3.64 gears. Everything else was ordered a la carte like a Hurst four speed and Rallye gauges. Even heavy duty suspension wasn't included. [ Peyton ] Buick kept the car low key. No stripes or graphics. The only outside markings were the Stage-1 badges on the fenders. Other than that it looked just like a stock GS. [ Tommy ] That made the Stage-1 kind of a sleeper and was easily overlooked. [ John ] Back then and even today people don't think of Buick and performance in the same breath. [ Tommy ] Buick only managed to move about 3,000 of them. Way less than other cars in the same price range. [ John ] When you think about low production numbers, the maximum performance that you get right at the top of the heap, luxury. You don't get any better. You've got everything sewed up in one package. [ Peyton ] Ever since the car was ranked fastest four seater folks have been fighting over whether that was really true. Now there's been countless Stage-1 versus Hemi shootouts over the years with no clear cut winner. In our book the title is still up for grabs. [ Tommy ] Want to know how a master got started in his craft? We've got a pretty cool story coming up next.

[ Tommy ] There's a common component when it comes to cool cars that pretty much everyone of them has. We've got a friend of ours that has developed special procedures and techniques that has definitely influenced the custom car industry, and here's his story. [ Steve ] Pulling into the parking lot every morning I'm still really excited to get here and looking forward to the day. Getting to the shop, meeting with the production manager. We walk through and look at various parts, talk about how we're gonna process some pieces. Always start in the strip room. That's where everything gets started here. Look at everything from a quality standpoint, and look at it like, would I put this on my car? If yes then it's gonna be good to go. Try to use everything as a learning tool in here. Share the knowledge that I've gained over the last 40 years. I cannot always tell you what to do but I can tell you what not to do because I already made those mistakes. I spend about two hours of every day actually out there on the floor. From there I'm up front and talking to the sales team, and looking at components, and talking about pricing and inventory. Eventually I make it to the office and talk to the real boss here, which is my wife Sherry, who has been the best partner I ever had. Early in my teen years when parents could sign off you could go to work at 14. I went to work for a plating company. I got a little taste of plating and I was really interested in the chemistry. I'm not a trained chemist, and I told you earlier I'm not really good at spelling but I'm really good at math. A lot of chemistry has to do with mathematics, calculating formulas and titrations. When I started there was no plating on aluminum. So I was experimenting around with plating on aluminum, and that was a chemistry mistake that led to the success of plating on aluminum. Then as time went by I had an opportunity to develop proprietary nickel brightener for the plating industry. You know we plate so many different configured parts and most of the chemistry was only developed to plate either bumpers or small parts. I needed an all purpose brightener system that allowed me to plate all different configurations and components. I had some help along the way from a company called TazChem, and Becky-Z I called her. In 1988 was able to develop some proprietary chemistry, and then again in 1998 to improve on that. I had been doing black chrome for years but I was never totally happy with it cause it was such a matte finish. When we moved up here in the year that we were closed it gave me some time to develop black chrome chemistry that had a reflective value to it and was durable. That's what I was looking for. Again through trial and error of chemistry was able to come up with some formulations that allowed me to create the black bass that Tommy and the whole Detroit Muscle scene is interested in. Through the years nickel plating had become real popular. It has a little bit different glow, softer feel to it. Not everybody wanted the silver bling of hexavalent chrome. So I had been trying to figure out a way to put some type of topcoat on nickel plating and gold plating to give it durability where the nickel wouldn't tarnish and oxidize and it wasn't so maintenance heavy, and where the gold wouldn't literally polish off over a period of time. I had been experimenting around with different deposits. So I came to titanium because titanium had the same color characteristics as nickel plating. After some trial and error and not being able to get titanium anodes to dissolve into the bath I went to the concept that you use gold plating where we buy gold bricks. They're basically dissolved into a solution that allows us the liquid form. So develop the liquid form with titanium, made that bath up, and the neat thing I wasn't expecting was not only can we put it over nickel without it really changing color at all, we can also do it over the top of copper and gold. So we try to be the leader of the industry but I do also share all that information with competitors. It's available to anyone. Like I told you, when I pull in here in the morning I'm still excited. I don't think I would ever have been satisfied with my job if I was just plating the same piece day in and day out. There are a lot of challenges in job shop plating. It's the challenge that keeps me going but it's also the smile I put on everybody's faces. Not only mine but the customers and even my employees to be able to have pride in that finished product. Being able to deliver those type of smiles is priceless.
Show Full Transcript