HorsePower Builds
Want more content like this?
Join the PowerNation Email NewsletterVideo Transcript
Hey, not bad for a muscle car that just turned middle aged. Huh?
Welcome to the show.
If you were at the New York World's Fair back in 1964 you saw the introduction of a Proud Pony that was appropriately named the Mustang
almost from day one. The sting has been a popular platform for modifications in the name of high performance
through the years. Ponies have been built up for competition on road courses and drag strips all over the USA.
What we have here is the
Rausch version of a modified Mustang. Now they call it the Jack Rush
Classic, but it starts life as a stock GT.
This is what we end up with after they had a whole slew of suspension styling and performance parts.
Not only does it make a strong visual statement, but
it also makes 379 horsepower. Thanks to a well massaged motor and this rouse super charger.
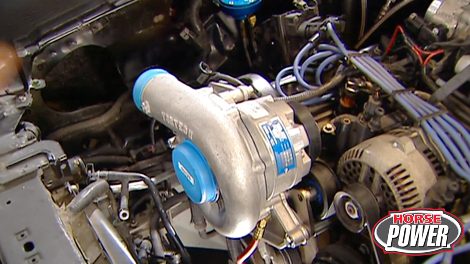
Of course, this show is all about real world build ups that you guys can handle at home. And I gotta tell you voted on a super charger like this one from Vortech Engineering is one of the most efficient ways to increase your horsepower and torque.
And unlike Nitrous, that super charge will be there whenever you need it. Every time you need it, there won't be any bottles to fill or valves to open. Now, you might remember Joe's project nightmare here from last season, we added this cold air induction, a larger throttle body plus a set of headers and an aftermarket exhaust system all in the name of making it breathe better.
Well, today we're gonna use the nightmare to show you how to cram more air and fuel into your engine using this super charger kit from
or
tech, this is their standard version. And although we plan to install an after cooler later on, well, at A P si this thing's efficient enough to run without one. Well, I like the idea of adding the after cooler later on for sure. You know, a lot of you guys out there probably can't step up to write a big check for all these components here. So it makes a lot of sense. You bet one major part per paycheck. Uh Speaking of parts, here's something I wanna show you, you know, a turbo
charger and a centrifugal supercharger work very much the same except that a turbocharger uses exhaust to spin the system up. Now, the centrifugal supercharger uses a belt driven pulley like this one to turn the whole system. In fact, for every rotation of this pulley get 3.6 turns right here at the impeller. Now that is going to put a lot of air inside the engine and of course, you're gonna need more fuel. So this kit comes with a high volume T rex fuel pump and a new fuel management unit here. Of course, we're gonna get this whole deal started by first disconnecting the battery
after draining about a gallon of cool it, it's time to remove all the air and the pieces up to the throttle body.
Well, some time ago, we installed this shaker set up to replace the stock air induction. Now, that was all well and good, but the vortec gets its cold air from inside the fender. So
we'll try to keep this thing for good looks. But the rest of the shaker pieces have to go
in with the car in the air. We can prep the pan for the oil return line
by punching a hole in it right here.
Use a 38 NPT tap to cut threads in the pan
screw in the fitting
and attach the aluminum tube.
We're gonna drain the oil and change the filter under here right now. That way if any chips
got in the front of the oil pan there when we're doing all that tapping
and we can just flush them out right now.
We're also gonna remove this plug right here by the oil filter
and replace it with this 90 degree elbow from the kit. Now, this thing is gonna allow us to provide pressurized oil to that blower up there and keep it lubricated.
We'll connect everything up. Once we get that blower mounted, of course, once we get everything taken care of up front here, then we can turn our attention to that high volume fuel pump that I showed you earlier.
Yeah, this thing is an in line pump that mounts here at the bottom of your spare tire. Well,
and to make matters easy for you, the kit comes with this template that shows you exactly where to mark four holes up in the trunk.
Then you can drill the four holes from inside the trunk,
install the pump with the mounting hardware.
And after disconnecting the factory feed line from the fuel filter,
connect it to the pump feed line
and the other line from the pump back to the filter.
Well, the final step to our fuel pump installation is to wire it up using this relay kit
that uses a four wire set up. Now one red wire goes to a 12 volt source, one to our fuel pump. The black wire is a lead in this yellow wire. Well, that's the trigger wire and it's gotta go to a switch 12 volt source that is after we mount this little box in the trunk.
There you go. Good to know people in high places.
Tell you what, while we wind up the wiring, why don't you hang with us for a minute after the break, we'll finish our super charger installation and
make some numbers on the dyno Jet. Stay right there.
Well, how are we looking back there, Joe? It looks nice and dry to me. Good deal.
Welcome back to the shop where we're in the middle of installing a vortex supercharger on Joe's 96 Mustang GT here with the pump plumbed and wired up now is a great time to reconnect the battery. Turn the switch energize the system and check everything for leaks.
We came up high and dry
on that account. So now we're gonna get back under the hood here and install that FMU, which by the way is the fuel management unit. Well, here it is and what it does is read your blower's boost. So for every pound of boost that it generates, this thing will increase fuel pressure by 10 P. Si
now, that way you've got a constant air fuel mix, your engine won't lean out and you won't have to worry about torching any pistons. Now, we're gonna mount ours right here on the passenger side fender. Well, this way, the supply lines will easily reach our fuel rail and the return line there behind the shock tower.
Next, we need to get rid of this coil pack here so we can open up the front of the engine and work on it.
Then we're gonna remove this ac silencer bracket here, at least for right now, it'll reattach later, once we get that blower assembly into position,
then we got four bolts on the timing cover. We need to remove this idler pulley and this bottom bolt on the alternator mount.
Now, all that hardware is gonna be replaced once we get that blower into position
while Chuck works on the front of the motor. I wanna do some pre assembly on our super charger and this made bracket here. First thing you gotta do is take this brass fitting
and thread it in
for an oil feed line.
Then attach this half inch oil drain hose,
mount the main bracket to the super charger
using the supplied hardware from the kit.
Then we're gonna install this idler plate,
then install the idler
coolly to the plate.
Finally, we installed this oil speed line to the brass fitting we installed earlier.
Ok. I hope you made some room for this big old snail. Well, we won't know till we drop it down in here. Let me get this belt out of the way and we'll get it started. Yeah. There you
go there.
Yeah, there it
is.
All right. Hold it there, Joe. Ok. Got it on.
Hold that belt there. Let me go ahead and tighten up these mounting bolts here.
All right,
man, that belt sure snakes around in here.
Well, maybe that's why they call it a serpentine belt. You know. Hey, man, wasn't that my line? No, your line's down under the car remember we still have to connect that oil feed line
and that return line that we worked on earlier.
Well, with the blower mount in place here, I can see that we're gonna have to modify this upper radiator hose here to give us a little more clearance
around the blower housing. So I'm gonna start by removing about an inch from this upper radiator hose right here.
Well, next we're gonna split the hose right here in the middle so we can insert the steel sleeve that comes with a kit. Now that's going to make up the difference in the overall length of the hose.
Man, I tell you, we're getting close to the finish line of this project. In fact, I started pre assembling some of the air inlet pieces starting with the factory mass airflow meter that attaches to this vortech bracket. Oh, by the way, this factory piece with the screen. Well, you can crash it.
Well, next, I've attached the elbow and sleeve from our kit and on the other side of the bracket here,
we can attach our K and N filter.
Finally, we need to install this air inlet temp sensor.
Next, after supporting the car on jack stands and removing the front wheel, I'll get this inner liner out of the way so you can get a better look.
Well, next, using these factory studs inside the fender for mounting, we can position the assembly.
There we go
air bolted down
well, that takes care of all the hard work under the hood here. Of course, the last pieces to go on
were this black plastic ducting that runs from the mass airflow sensor up here to the inlet side of the blower.
And this metal tube here that runs from the outlet of the blower back here to the throttle body.
Then all we had left to do was to reconnect all of our hoses, vacuum lines, electrical connections and sensors
and noticed how we reinstalled this coil pack on a new bracket from the kit that mounts right to the valve cover. So after some oil and coolant,
this Mustang is gonna be ready to roll.
Last time we had the Mustang on our dyno Jet. We made 204 horsepower at the rear wheels. Let's see how much we can beat that.
Hey, man, these numbers are gonna blow you away, check it out 286 at the rear wheels. Now, by my calculations, that's about 82 more than we had before. Oh, man, I'm loving that.
Well, you gotta love the extra horsepower, but you know, here's something else for you think about that vortex system is smog legal in all 50 states. It carries a
year guarantee and you can bolt it on in a weekend. Absolutely. Of course, it will put a little pressure on your budget smidgin over three grand for this satin version more for the polished. Well, stay right there. We got a lot more horsepower ahead. Now, I wonder what would happen if we put on one of those after coolers. Hey, I don't know.
It's the world finals and it's time to rock your national trail raceway.
We're here at the NFC A world final. Joe Elmer. Somewhere here on the big block. The power block dude himself. I can see him now, down in the pit area. Check him out there. He is. Yes. The man with the hairspray.
I hate to admit it, but this is the way we travel to races a lot in a Chevy van. Kind of boring. Huh? A
real pain in the Astro if you ask me, but check this out
a grocery getter that gets down the track in about eight seconds.
That's a 1985 Chevy Astro van.
Uh It's got a 10 inch chop, six inch midsection cut and we got 13,000 hours in it.
Uh It's all steel.
What do you think? Is this a van? The horsepower crew and I could travel in
a
quarter. It uses about uh, eight hours alcohol
so we can drive it to the race. I don't think we want a tanker truck with you at all times,
but we get a lot of attention. Yeah, you would get there quick. Yeah.
Well, we didn't come here to buy a van. We came here to catch some competition.
The cameraman almost caught the nose of that. 57 Chevy.
Well, it's the World finals of grassroots drag race sponsored by the N MC A now known as the NSC A.
And while each race is important to these competitors,
some had titles in the bag upon arriving.
But like Pat, you see this year's king of pro streak
and Mark d'antoni champion of outlaw streak for the fourth consecutive year.
A lot of people say he doesn't get old hat
winning, never gets old hat, especially when you put a lot of hard effort into it. Like, uh me and my team do,
um We're all proud and we're all glad to be here today.
We were always taught that if uh if you take care of the little things, the big things will follow suit.
So we're just always checking and tweaking on little stuff and uh
we do real well that way and it's a common practice and the whole team does it.
Uh Mark's great, whatever he does. Clutch calls anything engine wise, he's, he's the best and there ain't a guy out here that's better than him.
He's the hardest guy working guy out here five days a week at the shop at home. He's working on a car every night.
One of the biggest stories here wasn't about clinching a title but rather a world record.
This is Mike Modesta and his 96 mustang battered by a recent crash,
but just may be destined to be the first ever in the limited street class to run in the sevens
to a new power combination that includes an FW intercooled pro charge
the power on the car right now is, is unbelievable from start to finish.
Nitrous will just more on the start
and it will kind of
lull off during the end,
but this is just a start to finish.
This motor has seen 1600 on the
dyno.
Um
It's only 289 cubic inch
but
yeah, it's, it's capable of a lot of power.
I, I tried Nitrous and all nitrous is, is nice, but
in the race scene is very temperamental and
burns up a lot of pistons. We could go 234 seasons with the same set of pistons and a blow motor.
The blow mow is a lot more reliable
and they make a, you can make a lot more power
later under the lights. The last qualifying run of the weekend,
Mike goes at 801 at 100 74 miles an hour
close, but no cigar,
no world record
next day. Under overcast skies. The battered Mustang and its driver stage for the first round of eliminations.
And yes, it's a 794 quarter mile run.
First seven second car in limited street from Brooklyn, New York. 1 76 7 94.
It's a wreckage from the eight mile on. I, I knew I had it. I knew I had it. Wow.
What a feeling
going through the lights
on the sh
I was jumping off the
choice, but
we did it.
I
need to go
in the house.
And so the modest racer from New York nicknamed Mustang. Mike captures a little place for himself in the history books.
Just a part of that proverbial thrill of victory
and the agony of hitting the wall. That only happens
in the wild world of grassroots drag racing.
If you've got a manual shift in your street machine. Well, these high tech shift knobs from a cent are your high tech ticket to sure shifts.
Now, the machine from billet aluminum and these gear teeth are designed for a comfortable grip with no sharp edges.
You can get them in a variety of anodized colors plus their optional high tech series features a posh aluminum cap for extra flash.
The threaded inserts allow them to fit just about any threaded shift or handle. Hey, the price is pretty easy to handle too
at just under 40 bucks. Several weeks ago. In the show, I installed a set of headers on my mustang which made more power. But when it came time to reinstall the factory oil dipstick, I was kind of stuck. There was no way that thing was gonna snake around the headers. But low car had the solution
with one of their flexible aluminum dipsticks. They feature a slim design, easy to read markings in this bracket here for easy mounting in the engine Bay. They've got them for all kinds of small block Chevys and for,
and you'll just have to dip into your savings to the tune of 42 bucks.
Does your fox body mustang whistle while it rolls down the road? If it does, chances are the weather strips probably need to be replaced. Well, now you can seal the deal with these replacement strips from soft seal.
They're designed to install just like the originals, but they use an improved rubber compound to help resist the effects of UV rays
and severe weather.
Now they offer kits and individual pieces for all 79 to 93 mustangs, everything from hatchbacks to hard tops and we ain't whistling Dixie either with prices starting at about 40 bucks. Hey, I think you heard the old whistle saying it's Quentin time, but we're gonna be back next week with more horse power. Why don't you join us and what we gonna do next week? Let's work on a Chevy for a change, whatever.
Show Full Transcript
Welcome to the show.
If you were at the New York World's Fair back in 1964 you saw the introduction of a Proud Pony that was appropriately named the Mustang
almost from day one. The sting has been a popular platform for modifications in the name of high performance
through the years. Ponies have been built up for competition on road courses and drag strips all over the USA.
What we have here is the
Rausch version of a modified Mustang. Now they call it the Jack Rush
Classic, but it starts life as a stock GT.
This is what we end up with after they had a whole slew of suspension styling and performance parts.
Not only does it make a strong visual statement, but
it also makes 379 horsepower. Thanks to a well massaged motor and this rouse super charger.
Of course, this show is all about real world build ups that you guys can handle at home. And I gotta tell you voted on a super charger like this one from Vortech Engineering is one of the most efficient ways to increase your horsepower and torque.
And unlike Nitrous, that super charge will be there whenever you need it. Every time you need it, there won't be any bottles to fill or valves to open. Now, you might remember Joe's project nightmare here from last season, we added this cold air induction, a larger throttle body plus a set of headers and an aftermarket exhaust system all in the name of making it breathe better.
Well, today we're gonna use the nightmare to show you how to cram more air and fuel into your engine using this super charger kit from
or
tech, this is their standard version. And although we plan to install an after cooler later on, well, at A P si this thing's efficient enough to run without one. Well, I like the idea of adding the after cooler later on for sure. You know, a lot of you guys out there probably can't step up to write a big check for all these components here. So it makes a lot of sense. You bet one major part per paycheck. Uh Speaking of parts, here's something I wanna show you, you know, a turbo
charger and a centrifugal supercharger work very much the same except that a turbocharger uses exhaust to spin the system up. Now, the centrifugal supercharger uses a belt driven pulley like this one to turn the whole system. In fact, for every rotation of this pulley get 3.6 turns right here at the impeller. Now that is going to put a lot of air inside the engine and of course, you're gonna need more fuel. So this kit comes with a high volume T rex fuel pump and a new fuel management unit here. Of course, we're gonna get this whole deal started by first disconnecting the battery
after draining about a gallon of cool it, it's time to remove all the air and the pieces up to the throttle body.
Well, some time ago, we installed this shaker set up to replace the stock air induction. Now, that was all well and good, but the vortec gets its cold air from inside the fender. So
we'll try to keep this thing for good looks. But the rest of the shaker pieces have to go
in with the car in the air. We can prep the pan for the oil return line
by punching a hole in it right here.
Use a 38 NPT tap to cut threads in the pan
screw in the fitting
and attach the aluminum tube.
We're gonna drain the oil and change the filter under here right now. That way if any chips
got in the front of the oil pan there when we're doing all that tapping
and we can just flush them out right now.
We're also gonna remove this plug right here by the oil filter
and replace it with this 90 degree elbow from the kit. Now, this thing is gonna allow us to provide pressurized oil to that blower up there and keep it lubricated.
We'll connect everything up. Once we get that blower mounted, of course, once we get everything taken care of up front here, then we can turn our attention to that high volume fuel pump that I showed you earlier.
Yeah, this thing is an in line pump that mounts here at the bottom of your spare tire. Well,
and to make matters easy for you, the kit comes with this template that shows you exactly where to mark four holes up in the trunk.
Then you can drill the four holes from inside the trunk,
install the pump with the mounting hardware.
And after disconnecting the factory feed line from the fuel filter,
connect it to the pump feed line
and the other line from the pump back to the filter.
Well, the final step to our fuel pump installation is to wire it up using this relay kit
that uses a four wire set up. Now one red wire goes to a 12 volt source, one to our fuel pump. The black wire is a lead in this yellow wire. Well, that's the trigger wire and it's gotta go to a switch 12 volt source that is after we mount this little box in the trunk.
There you go. Good to know people in high places.
Tell you what, while we wind up the wiring, why don't you hang with us for a minute after the break, we'll finish our super charger installation and
make some numbers on the dyno Jet. Stay right there.
Well, how are we looking back there, Joe? It looks nice and dry to me. Good deal.
Welcome back to the shop where we're in the middle of installing a vortex supercharger on Joe's 96 Mustang GT here with the pump plumbed and wired up now is a great time to reconnect the battery. Turn the switch energize the system and check everything for leaks.
We came up high and dry
on that account. So now we're gonna get back under the hood here and install that FMU, which by the way is the fuel management unit. Well, here it is and what it does is read your blower's boost. So for every pound of boost that it generates, this thing will increase fuel pressure by 10 P. Si
now, that way you've got a constant air fuel mix, your engine won't lean out and you won't have to worry about torching any pistons. Now, we're gonna mount ours right here on the passenger side fender. Well, this way, the supply lines will easily reach our fuel rail and the return line there behind the shock tower.
Next, we need to get rid of this coil pack here so we can open up the front of the engine and work on it.
Then we're gonna remove this ac silencer bracket here, at least for right now, it'll reattach later, once we get that blower assembly into position,
then we got four bolts on the timing cover. We need to remove this idler pulley and this bottom bolt on the alternator mount.
Now, all that hardware is gonna be replaced once we get that blower into position
while Chuck works on the front of the motor. I wanna do some pre assembly on our super charger and this made bracket here. First thing you gotta do is take this brass fitting
and thread it in
for an oil feed line.
Then attach this half inch oil drain hose,
mount the main bracket to the super charger
using the supplied hardware from the kit.
Then we're gonna install this idler plate,
then install the idler
coolly to the plate.
Finally, we installed this oil speed line to the brass fitting we installed earlier.
Ok. I hope you made some room for this big old snail. Well, we won't know till we drop it down in here. Let me get this belt out of the way and we'll get it started. Yeah. There you
go there.
Yeah, there it
is.
All right. Hold it there, Joe. Ok. Got it on.
Hold that belt there. Let me go ahead and tighten up these mounting bolts here.
All right,
man, that belt sure snakes around in here.
Well, maybe that's why they call it a serpentine belt. You know. Hey, man, wasn't that my line? No, your line's down under the car remember we still have to connect that oil feed line
and that return line that we worked on earlier.
Well, with the blower mount in place here, I can see that we're gonna have to modify this upper radiator hose here to give us a little more clearance
around the blower housing. So I'm gonna start by removing about an inch from this upper radiator hose right here.
Well, next we're gonna split the hose right here in the middle so we can insert the steel sleeve that comes with a kit. Now that's going to make up the difference in the overall length of the hose.
Man, I tell you, we're getting close to the finish line of this project. In fact, I started pre assembling some of the air inlet pieces starting with the factory mass airflow meter that attaches to this vortech bracket. Oh, by the way, this factory piece with the screen. Well, you can crash it.
Well, next, I've attached the elbow and sleeve from our kit and on the other side of the bracket here,
we can attach our K and N filter.
Finally, we need to install this air inlet temp sensor.
Next, after supporting the car on jack stands and removing the front wheel, I'll get this inner liner out of the way so you can get a better look.
Well, next, using these factory studs inside the fender for mounting, we can position the assembly.
There we go
air bolted down
well, that takes care of all the hard work under the hood here. Of course, the last pieces to go on
were this black plastic ducting that runs from the mass airflow sensor up here to the inlet side of the blower.
And this metal tube here that runs from the outlet of the blower back here to the throttle body.
Then all we had left to do was to reconnect all of our hoses, vacuum lines, electrical connections and sensors
and noticed how we reinstalled this coil pack on a new bracket from the kit that mounts right to the valve cover. So after some oil and coolant,
this Mustang is gonna be ready to roll.
Last time we had the Mustang on our dyno Jet. We made 204 horsepower at the rear wheels. Let's see how much we can beat that.
Hey, man, these numbers are gonna blow you away, check it out 286 at the rear wheels. Now, by my calculations, that's about 82 more than we had before. Oh, man, I'm loving that.
Well, you gotta love the extra horsepower, but you know, here's something else for you think about that vortex system is smog legal in all 50 states. It carries a
year guarantee and you can bolt it on in a weekend. Absolutely. Of course, it will put a little pressure on your budget smidgin over three grand for this satin version more for the polished. Well, stay right there. We got a lot more horsepower ahead. Now, I wonder what would happen if we put on one of those after coolers. Hey, I don't know.
It's the world finals and it's time to rock your national trail raceway.
We're here at the NFC A world final. Joe Elmer. Somewhere here on the big block. The power block dude himself. I can see him now, down in the pit area. Check him out there. He is. Yes. The man with the hairspray.
I hate to admit it, but this is the way we travel to races a lot in a Chevy van. Kind of boring. Huh? A
real pain in the Astro if you ask me, but check this out
a grocery getter that gets down the track in about eight seconds.
That's a 1985 Chevy Astro van.
Uh It's got a 10 inch chop, six inch midsection cut and we got 13,000 hours in it.
Uh It's all steel.
What do you think? Is this a van? The horsepower crew and I could travel in
a
quarter. It uses about uh, eight hours alcohol
so we can drive it to the race. I don't think we want a tanker truck with you at all times,
but we get a lot of attention. Yeah, you would get there quick. Yeah.
Well, we didn't come here to buy a van. We came here to catch some competition.
The cameraman almost caught the nose of that. 57 Chevy.
Well, it's the World finals of grassroots drag race sponsored by the N MC A now known as the NSC A.
And while each race is important to these competitors,
some had titles in the bag upon arriving.
But like Pat, you see this year's king of pro streak
and Mark d'antoni champion of outlaw streak for the fourth consecutive year.
A lot of people say he doesn't get old hat
winning, never gets old hat, especially when you put a lot of hard effort into it. Like, uh me and my team do,
um We're all proud and we're all glad to be here today.
We were always taught that if uh if you take care of the little things, the big things will follow suit.
So we're just always checking and tweaking on little stuff and uh
we do real well that way and it's a common practice and the whole team does it.
Uh Mark's great, whatever he does. Clutch calls anything engine wise, he's, he's the best and there ain't a guy out here that's better than him.
He's the hardest guy working guy out here five days a week at the shop at home. He's working on a car every night.
One of the biggest stories here wasn't about clinching a title but rather a world record.
This is Mike Modesta and his 96 mustang battered by a recent crash,
but just may be destined to be the first ever in the limited street class to run in the sevens
to a new power combination that includes an FW intercooled pro charge
the power on the car right now is, is unbelievable from start to finish.
Nitrous will just more on the start
and it will kind of
lull off during the end,
but this is just a start to finish.
This motor has seen 1600 on the
dyno.
Um
It's only 289 cubic inch
but
yeah, it's, it's capable of a lot of power.
I, I tried Nitrous and all nitrous is, is nice, but
in the race scene is very temperamental and
burns up a lot of pistons. We could go 234 seasons with the same set of pistons and a blow motor.
The blow mow is a lot more reliable
and they make a, you can make a lot more power
later under the lights. The last qualifying run of the weekend,
Mike goes at 801 at 100 74 miles an hour
close, but no cigar,
no world record
next day. Under overcast skies. The battered Mustang and its driver stage for the first round of eliminations.
And yes, it's a 794 quarter mile run.
First seven second car in limited street from Brooklyn, New York. 1 76 7 94.
It's a wreckage from the eight mile on. I, I knew I had it. I knew I had it. Wow.
What a feeling
going through the lights
on the sh
I was jumping off the
choice, but
we did it.
I
need to go
in the house.
And so the modest racer from New York nicknamed Mustang. Mike captures a little place for himself in the history books.
Just a part of that proverbial thrill of victory
and the agony of hitting the wall. That only happens
in the wild world of grassroots drag racing.
If you've got a manual shift in your street machine. Well, these high tech shift knobs from a cent are your high tech ticket to sure shifts.
Now, the machine from billet aluminum and these gear teeth are designed for a comfortable grip with no sharp edges.
You can get them in a variety of anodized colors plus their optional high tech series features a posh aluminum cap for extra flash.
The threaded inserts allow them to fit just about any threaded shift or handle. Hey, the price is pretty easy to handle too
at just under 40 bucks. Several weeks ago. In the show, I installed a set of headers on my mustang which made more power. But when it came time to reinstall the factory oil dipstick, I was kind of stuck. There was no way that thing was gonna snake around the headers. But low car had the solution
with one of their flexible aluminum dipsticks. They feature a slim design, easy to read markings in this bracket here for easy mounting in the engine Bay. They've got them for all kinds of small block Chevys and for,
and you'll just have to dip into your savings to the tune of 42 bucks.
Does your fox body mustang whistle while it rolls down the road? If it does, chances are the weather strips probably need to be replaced. Well, now you can seal the deal with these replacement strips from soft seal.
They're designed to install just like the originals, but they use an improved rubber compound to help resist the effects of UV rays
and severe weather.
Now they offer kits and individual pieces for all 79 to 93 mustangs, everything from hatchbacks to hard tops and we ain't whistling Dixie either with prices starting at about 40 bucks. Hey, I think you heard the old whistle saying it's Quentin time, but we're gonna be back next week with more horse power. Why don't you join us and what we gonna do next week? Let's work on a Chevy for a change, whatever.