HorsePower Builds

Video Transcript

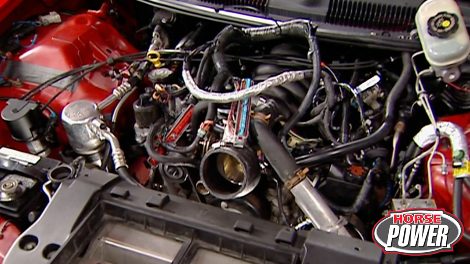
Hi, welcome to horsepower. Remember our Camaro Ss project car? We call the Ls gun. Sure, you do. Well, today we're gonna do some troubleshooting to find out why the Ls gun sounds a little bit shot.

Mike has been hammered on this car pretty hard lately and for some reason,

it's got strange sounds coming from under the hood

and that thing is definitely gonna need some attention. Now, the LS One is without a doubt one of the hottest performance platforms today and

well, it lends itself to all kinds of performance upgrades. Now, we got a whole passel of parts that we're gonna throw at the thing later on. But first we need to find out if the engine is really up to the task. So today we're gonna remove the,

take it apart and see what we've got.

But one thing we've got done is our homework. Automotive journalist Will Hansel has written this book all about modifying and tuning the genre

engines. Now, a few days ago, we had a chance to talk to will about why he dedicated a whole chapter to extracting the LS one.

This engine was built for manufacturability. So there's a lot of quirks as far as the clips and the hoses and the connectors that go on it.

And hot rodders just aren't used to these type of components. So, having a photo and a little caption to describe every step made it very easy to do. And one of the biggest things that you guys will experience is the engine needs to come out from under the vehicle. You actually lift the vehicle off the engine and transmission. With that in mind, we've moved the Camaro over here to the truck shop so we can use their two post lift. Now, I see that Mike has already been busy here. He's drained the radiator and disconnected

the battery. So we're gonna get started here by removing this air inlet mixed.

Now, we can disconnect all the coolant hoses,

the throttle cable

and with this special tool here, we can disconnect the fuel lines.

We also disconnect the purge solenoid vapor line.

Now, we can remove the brake booster hose

and remove the master cylinder

from the booster

with the master cylinder out of the way,

we can remove these shock tower bolts.

Next, we're going to remove this intermediate steering shaft bolt.

Now, once the engine starts to drop out, we'll just wiggle the shaft out of place there.

Uh, do it.

Now, we're also going to remove the two front brake lines and well, they're real easy to identify.

You just check out the markings on the a BS module, here's left front,

right front.

Once the lines are handled,

all we have left to do is to split this factory smog line at the factory's place.

There's also a few things we need to take care of here on the passenger side, including removing the harness and the PC M.

Now, here's a tip that'll help you save a lot of time

and a few headaches.

All right, you're clear in here.

The GM service manual tells you to remove half the dash to disconnect the PC M leads. But if you collapse this gromit, feed it and the harness back through the firewall, that'll give you enough slack to disconnect it inside the kick panel.

Now, I can loosen the strut tower bolts on the passenger side and tackle those upper ac compressor bolts

with a Camaro up on the lift.

I can remove this brake line heat shield from the driver's side

along with a couple of clips that hold those lines in place on the frame,

then disconnect the constant power wire from the back of the alternator

and remove the sway bar

under the passenger side. We can remove the last two AC compressor bolts and swing it out of the way,

then remove the starter.

After disconnecting the sensors for the O twos, the crank and the oil level,

plus both ground straps.

After removing the hydraulic, throw out bearing hose,

we can get the exhaust pipe out of the way

followed by the drive shaft.

Here's a real time saver in his book, Hansel recommends taking the top bolt out of the torque arm bracket and letting the arm rest against the bottom of the car.

After removing the shifter, I can disconnect the wheel speed sensor here at the spindle.

It looks like we're down to the final steps on removing this engine. The only thing we have left are the six bolts on the cradle four on the transmission cross member that is after we lower it back down and support it on this dolly

and it needs to be positioned so the weight is evenly distributed. Ok. Make sure the engine cradle is resting on the front of the dolly.

All right, here we go. The moment of truth, we're gonna start slowly lifting this car off the engine ready, Mike.

Now, that's an interesting sight. Remember if this is your first time you're bound to miss something. So make sure everything clears. It's a lot easier to unhook a hose than to rip it off. We're looking pretty good.

Thanks to the dolly, we're about ready to give the engine and the transmission a ride back to the horsepower shop. You bet that's where we'll start tearing down our LS One something you don't want to miss. Stay with us.

Hey, welcome back to horsepower where we've just removed this LS One engine from our Camaro Ss there. In order to do that though, we had to unbolt the sub frame. Then we had to lift the whole body up over the engine using a two post lift from our friends over at the truck shop. Now, before we could, bolted to the engine stand though, first, we had to remove the transmission

disconnect the wiring harness

and remove all the accessories.

Now, if you ever do this, you're gonna need some of these special pullers to remove the power steering pump from the engine.

And the reason you wanna keep it connected to the rack on the sub frame is to keep air out of the system, which can be a nightmare to bleed.

And now that's a great tip. Of course, while Joe and Mike were wrestling this thing out of the Camaro,

I was hitting Hansel's book to try and familiarize myself with his engine before we start tearing it down.

Hey, this is really a cool engine and while we tear it down, well, we're gonna show

you some of the features of it that make it such a potent platform.

We're gonna start with the intake manifold. Now, check this out. This thing is made from a high tech plastic composite here to help isolate the heat from the incoming fuel charge. Plus it's a dry intake, which means that

you don't have to drain the block of coolant before you remove it.

And thanks to these coil packs up here on the valve covers, well, there's not even a distributor to have to fool with

before we get too far into this project. Here's another tip. Make sure you bag

and tag all the bolts as you remove them. Some may look similar but if they wind up in the wrong place,

well, it could cause some damage to your block.

If you remember the reason we're knocking this motor down is to try and find the source of a noise that had us a little bit worried.

And I don't think these cylinder heads are the source of the problem, but you know, when it comes to making power,

well, the cylinder head is a real critical component.

Now, the LS one uses tall symmetrical porch or with a straight path to the combustion chamber. Plus they've got a generous 200 ccs of volume.

Now, this tall roof right here also gives that injector a straight shot to the back of the valve.

Now, those straight runners are made possible largely to the fact that with this LS one uses four head bolts per cylinder rather than the five that you're gonna find on a traditional small box.

Here's something else that's pretty cool about this engine. The oil pan is a structural member that helps support the bottom end.

So we're gonna remove it without draining the oil and check for any metal shavings.

Nothing's showing up in the oil, everything seems to be pretty clean.

So I guess the search continues.

Yeah, you know, the last time I listened to this engine, I really didn't think that it was the rods or the mains making all that noise. In fact, I was thinking something more like the timing chain or

maybe even a lifter. So, what do you say? We get this front cover off here and see what's hiding in there.

First we remove the water pump,

then the balancer,

the timing cover

and finally the oil pump,

man. I don't know, this looks like pretty normal chain where to me and I don't see anywhere where it's been rubbing on the block here. You know, I hope we're not tearing this thing down for no good reason. Well, we can't stop now. Hey, I got a couple of tips, but you're full of today, aren't you? Absolutely. Now, if you take the balance revolt that you just removed and threaded into the crank like so, oh, this is especially important if you ever want to do a cam swap on your LS one. Now with the push rides out and tension off the lifters,

you can give that crank a couple of revolutions here.

The lifters will move up and away from the camshaft

and stay nested in these retainer boxes

and with the timing chain out of the way

you could pull the camshaft straight out,

it looks like we're down to the final area of inspection and that's the bottom end. Now, I'm gonna remove these rod caps and push the piston out and check for any broken skirts, rings or even a spun bearing.

We got all the pistons on. It looks like we definitely found our problem. Some trash got in this bearing here causing it to rotate in the big end of the rod. So it looks like we're definitely headed to the machine shop now. Wow. Good catch Mike. I guess we'll make a mechanic out of you after all. Now, what do you say? We go ahead and rotate the motor up, check the crank and see if there's any damage in there.

But before we pop that crank out of there, I wanna show you a few more things about this LS one. Now, these were really meant to handle the power. Just check out these deep skirts here at the pan rail. Plus they use six bolt mains, four of them come in from the normal direction and two more come in from the side.

Now, when you take one of these apart, you also want to make sure that you note what direction these numbers are facing that way when it comes time to reassemble the engine, everything goes back together like it should.

Oh, and one more thing,

this number three Maine here is your thrust maine. So once you get it loose, you're gonna have to use a pry bar to work it out of the saddle.

You know, this crank doesn't look too bad except for that journal where the bearing spun

and the rest of the journals look like you could probably use a little bit of polishing too. So we'll definitely be sending this crank off to the machine shop along with the block.

Now, that block is gonna get a clean up home and we're gonna get the crank ground here. Plus we're gonna get the whole rotating assembly balanced.

Well, in any event, that's it for our disassembly today. When we put this motor back together in a few weeks, we're gonna fill it full of some parts that'll give us the reliability. We're after. Plus they're gonna be compatible with the power ADDers. We got planned for the LS guy.

That sounds like fun. Meanwhile, we got more fun ahead for you. So stick with us

a

lot of, you know, me as a Ford guy and well, that may be right. But I think it's time for you Mopar

people to get your 15 minutes of fame, give or take. So here it is the biggest Mopar party on the planet

for 24 years. Crowds have flocked to this amazing celebration of Mopar

Muscle,

the race

to show or just soak up the biggest display of classic low

bar metal ever. This year, the event pays tribute to the Dodge Charger including models. You do remember like the 67 and some models you probably don't

like this faithful replica of a 64 concept car

that kind of paved the way for the whole Charger line.

It started out as a 64 pole hard top

and, uh, you had to cut the top off and then you had the strength in the body.

Uh, so it wouldn't collapse

and then you had to hand fabricate everything because there were no,

no available pieces or parts

except to borrow them off of other cars, which is what Pro

Chrysler did when they were making the concept car.

Hardcore Charger fans find this 70 RT rare with its reflective C stripe loaded cockpit and a seldom seen Sunroof.

Well, how about Richard Petty's 74 that won more NASCAR races than any other in history.

Now, speaking of racing, here's a rendition of the historic hippie hemi.

This would make it over 1500 horses.

We've always been attracted to the, uh, the nostalgia funny cars.

Uh, I was looking for a place to put the boat in the water and found this thing in somebody's front yard.

The car should run 7 57 60 somewhere in there.

What's it feel like driving to day?

It's different. I mean, the fastest thing I ever drove was nine seconds before I got here.

Don Margo's 69 RT is a slick Sleeper, pretty plain on the outside, but pop the hood and you'll see 540 inch

hemi

wind turbo electronic fuel injection.

Of course, not all mo parts were built to go straight on the drag strip. How about the special built Plymouth.

It was built to rule the road courses back in 1965. And, oh, yeah, it's got a

hemi in it.

Of course, plenty of eye popping show. Plymouth made the scene too

if it's got a hemi

under the hood. Well, it's worth a lot of bucks if it's one of only nine made with a drop top and a four on the floor. Well, it's worth get this over seven figures,

at least to the new owner. The fact that I like that is it's a billboard car and there's only two billboard convertibles made

and, uh, you know, the white leather interior, lots of options and I like to drive them and that's just gonna be a nice one to drive around.

Bill's Barracudas were restored by Roger Gibbons who's one of the tops in his business today.

You know, my goal is to make it look like an original car that was bought in 70.

The part situation is a lot different nowadays, you know, we're using parts now that we would have thrown away at that time,

the cost of restorations changed a lot.

Uh, the average job going out of my shop is about $100,000.

Go.

So your mo

bar is not a concourse car,

then maybe it's got potential as a trophy winning burnout champion.

Now, if yours is a work in progress, the nationals has the biggest Moar

swap mate you'll ever find,

we found these guys extracting apart from a well used donor car,

we're gonna chop the roof off here in about a couple of minutes.

If he wants it, then he's got to get it off and he's got to carry it back to the truck.

It's the first year ever seen somebody actually take the cars apart like this. So

well, now that you got it, how are you getting it home back of a pickup truck? I hope

it fits

whether it's a distant green project or one of those untouched sacred survivors,

whether it's born to run or one, you're dying to show off low

bar beaver is furious

and its muscle car legacy

not likely to ever burn out.

Hey, Leno

has hit the nail on the head with their new sledge hammer cranks. Now they're a moderately priced 4340 steel forging that are made and machine in the good old us of eight.

Now, they're designed for street and strip small block Chevys with strokes of 348 to 375 inches and

they'll fit both one and two pieces. Rear seal designs. Now, the cranks come edged and detailed. Plus they're heat treated and Sonic clean for an easy drop in installation. So if you're ready to crank up the power with your small box, Chevy, well, you can pick up one of these for under 800 bucks.

Well, if you're ready to upgrade the exhaust in your first generation Firebird or

Camaro. How about flow master's new three inch muscle car system?

Now, it uses mandril bent aluminized tubing, a fully welded H pipe and their new super 40 mufflers. The tail pipes exit in the stock location between the leaf spring and the rear quarter. The kit comes with all your necessary clamps, hangers and hardware for an easy installation.

And the price you should sound off about two right at 400 bucks.

That's pretty hot, but excessive heat can kill a set of plug wires, especially if you're running headers or pulling a heavy load.

Now, Jacob's electronics has these ultra ceramic boots that would stand temperatures up to 2000 degrees. Now, they use a low resistance spiral cord wire for maximum energy without radio noise.

You can get a set of these for most popular applications at a price. You might not resist just under $190.

Well, we got an irresistible horsepower for you next week.

We'll see you then.
Show Full Transcript