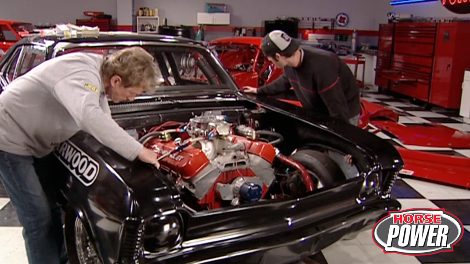
HorsePower Builds

Video Transcript

Hey, welcome to the show at a shop full of race ready horsepower. These two red racers were built for exhibition runs and match races to promote cars for kids Southern style. Now, that's an organization run by a bunch of dedicated gear heads who get out and raise money for children's charities. Now, this Mercury Comet here belonging to Jerry Hall is a throwback to those glory days when a FX racers were stars of the strip under the hood. It's got a 514 Stroker motor making about 700 horsepower

under the car. Check out how the front wheels have been moved forward about nine inches.

The rear wheels are moved up 18 inches. Now, back then, folks said this looks kind of funny and that launched the funny car move.

It's similar to the car. Don Nicholson campaigned back in the mid sixties when he battled rivals like sock and Martin's Plymouth Belvedere

and that was 15 years before I was even born. Of course, the technology has evolved through the years and today's cars have more power and a lot less weight.

We lightened up our supernova a while ago with fiberglass bumpers hood and deck lid.

And today we're going to show you how to shed even more weight, but first some unfinished business on the inside.

Whenever you build a car with a roll cage and wheel tubs, you're going to remove things like interior panels. Now, N hr rules state that the driver's compartment has to be sealed for protection against nitrous blow offs or fuel explosions. So to make the Nova legal, we hauled it to the home of some master fabricators.

Metal craft tools is a family business with deep roots in NASCAR and other forms of racing. A

place where a father and son team not only handle custom metal fabrication,

they make the tools for other fabricators around the world.

The English wheel has been around over a century and it's still a mainstay with NASCAR teams. Well, this company not only makes the time tested tool,

they show a growing legion of enthusiasts how to use them so they can turn ideas into fabricated finished pieces.

Cal and Mark Davis can teach novices how to shape steel into anything for most any hot rod project.

It's just a ton of fun and uh

very satisfying and it's a very learnable skill. It's very easy to learn.

They use both the English wheels and power hammers they make here.

Plus they can teach hobbyists how to powder coat parts for raw metal to make professionally painted pieces.

Of course, we came here for some internal tin work on the nova.

But we also had to deal with a rusted out lip around the right rear wheel.

So after cutting away the rusted portion mark makes a pattern out of poster board.

Then after transferring the pattern to steel and cutting it out with catch shears, leaving a half inch for a flange.

The next step takes him to the bead roller

as you tilt that piece, it's gonna start to throw a flange in there.

Then he

goes the piece into place, uses a straight edge to make another mark

and uses the brake to make a bend that will follow the line in the car's body.

Finally, after it's

Clio back in place, he can spot Welton

leaving an itch between the wells. So he doesn't distort the metal

after filling in those wells, he grinds them down.

And here's an important step using good old hand tools. Mark begins rolling the bottom edge back onto itself first with the pliers.

Then will the hammer and

this will give the opening a true factory look. And most importantly,

it will give it plenty of strength.

Now for the can work to make our Novo race legal starting in the trunk

here. Again, a paper pattern has to come first. This one starts with a one inch brake.

I put a brake in there to sort of give it some strength to keep it from doing this.

We'll just slide it up under here, three quarters of an inch and then we'll put a step

or this

piece

ends

up

after a test fit, Mark starts creating holes in the truck panel for the Nova's battery and fuel cell using the nibbler to finish them out

with the panel in place. The battery box goes in with a perfect fit,

same drill, so to speak for the fuel set

after its hole is trimmed out and fitted with this bracket. Bart drills, mounting holes and bolts it snugly into place

inside the Noble. Because of the roll cage, we need two large pieces to cover the now open package tray area.

So after determining the center line mark uses a framing square to do the rest

that establishes exactly where you want to split the panel.

Mark cuts out his first paper pattern with a break in it for the edge of the shelf. Then after cutting around the roll bar, he adds other pieces a little bit later. After cutting and adding more brakes, Mark's got the first big piece ready.

In addition to making the interior look better, adding tin pieces and sealing them will help keep burnout smoke and dust away from the driver.

Now, for the side panel, a radius gauge tells mark how to perfectly cut around the shape of the wheel tub.

Once again, it's paper to metal,

but this time, Mark uses the Beverly shear to make the curve

and check. This mark uses the shop's metal railing to get the curved top of the panel where it fits against the window.

Then after fitting it into place and trimming along the door line,

this project's almost a done deal. Once you get your rivets and silicone in there, she'll be ready to go to the racetrack. All right,

while we were there, Mark helped us fabricate some rear panels to finish off the job.

I'm just gonna go ahead and drill some holes, place some

Clios in it to hold it in place and then pop rivet it and finish it off.

Finally, after laying masking tape about a quarter inch from each side of all the panel seams,

we laid down some aluminum silicone,

run our finger down it to smooth it out,

pull the tape

and that's it.

Well, of course, we don't have time to finish this car today. But if you ever do this job, make sure you take your time,

try the tape trick and well, your work will look as good as it seals. Looks like we're going to take a short break. But when we come back, we're going to lose at least 200 pounds of weight on this thing. Stay with us.

Hey, welcome back to horsepower. Now, we just showed you some interior tin work we were doing on Old Supernova. Meanwhile, here's that 98 Mustang you saw earlier also built by HSC race cars. Now we have something really cool to show you, check this out

now in its naked state. So you can get a better look at the 604 topped with a 1471 blower

Linco transmission,

narrowed four L

rear end

and the other gadgets that get this thing down the track in a little over six seconds at 220 miles an hour.

Man, this is awesome. This whole body only adds about 130 pounds to the monster Mustang back there.

I already removed the doors off of Project Nova and they weigh about 150 pounds per pair. So it doesn't take a genius to figure out that's some weight we can live without.

Yeah. Well, today

we're going to slim down the supernova with a pair of these lightweight fiberglass doors that we got from Harwood and we'll also install one of their fiberglass front ends to take a whole lot more weight off. But to make this thing work, we'll also have to swap out the hood that's now on the Nova for this pinon bird

to finish getting everything out of the way. We pull out the inter fenders

on both the outer fenders and remove them.

Next. After draining it, we need to get the radiator out.

Then we can remove the radiator core support and the grill as a unit.

You can use the stock hinges on these new doors, but we're trying to lose as much weight as possible. So we went ahead and got this door hinge kit from applied racing technology that uses chrome moley mounts. Now, the first thing to go on is this hinge plate, but first, we'll need to clearance the door jam, so it sits flush against the door.

Next, we'll need to cut out a large section of the inner door panel so we can complete the installation of the hinge plate.

Now, with the hinge plate installed, we can hold the door in place and determine where to weld this hinge mount to the car's body.

Man, I got to admit it. That's a great job. This thing's going to work fine. So let's move on to our latch and striker.

Now to make sure this lines up, we're going to first install the striker right here in the stock location.

Now, if we close the door on the striker and make a mark,

thanks Mike

and measure from this door seam to the center of the striker,

we'll know exactly where to cut a hole for our latch.

That's it for the latch. Now, look at this, we installed this release handle set up using some

A RT hardware and we'll cover up this hole with 10. Later on.

Notice how we cut a hole here in this new plastic window so that the handle is accessible inside

and outside of the car. Now that's very important for safety. Oh, by the way, we got our windows from Lexan,

it's the safe stuff that all the professionals use

to get the new front end mounted. First, we need to hold it in place, then figure out the routing for our frame and make some mounting marks

man with this thing butted up against the frame. It's almost a perfect fit already.

So we're going to use the stock frame rails and these plates on the underside to secure the front end.

That makes a lot of sense in our case. Plus, we can get this thing off just by removing a few bolts. But if you race a whole lot and want a quicker release, set up, check this,

this plate bolts up to the inside of the clip. This slider tube is welded to the frame and

the whole deal is held in place with a pin.

There's no set sequence to follow, but there's always a lot of fabrication and the kit includes all the materials you need.

While each application is a little different. The idea is always to fab up a frame that mounts the front end solidly to the chassis

and to the body

to mount the radiator. We're using one of a RT S kits and I already welded the bung to the crossbar down here. Then this bracket slides into place and these aluminum tabs weld to the radiator

some time ago, you might remember we

fed up this tin plate to keep air turbulence out of our carburetor.

And fortunately the way this new hood's designed we can still use. It

looks like another good fit mate,

man. This thing looks awesome and everything fits pretty well too. Now, what do you say? We get to the fun part. I already weighed the fiberglass doors and the front clip came up with a total of 77 pounds. So, how much weight did we lose? Well, here's your answer. Hanging on the scales, the stock benders doors and of course the grill grand total.

Well, there it is 240 pounds. Now, this assortment of odds and ends here

got to weigh 15. So

that's a total savings of 178. That's about the equivalent of somebody like me riding on the hood of your car down the track. Well, stay with us. We're going to take you to a real cool event when we come back.

Everybody loves horsepower and hot looking cars. I'm going to take you to an Aby that's got both. After we clean up our mess.

Once a year, the road to high performance fun leads to year one's annual power party

a weekend where anybody can come out to compete for show car honors,

bragging rides and prizes on the quarter mile drag strip and a whole lot more.

This year, the year one experience as it's called, has two locations Atlanta Dragway and Road Atlanta.

You know, most of

our people are primarily drag racers. So by having this event here at road, Atlanta, we're gonna expose them to turning left and right.

Imagine putting your muscle car through pretty fast paces on the road course or auto cross. Anyone

this time there are two first, a dry auto cross where you race against the clock and try not to kill too many cones in pursuit of a quick time.

We're gonna see if we get it

to 23. 23. Huh?

If I

can get my foot over there,

if we could get your big ass.

But if that's not enough to test your widths and reflexes, there's also the wet Auto Cross and one of the Pano school's Audi complete with an instructor to make life a little more interesting

as we drive around. I'm gonna use the hand break

to put us into some

intentional slides. Ok? And the goal will be to keep everything under control and straight

man, he makes it look so easy.

My turn

here here, here,

here,

here's where you want to go.

Great,

go

brakes,

right.

I meant to do all those.

The year one experience is a true family event with, as the saying goes, something for everyone.

And while catching up on old acquaintances, I joined some other enthusiasts for the ultimate passenger ride with a pro

one of

these,

you wish you'd been driving.

Um

I'll take the ride

meanwhile, at location two, the drags drip, there's a hot new class revving up a lot of excitement.

One that's driven by a group called LS

one.com. Any vehicle can come out here as long as they're LS one or LT one powered.

So pretty wide open, we have mustangs that are gonna be built with LS one S in them and

there's a couple of twin turbo LT one

Firebirds, classic cars like this one with a late model engine

check. This, this car running in one of the group's classes was built by an automotive school class and it's gone on to earn a special distinction

right now. We feel it's the fastest naturally aspirated stock suspension Camaro in the country. And we're proud of all the guys here at the school

and work on it.

And the

sooner

we put a good short block together and get the cylinder head slowing, right, put it together and then all the management's done with the

fast,

pretty impressive, but the most remarkable achievement is coming up,

the winner of the coveted Year One Cup. It's a prestigious award. It continues to grow in stature, I think.

And it's just great for us to be able to reward somebody for building an E car.

We'll get fired up for the winner when we come back.

Welcome back to the annual Year One experience just in time to experience the search for this year's best of the best A car. So cool. It deserves the year one cup award

like these proud past winners

and judging for the next cup winner is a tough gig but hey, somebody's got to do it.

Here goes

Corvettes.

I

like this thing. Even if it is a Chevelle

man, this is no Mickey Mouse car show. There are a lot of great rides here, but

I'm making a choice. I know what I want. Hey, no peeking.

Ok. One runner up is a nifty nova which is easily award winning material.

Then this beautiful Boss 302 which proves Mustangs do have a chance here.

But the winning ride Scott will be's home built 69 Camaro loaded with year one restoration parts

and a ton of personal touches that definitely charge the judge's senses.

Congrats to Scott and all the runners up.

Now, here's a cool way to improve the looks and performance of your LS one and LS two engines. Pantera has just released this coil pack setup that produces twice the amount of voltage of stock G MS. Now the kit comes with the coils, the coil bracket, wiring harness and plug wires. Another cool feature. It only takes a couple of hours to install it and the price will only set you back 895 bucks.

Most of you know, be cool for the

aluminum radiators. But now they're putting that metal to new use with these components for your trailer or shop. Just a few of them include this storage tray for your oil a bracket for your electrical cords, mounts for your floor jack and even this tray for your fuel jugs. Good way to get organized and you can get them in the jags catalog. I

got to thank our friends from cars for kids Southern style for the use of these cool rides this weekend.

If you want to learn more about this great organization, check out Horsepower tv.com. Meanwhile, check us out next week.
Show Full Transcript