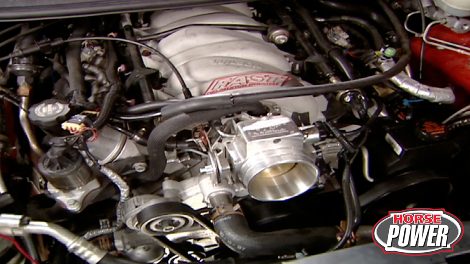
HorsePower Builds

Video Transcript

Whether it's a funny car or a family hot rod, there's nothing like a super charger to give a lift to your engine's horsepower

and there's nothing like the bad blower build up will tackle in the shop today and thoroughly tunes for maximum power.

Well, power is part of our name and it's definitely the name of the game today in the shot. Here's one way you can make it. This is Andy Looper's 70 Rs Camaro

and he gets about 500 naturally aspirated horse power with this poked and stroke 383 pretty impressive. But we're heading in a different direction with our 98

last year, we got about 80 extra horses with a single shot nitrous set up. That was well and good. But today we've got an even more potent power at it.

Yeah. And here's how a pro charger intercooled serpentine race kit that uses twin inter

coolers to produce twice the amount of horsepower than a non

intercooled system.

Now, while the principle for supercharging is all the same forcing more air into the engine,

the pro charger uses the coolers to substantially lower the intake air temps, therefore making more horsepower.

The kit also includes the plumbing. You need a larger crank pulley, a

replacement fan

and even this anti surge unit, plus you get various brackets, you'll need to relocate things like the air pump, cruise control and even the horn. Now, I know this looks like an

posing mess of parts, but

you can install it with regular hand tools you have in your shop. The most thing you'll need is time about 8 to 10 hours and a lot of that is spent in prepping the car. Our first step with the Camaro

is to return the PC M back to the factory setting.

Then after disconnecting the battery, we unplug the air temp sensor,

the air mass meter

and loosen this clamp on the throttle body.

That way

we can remove the entire air inlet assembly.

Then with the car up in the air, we need to remove the plastic radiator air dam

and vented splash panel from beneath the car

to make room for the coolers and inlet hoses. I'm going to trim the air dam on each end about an inch away from the outermost holes

and the plastic flaps to make way for the inner cooler tubes.

We don't have any bolt holes in our balance or to mount a new crank pulley. So we'll go ahead and replace it with a super damper from A T I. Now, this is actually two dampeners in one. It works especially well in high RPM. Race engines.

Well, the next steps are all about clearance. By installing this bracket, we can move the air pump and cruise control unit enough to make way for the driver's side intercooler. Now to make room on the passenger side, we remove the horn and relocate it with another supplied bracket.

We're removing the stock fans and shroud from the Camaro

and we're gonna replace them with this larger 16 inch fan and sheet metal shroud that came with our kit.

Now, this of course is to allow more room for the pro charger and the drive system.

Now, after I attach the fan to the shroud here, we can finish up the wiring

after sliding it into position,

it's held in place with his core support. It's also from the kit.

Now it's time for the heart of the system, the head unit and the main mounting bracket. Now the pro charger is basically an internally gear driven centrifugal compressor. It uses a build aluminum impeller which is controlled by the engine RPM. S which of course controls airflow and boost using the engine's back pressure.

First, we need to remove the two alternator bolts and replace them with the supplied studs.

Then the heck standoffs before torquing them to 40 ft pounds.

After removing the factory idler pulley bolt, we can install the billet main bracket to the standoffs and the idler pulley.

Now we can position the pro charger dry belt around the crank pulley

and Finally, we install the pro charger to the mounting bracket

and torque to recommended specs.

These Quinn inner coolers from our kid are actually air to air heat exchangers. The heated charged air from the pro charger enters the inlet plenum here and it's cooled thanks to ram air flowing through the core passages and this series of cooling fins before it exits here. Now, the tubing and this is just part of it is used to route the air from the charger to the inner coolers and eventually all the way up to the throttle body.

The first step is to drill hose and the radiator core support,

then install hex bolts from the kit

which serve as mounting studs for the inner coolers.

Now, we can start plumbing the system

first connecting the two inner coolers to the pro charger.

There are more than a dozen and a half elbows and couplers and hoses in the kit to route the system.

And here's a tip for you.

Most of them use hose clamps which you want to leave loose until all the tubes are installed.

This surge valve installs on the inner cooler tubing. Now, what it does is open to prevent excess charge. Now, this also prevent compressor surge and improve the idle quality.

Now, we can see how the system works. Air gets sucked into the cane and filter to the pro charger. Then the charged air gets sent out to the inner coolers and the cool air is sent straight up into the engine.

Then up here on top, that cooler air enters this air inlet Plet

where it's directed into the throttle body and gets that 8 to 10 pounds of foods depending on what size cooler you use. Well, during the break, we'll finish up the plumbing, then show you how we're going to feed more fuel to the system. Stay with us

today. We're supercharging our 98 Ls one Camaro with a Tuner Pro charger kit.

After installing the charger unit, we bolted up the two inter coolers and our incoming air filter assembly.

Then we finish plumbing the system

up to the new inlet plenum that's attached to the throttle body. Well, now we got to get more fuel to

motor to accommodate that eight pounds of boost. We're making

these stock injectors. We took out of the Camaro only push out 25 pounds of fuel per hour. That's compared to these high performance injectors from Holly, we're going to use that are rated at 42 pounds.

They use six holes in the metering or

to deliver an atomized 10 to 15 degree spray pattern.

By the way, these injectors are designed to support up to 680 horsepower

to push the fuel up to those new injectors. We ordered this high flow fuel pump from Haley that will plumb up to the fuel rail. Now, this thing flows 480 pounds per hour at 15 P si and will support up to 800 horsepower on EF I units. Now I also got this fuel filter to install upstream from the pump.

But first, in order to make it a flow through filter, I'll need to drill a hole in the center.

The reason we did that is to use this filter as an adapter for the stock line.

Then after drilling some mounting holes, we can mount the fuel pump on the frame rail.

Then we ran new A N line to an in line low pressure filter on up to the pump. Then for our high pressure side, we went from the pump to a high pressure fuel filter

then on up to the engine bay.

Well, now we need a way to adjust fuel pressure when this motors under boost. And since there's no aftermarket fuel regulator to fit the stock LS one fuel rail, we'll have to go with an external regulator like this one from Mallory. Now it's adjustable from 30 to 100 P si.

And since it's made for fuel injected motor, it comes with this bypass port for a return line

and see this little barb up here.

It's a boost vacuum compensation port. And what it does is decrease fuel pressure when the engines at idle or increases it when it's under boost. Now, after I cut this line to fit, I think we can mount it right here plenty close to the fuel rails.

Well, here it is plumbed up and just about ready to mount.

Here's what we got. Our inlet line coming from the fuel pump, this outlet line routed to the fuel rail and of course, our return line that was sent back to the fuel tank.

Well, next, we're gonna tee into this brake booster line.

This will give us a good strong vacuum source both to our purge valve and to a boost gauge.

When you're making as much boost as this, you wanna make sure you can monitor it at all times. We went ahead and got this gauge from auto meter that measures both vacuum and boost. Now, this white line goes to that vacuum tee.

The white wire goes to a switch 12 volt source and the black aground.

Since we already have an empty A pillar pod, we'll place the new boost gauge in it

and that way we'll have a constant reading from the driver's seat

while we're at it, we'll mount this fuel pressure gauge on the regulator here under the hood.

Finally, we need to tighten the blower belt using the jack bolt on the main bracket

when it feels like all the slack is out, go one more turn to make sure it's tight.

Now, we double checked all of our

bolts made sure the fuel system doesn't have any leaks and even oiled up the pro charger. Now, I can't tell you how well this whole system fit all the way from the blower on up that it did. Now it's ready to fire up. That is after we tune it and we'll show you how to handle that later.

However, we got another issue with this car that has to do with the way it transfers power.

A few months ago, we had a test and tune session at a nearby track and Mike and I both had problems banging the gears in this car under high RPM. S in fact, hitting third gear was a consistent problem.

So after the break, we'll turn our attention to the transmission, then tune the pro charger and take it back to the track. Stay with us.

Welcome back to horse power after supercharging our LS One Camaro with a Tuer kit from pro charger time. Now to put its tired stock transmission to rest,

it's got almost 100,000 hard miles on it

and it was pretty badly abused even before we started thrashing on it.

Plus with all that extra horsepower we're making, we need a solid, reliable way to shift the power to that new DTs rear end we installed recently.

Here's what's going to take its place.

It's a Rockland Standard gears T 56 6 speed built by their race division

and the main shaft here has been upgraded to THLS.

The 3rd and 4th shift forks are upgraded to steel over stock aluminum

and the 5th and 6th gear ratios have been shortened just to give us a little bit more performance. Best of all, this thing's been custom made for our particular project.

Of course, it accepts a standard GM throw out bearing which we should install right now

along with the bell housing

while we're at it. I'm gonna go ahead and replace the old clutch too.

Good thing.

I burn this one.

Well, the pressure plate didn't make it through too well, either. This thing's cooked.

I guess that's what happens when all you do is beat on the car. We're gonna replace that stuff with this new set up. We got from center force and it starts with this build aluminum CNC machine fly wheel. Now, the reason we chose this is to lighten up the reciprocating assembly a little bit to reach those higher RPM. S a lot faster.

Well, another surprise, the rear main seal is leaking.

Another factor for clutch slippage,

the disc we're using is a lightweight six Puck design. The pressure plate, it's their LMC series, which stands for light metal clutch. Since it's made of aluminum and steel,

these counter weights are designed to improve the clamping power of the clutch. It puts more pressure on the plate at

higher RPM. S

this transmission is a simple swap.

It accepts all the stock brackets.

And since it's the same length, we can use the same drive shaft by swapping out the yolk

with that handled. We can now see how much horsepower we make with that new pro charger system we installed and I can hardly wait,

but the whole system has got to be thoroughly tuned or we could risk detonation. Now for that, you got three choices. You can haul the car to a professional tuner,

have one, come to your place and do the work or with a laptop and a little know how do it yourself. And that's the way we're going.

You don't even want to start the car before this process,

although you can pressurize the fuel system to check for leaks.

Now,

once the computer is plugged into the port, what's going to happen is it'll shut off some of the sensors we don't need,

then allow us to get the proper timing curve and air fuel mix for maximum power. We're using the HP tuners program to turn off all those unnecessary sensors. Then we can raise the rev limiter and set the injector flow rate before firing this thing up and making our first run.

We're using this air fuel ratio meter inside the car. Now don't get excited. We're not going for big numbers yet. This one is to get a baseline on all the parameters

since the timing is low and we're running rich. Let's add two degrees in the upper RPM range

to refresh your memory. Our baseline on motor was 3 68

451 horsepower. 482 ft pounds of torque looks like we're running a little rich still. So we're going to lean it out in the power enrichment table.

Now, we're talking 491 horsepower. Now, we still have some tuning left to do and just like before we have enough fuel and not enough timing. So I'm gonna add one more degree and see what happens.

Wow, 541 horsepower,

you know, we're not maxed out on tuning yet, but there is a chance you can go too far and I already hurt this motor once and I'm not going to do it again.

Now, this tune is very impressive and it's set up for perfect drivability on the street.

If you remember when we put the nitrous on this car, it made an extra 80 horsepower. But with the pro charger, another 175 not bad for a day's worth of work,

man. I'm stoked over those horsepower and torque numbers and just think 541 horsepower at the rear wheels equals over 600 on an engine.

Dyno. That's some pretty hot stuff.

And we got some hot horsepower news for you coming up right after the break. Stay with us.

They were back after getting 541 horse power out of our supercharged LS one. That is, hey, wouldn't it be great to take this bad boy to the track and lay down some numbers. Well, we're afraid without a four link, some tubs and slicks we probably just lay down a bunch of tire smoke. Anyway. It's time to kiss this project. Goodbye and make way for some cool ones we got waiting in the wings.

In fact, next week we kick off a Pontiac project that represents the best of new horsepower technology and classic old muscle car looks.

We're even going to break new ground for us with the first TV build up of one of the hottest race cars and get this round track competition.

Plus we'll get real with a low buck build up on a more popular late model street machine

that'll make you and your pocketbook. Proud

horsepower TV S hot parts. A look at the latest performance innovations from the automotive aftermarket.

Today's show is all about sending cool forced air to a motor to make power. But don't forget the importance of cool fuel. These new heat sinks from BG fuels will transfer heat from your fuel for better atomization and combustion.

They work in high performance engines, both

BARB

RD and fuel injected with two sizes and they come in 8 a.m. or 10 a.m. fittings.

The price might fit your budget starting at $100

today. Our power adder of choice was supercharging, but there's nothing like nitrous for serious horsepower on demand.

Now, here's a compliment to your Nitrous kit from Edelbrock that'll help support your bottle in style.

It's a quick release bottle bracket made from lightweight aluminum weighing in at only two pounds. Now, it's powder coated for a high tech finish and it supports the bottle at its strongest point around the neck. It comes with this thumb screw to allow for quick bottle changes. And just how much change will it take to pick one of these up? About 240 bucks? You know, I never thought I'd see a motor mount. You could call pretty but check out these new bullet mounts from

propane for the new mustang.

Now, they're made from lightweight billet, aluminum and the new polyurethane compound. They've got them for the V8 and V6 and they weigh four pounds less than the originals. Which is a good thing. Now, a set of these is gonna set you back about $200. Well, that's it for horsepower. You know, I'm gonna miss banging the gears and burning the rubber in that old Camaro. Yeah. I don't think it's gonna miss you though. Next week we'll get to work on our newest project car and you don't wanna miss see that.
Show Full Transcript