MuscleCar Builds

Parts Used In This Episode

Anest-Iwata Usa Inc.
LPH-80, Miniature, center post gravity feed spray gun is a full-featured HVLP gun with spray characteristics similar to Iwata's popular RG-3 gun.
Coker Tire
DOT Approved Firestone Dragster tires 10.00-15.
Coker Tire
PRO-TRAC Front Runner tire 215/75-15.
Currie Enterprises
9-PLUS heavy duty round back housing,spring pads, 4.30 gears and Detroit Locker in a Nodular Sportsman case and 1350 yoke, axles and drum brakes.
Gold Eagle Co.
STA-BIL fuel stabilizer.
Halibrand Engineering Inc.
15x10 Halibrand Sprint cast polished aluminum wheels, 15x4.5 Halibrand Sprint cast polished aluminum wheels.
Pete and Jakes
Basic Super Bell front brake kit 5x4.5 bolt pattern.
Pete and Jakes
Super Bell front axle with early Ford spindles, Super Bell steering arms, Tie rod kit, spindle nuts and washers.
Powder-X
Powder coating booth and curing oven.
The Eastwood Company
Lead free body solder kit includes 1 Flat paddle, 1 Half round paddle, 1 File holder, 1 Flat body file, 1 lb of Eastwood paddle lube, 1 lb Eastwood flux for Lead Free Body Solder, 1 Reusable fiberglass acid brush, 2 lbs. of Lead Free solder and Instructional DVD.
YearOne
Complete and detailed stencil and striping kit complete with referencing pictures from original unrestored cars.
Video Transcript

Today on muscle car, learn how to work with lead free solder altered ego, gets it straight axle. The trans AM gets some stripes and take a ride in Ford's 1969 NASCAR winner, the Talladega.

Hey guys, welcome to the shop. Today we're working on the 69 tribute trains and we got all the panels sounded out. We're just about ready to lay down a fresh coat of white onto the body. Now you'd think the next step would be to mount all the tin back on it. But you know, life ain't that easy cars get built from the inside out and that means that we need to finish the firewall and the inter fender walls before we can put this thing back together.

You guys remember when we went through all the hassles to safely remove the lead from red sled. Well, this time I'm putting it back in, I'm gonna be blending this mount into the Firebirds wheel wells, but I'm not gonna be using real lead. I'm gonna be using lead free solder from Eastwood. It basically does the same thing without all the safety issues.

The first step is to apply the flux and solder to a clean surface.

It gets heated with a propane torch until it turns silver.

Then with a clean rag, wipe it down until all the residue is gone.

And next, it's onto the solder, heating the metal and the rod at the same time,

one of the first things you'll notice working with a lead free solder compared to the 3070 lead is it takes more heat to get it malleable.

There's a very narrow temperature range to work in. So keep your torch handy and work fast.

A wood paddle is used to shape the solder as you work, it's coated with bees wax to prevent the sticking.

So why use this method instead of metal filler? Well, it holds up better in high stress areas like seams without cracking and you can powder coat or chrome over it. Unlike metal filler,

unlike lead, this can be finished out with sandpaper

wheels, put up with a lot of abuse and this car is going to see some serious road miles that Brent's powder coating them for durability.

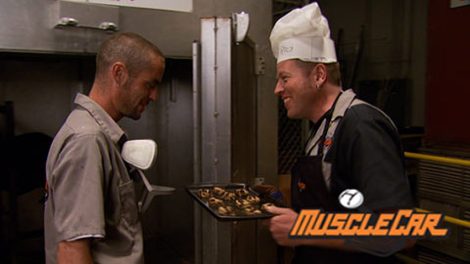
Once they're completely coated, they'll need to go into the 400 degree oven to bake. It's pretty much like a large version of the oven you have at home, which gave me a delicious idea.

Hey, Brent. Hold up, dude.

We gonna make some biscuits. I ain't making no biscuits. We're making cookies.

Ok?

Powder coating but doesn't release any toxins. So it will be safe to eat.

Now, we just have to wait,

man. Something smells good in there. Yeah. Smells like

cookies.

Oh, man.

The burning.

Damn it.

I'm

all right.

The cookies might be a little burnt but the wheel wells are just right.

I have one of those burnt cookies.

Hell, yeah. Tell me to get my snack on.

I,

I don't want cookies anyway.

Well, I never did get my snack time. That's all right. I went ahead and scuffed up the firewall and got it ready for some paint. So now all I have to do is finish masking it up and lay down some black.

We considered pulling the drive train back out to paint the firewall, but there's really no need to if we mask it up nice and tight.

I'm using my favorite mini gun for this job. The

ANAs

Iwata

LP H 80. The spray pattern is very adjustable from less than an inch all the way to six inches or more.

Its compact size makes it perfect for getting into tired areas where a larger gun just wouldn't work

after letting it dry for 45 minutes. It's back outside for reconstruction.

I could paint it in pieces. But since the body lines are so tight, we decided to play it safe and assemble it so we can set the final gaps before the paint goes on.

This way. We don't have to worry about chipping edges or rubbing the fresh paint during final assembly

the freshly powder coated wheel wells have cooled off and are ready to be installed and yeah, they still smell a little like cookies.

We marked all the shims during this assembly and that's saving us a lot of time and trouble. Now,

one side down and looking good, one side to go.

Even with all the shims marked from the first assembly, some small adjustments are sometimes still in order.

Nope.

Put that one fat washer back in there.

There we go.

Hold it right there.

Yeah, that'll work

well, time to mask off this bird one last time, but stick around because after the break, I'll be transforming this drab gray hunk of metal into a gleaming white bird of prey

up next, Rick spend some quality time in the paint booth

and Brent assembles, altered egos axles.

Hey, we're back. I got the Trans Am all masked up. Hit it with a scotch bright and some pre cleaner gave it a final rub end with a T rag and now we're ready for some sealer.

I spent the better part of a day just masking this car for final paint.

At this point. You need to be very careful about leaving paint edges and where the overspray is going to go. I also gave it a quick final scuff with a gold scotch bright and rubbed it down with wax and grease remover and attack rag before anything gets loaded in the gun.

The sealer has to air dry for at least an hour before the base coat goes on.

The rule of thumb with base coat is to use as many coats as needed to get it covered. Then put on one more. Since we used a white sealer, I only need three coats for this job.

I'm clearing it with PPGS 2002 clear. We still have to add the blue stripes, but I'll get to those later for now. I'm just sealing everything up

while I've been sucking isocyanates. Brent's back at the comet mocking up the rear end. We need to get the springs ordered. But first things first, the axles need to be underneath it so we can set the right height and make our measurements. We decided on a curry nine inch with 430 gears, a Detroit locker and 31 Spline axles and a lightweight car like the comet. This will be more than enough.

Now for a rarity in our shop, drum brakes. Why

this four wheel disc brakes on an A FX car? Man? That'd be as out of place as a none at the bunny ranch. Remember we want to keep the old school vibe with this one and the drums. Well, they're part of it.

The front axles need to be converted to a disc brake set up. So Brent starts by pressing the Baron adapters onto the spindles, wait disc brakes. Yeah, we want to go old school, but we also have to drive the thing and we're not crazy.

The spindles are mounted onto our super bell straight front axle with a kingpin to hold it all together.

Next come the caliper mounting brackets and steering arms,

the centrelink ties the east and west ends together

since this whole axle will be coming apart later, for ceramic plating, the bearings can go in dry for now.

Nothing fancy here. Just basic GM style calipers will do the trick.

Now for the fun part, seeing if all our measurements come together. If the tires bolt on and fit in the wheel wells, we know we got it right.

The Hali brand wheels and Firestone dragsters from Coker tire are straight out of the sixties and they fit like a dream. So it's on to the front.

Hey, Brent, you got any sandpaper over here? Sure do, man.

I tell you what, I'll give you a sheet of sandpaper. If you gotta help me get this thing up under here. All right. Even though it's

not much of an axle, I guess it'll, it'll work well, it's a little bit different.

Let's see what we can do, man.

All right.

Hey, man, we gotta get these boxes for uh where's our grip, Mike here.

Hey, Mike. Hey, you put these boxes up under here, mate.

All right, man. Appreciate it, dude. You send papers over there but you only get one sheet.

All right, that'll work. Thanks, man.

The only thing Brent needs to do here is get the ax

in position. So we know the length and arc when we order our springs.

Well, Brent's been wrestling the axles underneath the comet. I've been having just as much fun what's in, in the clear that I laid down on the trans.

Am

I stick around? Because in a bit we're gonna be laying out the stripes and I'll show you a cute we got, that'll make it a whole lot easier

after the break. A Ford designed to take the checkered flag.

Today's flashback, a 1969 Ford Talladega,

hang

on to your couch cushions. Today we're going on a wild ride with Richard Fleer

and his 1969 Ford Talladega

the 1969 NASCAR season. It only had one winner and his name was David Pearson. This was his weapon of choice

along with his NASCAR championship Pearson and his Talladega with the first, they hit 100 90 mile an hour at Daytona.

These cars were designed exclusively to win NASCAR races and Ford only made 743 of them

just enough to go racing

and that gave him the ability to go kick some butt on NASCAR tracks.

Richard picked this car up in 08 and he and his wife, Katrina had been looking for one since they got married after we got married. We started hunting for, uh Talladega. It

turns out that this was the very first production Talladega built on the assembly line.

And when I found that out, I knew I

to have

the

car

for pushing 40. This car is in great shape. The previous owner did a seven year frame off restoration once he realized he had the first one off the assembly line.

And this Ford only has a little over 38,000 original miles on the

under the hood. A massive 735 CFM four barrel Haley feeds a hungry 428 Co

Jet and it sends a modestly rated 335 horsepower through the C six automatic transmission before it hits those 14 inch wheels.

That's all part of the fun of owning a car from the sixties or the fifties. You feel the road, you feel the suspension,

you know, you're driving a car,

but it took more than a big engine to make these cars that started life as Torino Cobra as NASCAR season champs. This is the end of the Torino Cobra that changes it into a Talladega,

the oil cooler in front of the radiator power steering cooler next to the pump and of course, all the beautiful air, all the damage changes.

The front grill is left over from the Torino design, but the body work up front was extended and sloped in for better air flow.

The front bumper, it's actually the rear bumper cut,

re welded and brought in tight to make an air dams.

They even took the turn signals off of the fenders and put them behind the grill. Now, all that engineering for the track adds up to one nice ride on the street.

The car drives extremely smooth straight.

It rides great

aerodynamic couple with big Ford power is what made these cars, NASCAR legends and with less than 100 still known to exist. Well, keep your eyes open. This may be the only time you'll ever see one, even if they are huge

with 100 and 16 inches of wheelbase overall length of over 17 ft and weighing in at just shy of two tons. It's no wonder Ford needed all the help they could to get these beasts around the track.

Not a whole lot of flash and flare. These cars were made to

the T on the door and the T out back are the only outward badging that indicates this is a Talladega.

The interior will it just gets the job done? No factory options here, bench seats, front and rear AM radio

and the only spot where the word Talladega is actually written is on the inside of the door

compared to their rival Mo Parts. These cars may seem a little plain Jane on the outside, but under that stark exterior lifts the heart of a true muscle car

laying down stripes. Got you running in circles. We'll show you how to stay on the straight and narrow after the break.

We've been hard at work in our year. One trans Am today, soldering and powder coating the wheel wells, painting the firewall, hanging the body panels and laying on the base coat.

Next up is stripes. The 69 trans Ams were all white and blue. Just like this original beauty you saw on the show a few weeks ago,

we're using the same design, but with a modern twist with the newer paint technology, we can put the stripes under the clear, which will give us a completely smooth surface. Now, the original design may have been pretty basic but to accurately recreate them. Year one has taken the guess work out of the equation.

They've taken the basic tape stripe kit to the next level. This kit not only shows you where to lay the stripes, it also includes pictures of an original Trans AM along with every measurement you'll need to make the stripes appear factory original. Now, I've used a lot of tape stripe kits, but I've never seen one with the attention to detail that this one has.

So how does year one make them so accurate for every kit they've actually brought in an original unrestored car? So

I know it'll be just like the factory pattern. The first step is following the detailed instructions to make my marks using a grease pencil. Now, even though this is a complete kit, doesn't mean you can turn your brain off. Gotta keep in mind this mask has a quarter of an inch of play on the edge before you get to your eight inch stripe in the center. So always double check what you're doing before you lay down any pain.

I wet sanded the whole car with 800 grit before I started this process. If you go too coarse, you might get a hazy finish too fine and it might peel

once the stripes are laid out and the backing peeled off, it's time to mask it up.

The edges come first. And since the whole tail pan will be the same blue as the stripes,

this area has got to be carefully taped off as well.

Now we can put plastic on it.

Yeah, that's right. The whole car has got to be masked off again. I'll show you in a few minutes why time spent masking now is so important.

The areas I'm painting, get a swipe of wax and grease remover to ensure nothing will contaminate the paint

with everything masked up. It's finally time for some color three coats will make these stripes pop.

I'm using my LP H 80 mini gun again. It has a smaller tip and won't cause build up which means less of an edge and smoother stripes

for those of you guys that were wondering why on earth I masked up the entire car just for doing two little stripes while I was using a mini gun.

This is why

in a brand new state of the art spray booth still get blue overspray clear up here in the nose. That's why you put the time in the masking.

Once it's dry, I can carefully unmask it.

You wanna pull the tape back against itself instead of straight up to get a cleaner edge.

You ready? You ready? You ready for it? You ready for it? Aired it, uh, look at that, uh, stripes

before the clear goes on. I'll wipe it down with water. Then DX 330 on a gold scotch bright and finally a clean cloth.

The final coat of clear is called a flow coat and it will smooth out the tape lines, sealing in the stripes and giving the Trans Am a seamless finish.

But we got it all unmasked and this thing's really starting to look like a Trans Am. Now the next time you see it, we'll have the stripes on the hood and the rear spoiler and we'll have the mirrors, the front bumper and the cow painted. Plus we want to keep rolling on Altered Eagle and the 61 Impala. But for now, we're out of time. So until next time we're out of here.
Show Full Transcript