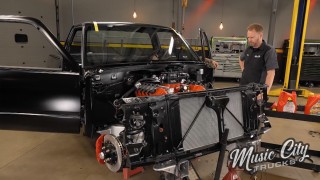
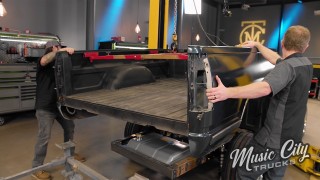
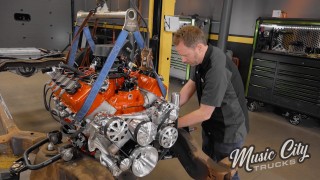
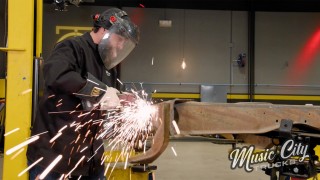
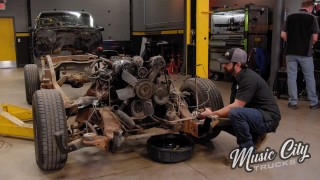
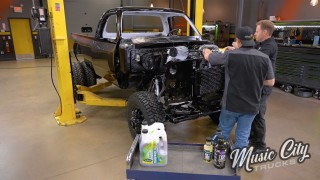
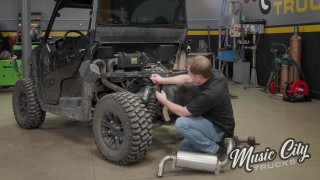
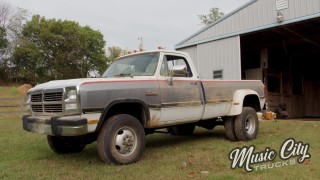
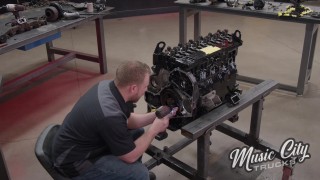
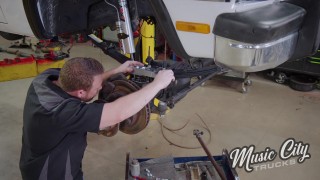
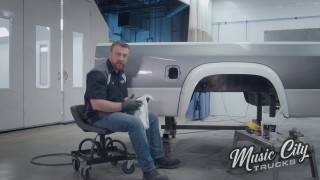
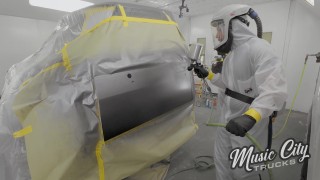
Music City Trucks Featured Projects

Music City Trucks Builds

Parts Used In This Episode

ATS Diesel Performance, Inc.
Flexplate
Custom Offsets
Ultra Scorpion Dually 022 Wheels

Video Transcript

[ Eric ] You're watching Powernation!

[ Eric ] Today on Music City Trucks we tighten our belts and give Project Nightshift a much needed boost towards the finish line. [ Joel ] And it's not just all about performance. We're slapping on some good looks to complete the ensemble of one big bad dually today on Music City Trucks. [ Music ] Nothing cooler than an old pickup am I right? [ Music ] [ Eric ] Underneath all this dirt there's probably a pretty good truck. [ Music ] One of the last major components we've got to put on this frame before the body goes back on is that big fancy transmission over there from ATS, but we're still waiting on our crossmember to come in the mail. So we're gonna address one of the last remaining things on the engine that we've still got to do before we can call it done, and that is the serpentine system. Most of the time when you install an aftermarket serpentine drive system it's generally to replace the original V-belt drive that was on your engine. One of the benefits of an aftermarket serpentine system if you already have one? That's where this comes in. I've got our scale setup here on the cart and we're gonna go through and weigh every bit of the new belt drive components and the old belt drive components. Weight is a huge thing no matter what you're doing. Whether it's off roading, race cars, hiking, weight adds up. There's an old saying that I heard a lot while I was in the Marine Corps that really stuck with me. It was about hiking but I feel like it applies to this too. That is that ounces equal pounds and pounds equal pain. I don't think this truck can really feel but we can definitely save it a little bit of struggle by cutting down on the weight. Start off with our fancy new a/c compressor. 10.45 pounds there. Now bracket, 3.5 pounds. That's actually really light. Alternator, 12.30. We're gonna do a lot of these small parts at the same time because I don't feel like picking stuff up and dropping it back down all day long. We're looking at 3.7 pounds for these pulley covers, the hub adapter for the crankshaft, and our lower water neck for our lower radiator hose. Moving on we've got the rest of our hardware, belt tensioner and cover. The last of our parts for the aftermarket system, 8.25 pounds for all that. We've just finished weighing all of our old parts and after doing some math to compare that to our new parts we found out we've got a weight savings of about 20 pounds, but that's not the only advantage to one of these new systems. I'm gonna tell you about the rest of it while I get this stuff installed starting with our water pump that I've already got the seal r-t-v'd and ready to go. We're gonna take the water pump and set it on the impeller because that sits it high enough that we're not gonna have to worry about that seal or the r-t-v getting anything in it or on it. This water pump actually has one bolt hole that sticks out a lot further than the other one. So we want to make sure that our bracket sits right on top of the water pump before we bolt it down. Now you are gonna get a little bit of resistance with this install because rather than a gasket this water pump uses a rubber seal, which means that it needs to be compressed unlike a gasket which just kinda sits there. You actually have a little bit of a gap you have to close up with a rubber seal. Get our alternator installed. Aside from weight savings some other benefits of this serpentine system include better belt drive efficiency, upgraded components like this 300 amp alternator that replaces the 120 amp that came from the factory, and we're ditching the mechanical fan for an electrical fan to give us more efficient cooling. These guys don't joke about clearance. That is close. Not to mention this serpentine system is gonna look great when we pop the hood on this dually. [ Joel ] Well we're still chipping away at the to-do list on Project Nightshift, and the next thing we're gonna tackle is getting that big, heavy Allison transmission on the back of this Cummins. Now we mentioned before that you are gonna need a few components out of a second gen Cummins in or to make this conversion work. One of those is gonna be a rear crossmember. The second your starter, and third your engine to transmission adapter plate. Now first gen and second gen adapter plates are almost identical except for a second gen is about an inch wider in thickness and the starter is clocked in a different position. Other than that these things bolt right up to the back of that block. It's good to add a little bit of thread locker to these bolts just so they don't start backing out. [ Music ] Keep in mind this is an aluminum case. So you don't want to crank down on these bolts too much. Otherwise you will crack it. [ Music ] Beautimus! The next thing we're gonna install is this really sharp looking flex plate that we got from the guys at ATS Diesel, and this thing is included in our conversion kit. Torque spec on these is 105 pound feet. [ Music ] [ torque wrench clicking ] [ Joel ] Sweet, get that transmission on. [ Eric ] It's not too bad with the help of the crane. [ Music ] [ Joel ] Here we go. [ Eric ] Oh man, that's a little heavier now. How's that dowel pin looking? [ Music ] Damn it! [ ratchet clicking ] [ Joel ] Go ahead and let her down. That wasn't so bad. You got it from here? [ Eric ] I think so. Just a little bit of fabrication on that crossmember. Shouldn't be all that hard. [ Joel ] Holler if you need me. [ Eric ] Coming up, sparks start flying and things heat up as we deep dive into some welding tech.

[ Eric ] Welding is more than just fusing metal. It combines precision, skill, and creativity. It's a dance of sparks and heat that transforms raw materials into something with form and function. Whether it's a pickup that hauls your family or a trailer hitch that connects you to your passion welders are the unsung heroes of our industry. It can seem like a lot of work sometimes but it's an invaluable skill that takes time and patience and it'll reap infinite rewards if you invest in yourself and take the time to learn how to do it. Seems to be. Modifying this Gen-2 crossmember to fit our frame took a lot of time and effort but doing it the right way and making sure it's safe and sturdy is always in your best interest when making any kind of modifications on something as important as your frame. Thank you! Sharpie cam! I've got everything bolted together and sitting just about where it's gonna stay. So one of the last steps we've got here is to get our plates welded onto this frame. We're welding right near the fuel tank. So I've got a welding blanket over there to cover that up for safety, but welding near fuel tanks isn't the only potentially nerve racking thing when it comes to doing framework. For a lot of guys the welding itself is a big challenge. So we got a hold of our friends over at Forney and had them come over to give us some tips and tricks to use their equipment for welding on frames. One of the more popular subjects in the truck community in recent years has been shortening long beds into short beds. It's primarily been done with square body Chevys but this is not a square body Chevy frame. This is actually a 2011 F-350 frame we've had sitting around the shop for that last few years. Obviously the idea of cutting a frame and having to weld it back together is probably a little bit scary. So we're gonna try to take the fear out of frame welding and show you guys at home how you can safely shorten your frame. Before we start actually marking and cutting things you've got to make sure that the frame is level front to back and side to side. Front to back we are perfect. So we want to make sure we avoid this kick-up right here so we don't have to worry about any weird angles or anything getting thrown off. We're gonna be using our square to make sure we get a nice, straight line right across the frame. I'll just run these lines the rest of the way down our frame. Then of course we will be double checking our measurements before making any cuts. I want to explain why we're not utilizing a Z-cut as opposed to the way we're actually doing it. With a Z-cut you cut your frame in a different orientation so that the two halves puzzle piece together. But in an effort to save time we're gonna be fully removing our front spring hangers, getting them out of the way, cutting the frame in half, getting these two pieces stuck back together, and then we'll fit the spring hanger back on. Now we're almost ready to get this hanger off of here but there's one more thing we need to address before we can remove it. We can either trim this crossmember from our cuts here or we can punch the rivet out, which is what I'm gonna be doing, and that'll give us at least an idea of where this hanger needs to go back on once we stitch the frame back together. [ hammer banging ] [ saw buzzing ] [ Eric ] Just got one more side to do and then we can get this thing pushed back together. Now that we've got our frame cut it's time to get it welded back together but before we do that this metal is a lot thicker than what we usually work with and we want to make sure we're getting good penetration with the welder. So we brought Gabby back in from Forney. She's gonna help us get our welder dialed in. [ Gabby ] The reason that we have this over here to practice on is so that we can make sure that this is done safe. So we're going to play around with our heat a little bit. Make sure that we get good penetration and good tie-in on our welds before we get going and transition into the frame to weld it back together. We'll play with some scrap first. What I'm gonna do first is I'm just going to pick a good setting. So we'll start at 37.7 and our wire feed speed will start around 400. Realistically that's not a bad setting. We got good tie-in here. We do have a large gap in our cut here. So we will have to build that up a little bit, but you can kinda work past that and slowly build in your welds so that you can reduce the heat so you're just warping. We have a lot of weight on this frame. So hopefully we don't get a lot of movement, but it's always possible for something to distort because of heat. Let's go ahead and do another weld here and just make sure you've still got a good setting. [ welder crackling ] [ Eric ] You can already see a little bit on the top side. [ Gabby ] Also I took my time a little bit more and I really focused on our cut. So that way I can kinda shove that wire back down into that groove and hopefully it'll give us a little bit more penetration as well. The way that it sits now I think will be fine as long as we go through and reinforce this weld before we start driving with something on it. [ Eric ] I guess it's time we stick that frame back together, huh? [ Gabby ] Alright, let's do it. [ welder crackling ] [ Eric ] That's not too bad. Gabby what do you think? I think we're off to a pretty good start. [ Gabby ] Yeah, it doesn't look bad. Looks like you've got good tie-in. You're still gonna add a brace though right so that way once we unclamp this? [ Gabby ] I think go ahead and finish this out. [ Eric ] I know you've got a busy day. You've still got some stuff you've gotta do with the guys down the hall. I'll let you go and keep plugging away at this. [ Gabby ] Well good luck! [ Joel ] Up next, we wrap our new cab and turbo in a nice blanket to help keep things cool.

[ Joel ] Well guys Project Nightshift is about to reach another milestone moment. We've got the transmission on, crossmembers done. We're ready to drop that body back on. Eric hit it! [ Eric ] A little anti-climactic. How you looking up there? [ Joel ] Go ahead and stop right there. The whole thing needs to go back. [ Music ] Let's try that. [ Eric ] I think we're still gonna have to come to the driver's side just a little. [ Joel ] Happy medium. From what I can tell right now just barely gonna clear. [ Music ] That might have got it. [ Eric ] Back just a little. [ Music ] [ Joel ] There we go! I got it started. I think it's lined up. Just might have to have you come down a little more. [ Eric ] Just a little more. [ drill humming ] [ Music ] [ Joel ] There she is big guy. Give her the old stamp of approval. [ Eric ] Looks to me like we've got a cab again. [ Joel ] Ain't going nowhere. Let's take a step back. I think we got about. We've probably got a good two inches of clearance on the transmission. So we're good there. [ Eric ] One less thing we've got to modify. [ Joel ] Air five! Now that we got the cab back on the chassis and everything on the outside's looking pretty spiffy we're gonna go ahead and focus our attention towards cleaning up the inside. As far as rust goes we actually got pretty lucky on this old truck. There's a few spots of surface rust that I'm just gonna buzz down with the d/a. I'll rust treat those and then we'll move on to some sound deadening. 80 grit sandpaper is going to be your ideal abrasive here. You want to be able to cut through the rust just enough to get down to the bare metal until it's smooth and shiny instead of brown. [ sander buzzing ] [ Joel ] There are several different companies out there that offer their own solution for rust converter. No matter which one you buy you want to make sure it contains something call tannic acid. What that is it basically converts your red oxide rust into a blackish blueish ferric tanite. What that's gonna do is completely seal out all the oxidation and convert it into a gel like substance and keep it from rusting down the road. [ Music ] By far one of the most underrated upgrades you can make to your project car or truck is adding sound and heat insulation. Just standing on the inside of this cab it's like I'm standing inside an oil drum and take a listen to this. That sound completely reverberates throughout this whole thing, but after we get done installing this Cool-It Supersonic acoustic that we got from the guys at Thermo-Tec you're gonna notice a significant difference. A little bit of forward planning is crucial here. You want this stuff to seal in nice and tight into every canyon and crevice of your cab. Be sure to press down firmly to eliminate any air pockets to create a nice, tight seal. That should do for our shape. I'll go ahead and peel this backing off and get her stuck down. You're gonna want to be sure to cut out spaces for anything like your floor shifter or mounting holes for your seats. You're definitely gonna want to keep that blade or box cutter handy to trim off any excess backing or material. [ Music ] This is kinda like a vinyl top or a headliner. You want to start in the middle, spread everything out nice and tight, and work your way to the edges. [ Music ] Just get into these little nooks and crannies and tighten it up. Don't forget to do the back side of the cab. You can even do the inside of your door skins if you're feeling froggy. Looks like everything is firmly in place. Let's go ahead and do our sound test. Oh yeah, as you can hear that is a significant improvement. At the end of the day this stuff is also gonna help cut down on heat because black trucks in the summertime, not that fun. [ Eric ] Coming up, we slap the bed on our dually and give this Dodge a new pair of shoes.

[ Joel ] Another thing we got from the guys at Thermo-Tec is this turbo sock. How this little guy works I it sits right on top of the housing. What it does is it keeps any unwanted heat transfer from your engine bay from getting into your air intake system. The turbo itself is a Borg Werner T-3 that we got from Summit Racing. It's got a turbine wheel size of 74mm and a compressor wheel of 54mm. About a 50 percent increase from the one we got from the factory. While I slap this thing on here I've got a little tech tip for you guys. That would be choosing the right turbo for your application. Now from the factory this truck had about 150, 160 horsepower, but between that P-pump swap, different cam, bigger injectors we might be hovering around that 300 horsepower range now. Since we had about a 50 percent increase in power that enables us to do 50 percent increase on our turbo. What are the repercussions of using too big of a turbo? What'll happen is it's gonna take you forever to build boost. By the time you finally do build enough boost the other dude's already gonna be at the finish line. So at the end of the day it's good to look at both ends of the spectrum and find your happy medium. If you can find that perfect turbo for the amount of power that you're putting out on your engine and there's not gonna be a whole lot of dudes on the dragstrip that can keep up with you. One last thing. When you do go to buy your turbo use a reputable company. Don't just go off of one of those auction sites that just sells the cheapest ones they can make because it can cause even more catastrophic failure to your engine, the turbo, or yourself. [ Eric ] One of the biggest dangers that your engine can face is actually one of the smallest. Particles of dirt, rust, even water can get in your fuel system and cause all kinds of issues. That's why we called up the guys over at Blessed Performance and got this FAST signature series titanium fuel pump and filter system. The first step of this install is gonna be to get this extra vent put in on our filler neck. Take this vent and I'm gonna get it as close as possible to our inner filler neck. Then I'm gonna make a mark where I've got to cut it. If you're using this type of a cutter and you have to roll your hose into it just make sure your blade's lined up. That way when it does start to cut you're not off your mark. Of course don't forget your hose clamps. We're just gonna get them snugged up and then tighten them the rest of the way by hand. [ Music ]

It looks like this is sitting pretty close to where it needs to be but I do need to shorten up this factory vent line a little bit. So I'm gonna go ahead and get that done. [ Joel ] With our bed secured back into place, our truck up in the air, I'm ready to install this fuel pump the rest of the way. First step in that process is to slide this mounting plate up into this bed rail here.

[ drill humming ]

[ Joel ] Now this kit also comes with two different styles of filters. One is an air and water separator and one is a particulate filter for all your solids. This is also another reason why you have to have a much higher gradable pump, because you're got to be able to pull all that fuel through both of these filters. You may note on this bottom one is has an O-ring. So just make sure you put that in before you put that filter on. Got both filters on. So now we've just got to tie into our pigtail that'll run all the way up to the battery, which we don't have a battery yet but we do have to install some of these fuel lines, both our supply and our return line. Those have got to run to the P-pump. All that's just gonna have to wait for another time. Obviously we couldn't do all this cool paint work without also adding a set of tricked out wheels. So I called the guys at Custom Offsets and they sent us this set of Ultra Motorsports Scorpion 0-22 duallies along with a nice set of brand new off road tires measuring in that 35 to 10 and a half range. Let's get these things on here. [ drill humming ] [ Joel ] Beautimus! [ Music ] Eric and I have put a ton of work into this truck. That custom paint alone was enough to break the average builder but we're finally getting close to achieving that look we set out for when we started this project. Cab's on, bed's on, new custom tires and wheels, new turbo, transmission's in. This thing's finally starting to look like a truck again. Before you know it we're gonna have to start sleeping during the day so we can punch that clock in for our night shift.
Show Full Transcript