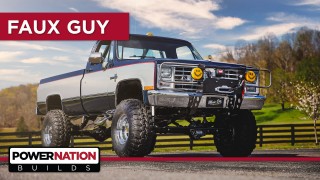
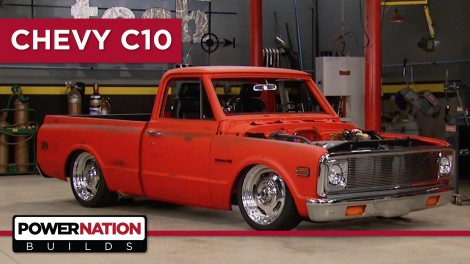
Video Transcript

(Jimmy)>> You're watching Powernation!

[ engine revving ] [ Music ]

(Katie)>> Welcome to Powernation Builds. When it comes to pickup transformations we're going from mild to wild. It's all that stuff that you bowtie fans are gonna love. Here's Truck Tech!

(LT)>> We're kicking off a new project today here at Truck Tech, this 1971 Chevy C-10, and we're about to get crazy with it.

(Jeremy)>> Under the hood is a carbureted 350 that actually runs pretty well. The previous owner added a few nice parts like an aluminum intake, a pair of valve covers, and a pretty nice set of headers. Well, we're going to be replacing it with the latest engine technology available to date, this direct injected six point two liter push rod v-eight, also known as the LT-1.

(LT)>> And we got ours from Pace Performance. The LT-1 is essentially the same exact engine you'll find under the hood of the C-7 Corvette. Rated at 460 horsepower and 465-pound feet of torque, our C-10 is gonna get down the road in a hurry, and the best part about direction is the fuel mileage.

(Jeremy)>> And this engine is so new it may be the first time you see one go in an old project like we have here.

(LT)>> Well let's get this truck torn down.

(Jeremy)>> I'll grab some tools. We'll begin up front with the hood. A few bolts on each side and we can lift it away.

(LT)>> Next up is the grill.

(Jeremy)>> The bumper is in the way of the fenders, so it's removed next. The fenders lift away and can be added to our growing pile of parts.

(LT)>> The inner fenders are about to go after fighting with more rusty hardware.

(Jeremy)>> With the front clip more or less disassembled, we can turn our attention to the rear and pull out this plastic bed liner. It's actually pretty solid.

(LT)>> You know when I saw that bed floor I was worried. There's been a few patches here and there.

(Jeremy)>> They've patched this brace, but it's not bad.

(LT)>> We can work with it. An overhead crane makes quick work of removing the bed. After the frame is rolled out we can get a good look at the underside and frame mounts.

(Jeremy)>> Little bit of rust in the door corners, little bit behind the cab, but other than that it's a really solid truck to be as old as it is. I'm gonna go ahead and get all of the suspension off the truck, cut off anything we won't need anymore, and start prepping the frame for paint. To make removal easier we cut the coil springs and dropped the trailing arms. [ Music ] Using a variety of power wire brushes and sanders we cleaned up this 1971 frame to prepare it for paint. We ran into rust, grease, and grime, but a few hours later the frame is looking so much better. So, for the frame it's getting a rattle can treatment.

(LT)>> First we'll degrease the entire surface, removing any debris, dust, or metal particles from our wire brushing. A couple of coats will really transform the look of our classic frame and it's gonna be quite a durable finish. [ drill buzzing ]

(LT)>> Next the trailing arms can attach.

(Jeremy)>> With the other arm installed and the air bags pre-assembled, they can be attached first to the control arm, and then to the frame of the truck. The stock rear axle has been painted and goes back into place.

(LT)>> We haven't cracked the cover just yet, but we are gonna come back and add a posi and some brakes later on. Right now though lowering blocks can go between the axle and the trailing arm, followed by the u-bolts and the supplied lower shock mount that sandwiches in between the bolts. With the front spring mount clamped into place, four three-eighths inch holes are drilled. Then we can assemble the air springs and bolt it up for good. Next the lower control arms attach with factory hardware. Then the upper control arms mount in their original locations. The spindle attaches first at the upper ball joint and the lower control arm swings up to meet it. We'll get the truck on the ground and temporarily install our air system by making connections at the tank and all four corners of the bags. [ compressed air hissing ]

(Jeremy)>> That's cool!

(LT)>> A lot of work, it's cool though.

(Katie)>> Coming up, it's out with the old and in with the new for our '71 C-10.

(Jeremy)>> This is the LT-1 from Pace Performance. It's the most technically advanced small block v-eight that Chevrolet has ever designed.

(LT)>> The Gen-5 LT-1 uses a trio of technologies that delivers high performance with greater fuel efficiency.

(Jeremy)>> What does this translate to? 460 horsepower out of six point two liters, and in the new Corvette Stingray zero to 60 in three point seven seconds with a top speed of 186 miles per hour.

(LT)>> We're gonna go ahead and mate up our LT-1 to this state of the art T-56 six speed manual transmission we picked up from American Powertrain, but before we do that there's a few plumbing issues we have to finish up back at the chassis involving the fuel system and some brake lines.

(Jeremy)>> With the frame rails complete, we can temporarily slide the tank up into place. With the tank held down, I can go back and mark all the holes, and then drill the six holes away from the C-10 frame. Doing it this way ensures perfect alignment without guessing. Now we can mount the tank in between the frame rails for good.

(LT)>> Brothers Truck Parts supplied pre-bent and pre-flared lines for the project, and it's a good idea to install them now because some of them run underneath our soon to be mounted drivetrain. [ drill humming ]

(LT)>> There are many different ways to get the power from the back of your engine to the ground, and we knew early on we wanted a manual transmission in our classic C-10 for that classic muscle car feel. I mean you guys know what I'm talking about.

(Jeremy)>> The dowel pin's just not sliding in the hole. It's right there, it's just not.

(LT)>> This is obviously an important step. So, take your time. [ ratchet clicking ]

(LT)>> Once the transmission mount is in place, we can now lower the whole thing into the frame. [ Music ] Well Jeremy, is it gonna fit, what do you say?

(Jeremy)>> I think we may get lucky here LT.

(LT)>> We've done our homework. So, I hope it does.

(Jeremy)>> Exciting moment I know that.

(LT)>> Because this LT one engine is so new, there really isn't much information out there about swapping it into an older chassis, but with a little bit of homework this turned out to be a completely bolt in situation, no cutting required. For starters are the motor mounts. We found these on an online auction of all places, and they're made out of billet aluminum, and they allow us to bolt up our factory 1971 350 rubber isolators. We're going to get the cab back on the lift so we can marry the two and check clearance for the transmission and shifter location, and after a few measurements we learned we're gonna need to do a few additional modifications to the floor.

(Jeremy)>> As you can see, we've already cut out our floor to make room for this taller transmission tunnel that our buddy Tommy Boshers sourced for us. I want to leave a one inch lip for the tunnel. So, I'll pull a couple of measurements and make a few clean cuts. [ saw buzzing ]

(Jeremy)> > That looks good! Okay, if we were building a show truck, we would go ahead and butt weld this thing in. That way you wouldn't know we put a transmission tunnel in it up top or underneath, but since we want everything to be as accessible as possible because we plan on driving this truck a lot, we're gonna go ahead and bolt the tunnel in. Plus, this is how they did it at the factory. So, if it worked for them it'll work good for us. Once I've got all the holes drilled, I'm using clip nuts and body bolts to secure the tunnel. Now we can make our cut for the new shifter to fit through, and we've made a very easy transmission tunnel upgrade, perfect!

(LT)>> The last place your horsepower goes before it reaches the ground is the rear differential, and we're pretty sure this stock 12 bolt has an open carrier in it, and that just isn't gonna cut it with our 460 horsepower LT-1. We just can't have any of that one tire fire. So, we're gonna show you how to replace the open carrier with a posi so you get the same amount of traction to each wheel and get maximum acceleration. Yep, just as we suspected, open carrier. With the fluid drained from the differential, the teardown begins by removing the center pin from the carrier. The brake drums need a little convincing to come off. Then we can push the axles in to access the c-clips and remove them. Before we go any farther, we need to measure the ring gear backlash so we can duplicate it with the new carrier. I'll mark the bearing caps to make sure they go back in where they came from. [ drill humming ] [ Music ]

(LT)>> We're keeping the 3.73 gears in this truck. They're a good ratio for quick acceleration and low r-p-m when cruising down the highway. I always use Loctite 243 to make sure the bolts don't back out, and once the ring gear is mated we can install the carrier. [ drill humming ]

(LT)>> The backlash measures a little loose, so moving some shims will get the carrier closer to the pinion gear. We're shooting for six thousandths backlash because that's what we had before. [ Music ] Re-install the center pin and install the cover with r-t-v silicone.

(Katie)>> Now this one of a kind custom is definitely getting plenty of love, but there's still a few more details to go.

(LT)>> Our LT-1 engine has been between the frame rails of our C-10 for a few months now, and we're ready to turn our attention to the cooling system, and that starts with a place to mount the radiator. Now our old core support has seen better days. It's heavily rusted underneath the battery tray, the hardware is gone, and along the way somebody got kinda creative and they cut off the headlight mounts and they welded the buckets directly to the core support. So, in its current state it's really not gonna work for us, especially when you consider you can buy a brand new core support for $190 bucks from LMC Truck. Once everything is tightened down, we're ready for the next step. Now that we have a place to mount it, we need a radiator that'll bring down the temperature of the coolant and send it on its way back to the engine. The rad drops in and is held down with the original brackets. [ Music ] I'll slide an inch and a half silicone coupler onto the upper radiator. Then I can start by measuring the first tube and cutting it down. My inch and a half 90 will meet up with this 45 that will connect straight to the water pump. With both pieces trimmed, I'll check the fitment and mark the alignment. Over at the welding table it's important to clean the inside of the joint with acetone to remove any contaminants. I will tack both sides and clean the outside of the joint with acetone before final welding. The lower radiator hose is much quicker to make. We got lucky. A single inch and three quarter 45-degree bend will work perfectly, once we cut it to the right length. I could have made a store-bought hose work, but for less than an hour's work we have two custom coolant tubes and the satisfaction of doing it yourself.

(Jeremy)>> Now when you guys were sitting at home on the couch I went ahead and cut out the rest of this rust and replaced all this bad repair work with new metal. So now I can start prepping the underside of the cab for the new material. We need to get rid of all this dirt, grime, and factory undercoating so our new material will get good adhesion, last for a lot of years. I like using a scraper because it's a lot less messy. That grinder throws debris everywhere and the next thing you know your shop's covered in dust. A little heat from a propane torch will help soften up any factory undercoating, making it much easier to scrape off. I will however use a small wire wheel on an angle grinder to get into the tight corners that the scraper can't reach. If you're wondering why you had to pay so much money when you send your truck out to have it built, well it's cause the person you're paying has to go through this. I need a shower. Since we have our cab off the frame, this would be a great time to go ahead and paint the firewall. With the cab wiped down and tacked off I can lay down one coat of the epoxy primer. After a 30 minute flash time we can lay down the flame red. Now I've got something special planned for this C-10, but the finish won't look new. As a matter of fact, this truck will have a durable paint job but look like it's been sitting in a corn field for about 30 years.

(LT)>> We've got our '71 C-10 back in the shop and we're making progress every single day. We've got the LT-1 installed in the frame rails, it's wired up, and sitting pretty. The cab's back on the frame and it's sitting on air bags down to the ground.

(Jeremy)>> And I've started some of the paint work. Now the last time you guys saw this truck I showed a simple two stage paint job on the firewall and have since jammed out the cab and sprayed the dash in the same flame red, and that's all before the truck gets a brand new interior today. Well, what do you think of the color?

(LT)>> You know I like the color a lot but I'm still not so sure on the name. I mean, "red", really?

(Jeremy)>> Well for the name flame red, I'd say it's about as orange as you can get, but especially when you compare these two side by side, that's so deep of a red.

(LT)>> There is a lot of contrast there yeah. Either way I really like the color and I think the truck's gonna look awesome when it's done. Because we converted to a manual transmission and had to use the larger factory trans tunnel, we ordered our carpet for a four wheel drive application. It fits perfectly with the taller floor profile. Next up are the door panels. We'll start by mounting the chrome retaining trim up top with the provided hardware. On the bottom of the door there are normally some threaded bosses welded to the metal, but over the years ours have broken off and we need to make our own holes. Use some masking tape and a sharpie to mark where the holes will go in all four locations. Mount the door panel and center it front to back. Use an eighth inch bit to drill a hole through the door panel and the door at the same time and install the screw. Once all four holes are drilled, remove the panel and take off the tape. Then install the panel for good. Next up I'll install the arm rest. Those are held on with two screws, and before I install the window crank I'll roll the window all the way up and line up the handle so it points up, giving maximum leg room. Then the door handle goes on, and the interior is already looking a lot better.

(Katie)>> Finally, from the inside out it's show and go time for our '71 C-10.

(LT)>> Now there's probably a couple dozen different ways we could have built this truck, from a bone stock nut and bolt restoration, which is pretty boring, to an all out custom show truck, but what we really wanted was something that looks pretty unassuming from the outside.

(Jeremy)>> Yeah, and underneath we've got the modern drivetrain that we wanted, which gives us a very dependable truck with a whole lot of power. Alright man, let's hit the road.

(LT)>> Alright! [ Music ] [ engine rumbling ] [ engine revving ]

(LT)>> Later on we're gonna trailer our C-10 to the racetrack for a real world high performance shakedown, but before we do, the LT-1 is needing some custom tuning.

(Jeremy)>> Now we've moved over to the Engine Power shop where the C-10 is up on the chassis dyno. Now this is the time for Alex to adjust tuning for wide open throttle. Now we'll make a first pass to get a baseline and we'll go from there, and hopefully we'll pull some hidden horsepower from our LT-1. [ engine revving ]

(LT)>> Well our first one was 388 horsepower and 391 pound feet of torque. Alex needs to make a couple of adjustments to the calibration, so we have a little bit more fuel and we'll try another run. Alight, fire it up, let's do one more. Cross your fingers.

(Jeremy)>> I think we'll get what we want. [ engine revving ]

(Jeremy)>> It sounds so mean.

(LT)>> Man try getting a Honda to sound like that! [ engine revving ]

(LT)>> Holy cow! 430 horsepower, 439-pound feet of torque, that is awesome!

(Jeremy)>> That's a big pick up from 388 and all we did was put a tune in it.

(LT)>> 6.2 liter with headers, you know, my custom exhaust of course, and holy cow, that's some awesome tuning Alex. That thing really loved the extra fuel.

(Alex)>> I think we made great progress on the dyno. We went from 388 to 430 horsepower. You couldn't have asked for a better gain honestly.

(Jeremy)>> Wooooo!

(LT)>> Get you some of that. With 460 horsepower under the hood tuned up to produce 430 at the rear wheels, we needed a place where we could take our C-10 out to stretch its legs, and we don't have to worry about losing our driver's license.

(Jeremy)>> That's right, and since the LT-1 would normally come in the C-7 Vette what better place to be than where they're manufactured today, Bowling Green, Kentucky. I mean the plant is right across the street. Now I know you may be thinking our C-10 is a little out of place on the racetrack, and hey, you may be a bit right. We never set out to build a truck that was capable of hitting the fastest lap times.

(LT)>> What we did build was a truck that can be driven hard, thrashed, and thoroughly enjoyed. Now we're gonna take it out for a couple of easy laps to get a feel for the track conditions and our new truck. [ engine revving ]

(LT)>> The suspension on our truck is all stock style but lowered with air springs. Normally you would see this type of suspension at a car show with a truck laid out sitting on the rockers.

(Jeremy)>> Just stay on the track!

(LT)>> I can't hold on, I need a handle! In these few easy laps it's working quite well on the racetrack thanks to the larger, stiffer sway bars both front and rear. They keep body roll to a minimum and this truck really sticks to the ground.

(Jeremy)>> Well we've got a couple of test laps on the truck. Everything's feeling really good. This thing's got a ton of power. It stops really good, and that thing is gonna be a fun day.

(LT)>> You know it's a little bit scary to be a passenger with this guy driving, but we're at an awesome track today. We're on the shorter course. It's about a mile long. It's pretty technical, it's awesome, and this truck is a blast. Let's go!

(Jeremy)>> After playing around a little bit we threw on some helmets for some solo hot laps, and with the power that LT-1 is putting down and the light rear end of the truck, this thing can get away from you pretty easy. Now working all three elements, the clutch, the brake, and the throttle, with a little bit of skilled driving, you can keep this thing on the track.

(LT)>> Well it's been a blast getting this C-10 out on the track at NCM Motorsports Park, and I have to tell you I think it's pretty awesome we got this Corvette engine powered truck back to the track where it belongs.

(Jeremy)>> Absolutely man, that's a cool thing. We set out to build a truck that we could drive every day, not worry about if we got any dings, or dents, or whatever, and you know to come out to a track like this and be able to bash on it and not worry about, that's a good feeling.

(LT)>> Well you know what? I think we're about ready to get shut down, so let's hit the road. Load her up! [ engine starts ]

(Katie)>> Wow, that sweet C-10 is one cool custom pickup. Hopefully it inspires you for your future builds. Remember, you can always catch the latest and greatest projects right here on Powernation Builds.
Show Full Transcript