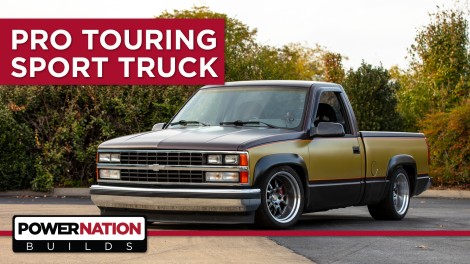
Want more content like this?
Join the PowerNation Email NewsletterVideo Transcript
(Jeremy)>> You're watching Powernation!
[ engine revving ]
(Katie)>> Welcome to Powernation Builds. Today a sport truck transformation is the focus, but the street is not the final destination. Here's Carcass!
(Jeremy)>> Hey guys, welcome to Carcass. Well, the sun is shining and we are not in the shop today cause we are out driving a new project vehicle.
(Jimmy)>> And you probably can't tell from the inside, but we're in a 1989 Chevy C-1500 Pickup. This is what's considered now the OBS Chevy from '88 to '98, and we have some big plans for this thing.
(Jeremy)>> Yeah, this is like a regular cab short box. Guys are starting to call them RCSB's. Obviously for regular cab short box truck. They're super popular. Still a throttle body truck. It's got the whomping 700 R-4, so it's got overdrive. This must have been a little classier model. I don't know who did the conversions on these, but you know it's got the wood grain center console. They're getting not hard to find, but the prices are creeping up on them. With popularity obviously comes some jacked up prices in the market, but you can still find them. And we thought, why not try to put one of these trucks together? It's got 247,821 and a half miles on it as of right now.
(Jimmy)>> And it smokes.
(Jeremy)>> So we need to swing into the gas station. We're going to fill this thing up, throw some fresh gas in it, and then we'll get it back to the shop and throw it on the dyno.
(Jimmy)>> And the a/c doesn't work. So, I want to get out of this damn thing anyways! [ Music ]
(Jeremy)>> Now before we hit the dyno we're gonna fill our truck up with a little better grade fuel and we're going to be adding some Sea Foam Motor Treatment. Now this stuff helps clean dirty injectors and carb jets. It also helps with your intake valves and your combustion areas. [ Music ] Now you can run this stuff in your crank case or in your fuel system, and for cars and trucks that are driven regularly you can put one or two cans of Sea Foam in every 3000 miles. And don't worry if you put too much in. Sea Foam only contains petroleum-based cleaning and lubricating ingredients, and it can't harm your engine or your fuel system. [ Music ] Now we only added about half a can of Sea Foam and a couple of gallons of fuel because we're just going to run this thing on the dyno, and then we're going to tear it completely apart and get ready to swap out the motor. [ Music ]
(Pat)>> Listen to this sweet sound right here.
(Frankie)>> Aww yeah, I forgot how clean this truck is.
(Pat)>> Yeah, I like it.
(Frankie)>> That's going to be cool.
(Pat)>> I'm not sure if it's gonna set the world on fire on the roller here.
(Frankie)>> I've never seen a raked window.
(Pat)>> A what?
(Jeremy)>> Well boys, this ain't the first time you've seen the truck but we're back to pull some numbers now.
(Pat)>> No, I really like this.
(Jeremy)>> Yeah, super straight, throttle body 350. We've gone over this already. You guys have seen it, and we're just pretty much here to see what it's going to make for power. It's got like 247,000 miles on it. I hope I'm in drive, not overdrive. We'll figure it out here shortly. [ engine revving ]
(Pat)>> It stayed together.
(Jeremy)>> It made it through.
(Jimmy)>> What is it?
(Frankie)>> Dang, somebody had a good guess.
(Pat)>> That's not bad, 172!
(Jeremy)>> No way, who said 171? Well Jimmy, we got this thing back out into the shop. It made a whopping 173 horsepower, which is nothing really to write home about, but I think we just kind of dive into this truck and get started.
(Jimmy)>> And with this truck, we're going to be going for a pro touring style build, and with the pro touring movement going on in the last few years, basically that means high performance but also comfortable. Something you can go out and drive. And so with this truck in particular, we're going to be taking out the stock powertrain, putting in the LS that Engine Power built for us matched with a six-speed manual transmission. And up front we're going to be doing a full front suspension kit. And in the rear we're actually going to be doing a custom three link setup with some pretty trick stuff on it that you guys will see later.
(Jeremy)>> And at the end of this we're going to do a little bit of paint work on the side of the truck here to give it a little classier look, and then we're going to dive to the interior and kind of upgrade the seats. So, it's a little more comfortable for Jimmy and I to drive.
(Katie)>> Up next, our '89 Pro Touring pickup gets an upgrade, plus a test fire.
(Jeremy)>> I think it's going to be a whole lot easier if we just kind of ditch the whole front clip. So, let's just get rid of the core support, fenders, and the hood, and we'll get down to that drivetrain. Easier that way, and in the back we'll just get rid of the whole box and we'll just kind of get rolling here.
(Jimmy)>> Alright, let me get some tools. [ drill humming ]
(Jeremy)>> Alright, that should be good.
(Jimmy)>> Ready? [ Music ]
(Jeremy)>> Go behind, there you go. (Jimmy>> We got one more thing. There you go. [ metal clanging ] [ Music ]
(Jeremy)>> I got mine. You keep working on yours. [ metal clanging ]
(Jimmy)>> There we go! [ mechanical humming ] [ Music ]
(Jeremy)>> At least it goes high enough. [ drill humming ]
(Jeremy)>> Alright, so last thing we're going to do before the box off is get rid of the electrical. Gonna undo this ground strap, and then we'll just unplug this connector up here.
(Jimmy)>> Alright, we'll get this thing down and we'll get the bed off.
(Jeremy)>> I'll go get the bed lift and the cherry picker. [ Music ] [ casters squeaking ]
(Jimmy)>> Alright, take it on up. [ hoist clicking ] [ Music ]
(Jeremy)>> Now should be able to roll the truck right out from underneath it. That is simple.
(Jimmy)>> Cool! Let's go! [ Music ]
(Jeremy)>> Hang on, a/c. You know what, Jimmy? This isn't even a 350.
(Jimmy)>> No?
(Jeremy)>> Says it right on the back here. 5.0 liters.
(Jimmy)>> Jeez, so now all the fun work can begin.
(Jeremy)>> And that begins right here with this 406 cubic inch stroked LS that was built by our sister show down in Engine Power. Now this thing laid down almost 600 horsepower and made an impressive 511 pound feet of torque, but this isn't the only upgrade we're doing to the OBS. We've got to add something to the back of this to get all that power down to the ground.
(Jimmy)>> And to do that we're going with this Tremec T-56 Magnum six speed transmission that was provided for us by American Powertrain along with this kit that they put together specifically for our truck. And obviously that includes the transmission itself, bell housing, pressure plate, clutch, reverse light harness, the throw out bearing, and all the hardware needed to do this job right. And the beauty of this kit is that we don't have to cut the floor to put this thing in. We can reuse the stock cross member and this transmission can handle 700 pound feet of torque, which is beyond what our engine makes. So, this is really the best option that we have, and we're going to have so much fun putting this thing in and absolutely roasting the tires off the truck.
(Jeremy)>> We're all set up. Let's get this thing in there.
(Jimmy)>> Let's see it. [ casters squeaking ]
(Jeremy)>> Close-ish, looks pretty center to me.
(Jimmy)>> Yeah, start dropping it down. Go down a little more, maybe not. [ Music ] Ready?
(Jeremy)>> One, two, three! [ Music ]
(Jeremy)>> Alright how's that?
(Jimmy)>> I mean, we've got only, not even an eighth of an inch, but I think we can put some bolts in it. I'm sure the pilot bearing is engaged so. [ ratchet clicking ]
(Jeremy)>> We're not really pulling this together with these bolts. We're just using them to snug this down.
(Jimmy)>> Yeah, and we've done enough of these that the dowels fit pretty tight. It's hard to get it all the way in without…
(Jeremy)>> Just by pushing. Here's the stand. Help you with it and you don't need me. You got this. You don't even need the stand. I'm going to get me a glass of milk and some cookies.
(Jimmy)>> Let me get the cross member.
(Jeremy)>> Let's get this trans mount on first.
(Jimmy)>> Okay, so now we can put the trans cross member in it, and the nice thing is, is that on these chassis there's another series of holes just a little farther back that the cross member will bolt into so we don't have to do any drilling and this transmission will be mounted.
(Katie)>> Coming up, our pickup conversion is getting closer with suspension upgrades and a fresh, clean look.
(Katie)>> Welcome back to Powernation Builds. It's time now to return to Carcass.
(Jeremy)>> So over at the truck we're actually just going to put the battery here for right now because we're not going to put the front clip on this thing. We have entirely too much work to do and we're going to be working on quite a bit of suspension. So, from here we'll put the starter in it, we'll hook up a couple of cables, and then we'll start making some connections. [ Music ] [ drill humming ]
(Jeremy)>> Up next, we'll toss in the starter. [ ratchet clicking ] [ Music ]
(Jimmy)>> That wraps it up on the tank side. Jeremy, how you doing up here?
(Jeremy)>> Well this is the last connection for the plumbing and all the wiring's in it. So, let's see if this thing fires up.
(Jimmy)>> Let's try it. Fuel pump on.
(Jeremy)>> Hear that. [ engine starts ]
(Jimmy)>> Well the guys at Engine Power, they did the hard work and our job was easy.
(Jeremy)>> And it just kind of slid right in here. So, I think that pretty much takes care of it for now though. [ saw buzzing ]
(Jeremy)>> Up inside the frame we have to trim off a couple ears with the cutoff wheel so we can get our new strut assembly installed. Let's do a test fit here. Make sure these holes line up. Yeah, that'll work. So, the next step here is I have to drill the shock hole out to about three quarters of an inch. [ drill humming ] Now we can install the entire coil over assembly. [ Music ] [ drill humming ] After our coil over assembly is installed, we'll install all of our new suspension parts. [ Music ] All of the RideTech suspension utilizes the factory mounting points. Besides, for the little bit of trimming we had to do inside the chassis to mount the coil overs, everything else just bolts right in. [ Music ]
[ drill humming ] [ Music ]
(Jeremy)>> Well that wraps up the front. From here Jimmy and I are gonna tackle the brakes, and then we're headed on to the back.
(Jimmy)>> A three link is relatively simple. There are two lower links and one top link to control the fore and aft location and the rotation of the rear axle, and a pan hard bar locates it side to side. In most cases for street driven vehicles, the top link is solid. This is fine for overall performance and axle control, but here's where ours will differ. Taking a page out of the circle track world, our top link will be a torque link. When power is applied through the drivetrain torque will be absorbed through bushings or springs to help soften the power applied to the ground, providing more forward bite. We've got some of our suspension brackets cut out and welded now. So, at this point we've got to get everything tacked in and mocked up to make sure the suspension is going to work like it's supposed to, and that all starts with cutting up this cross member here to make room for some third link brackets. [ saw buzzing ] [ Music ] [ welder crackling ] [ Music ]
(Jimmy)>> Once we get that tacked in place we'll move on to the cross member and the link brackets. [ welder crackling ]
(Jimmy)>> We've got all the brackets that we need on the chassis. Now I just need to weld the axle brackets. [ Music ] I've got some of the brackets tacked on the axle so we can keep moving forward.
(Jeremy)>> I also took care of these lower links. They're all mocked up so we can put these in as well.
(Jimmy)>> Oh sweet! You want to help me get this thing up here?
(Jeremy)>> Yeah! Get you side up there. There you go.
(Jimmy)>> Cool! [ Music ]
Throw in the coil overs and install the push rods. Oh yeah, we've gotcha. [ Music ]
(Jeremy)>> Dude, this thing looks so amazing, and I can't wait to take it out for a rip.
(Jimmy)>> Yeah me too, and I tried to design everything with adjustability in mind so we can kind of change everything and get it to handle the best that it can. Even like these rocker arms, we can make new ones with different ratios to adjust wheel travel or shock travel. Stuff like that. [ spray gun hissing ]
(Jeremy)>> For our first coat of color we're not trying to change the color. All we're doing is stacking up our paint, and after a couple coats it'll end up looking great. [ spray gun hissing ] [ Music ]
(Jeremy)>> We chose this color because we thought it would really compliment the second color of our two-tone. So, we have the first color laid down and now it's time to tape off for our two-tone color. We're going to be using some eighth inch fine line tape. Then we'll mask this thing off, spray the second color, and then we'll move on to clear. [ Music ]
(Jimmy)>> I haven't painted too much. So, I was a little bit nervous, but anytime I can practice some skills it's always exciting. Just like Jeremy, I'll lay down three coats of gold and then we'll move on to clear. [ spray gun hissing ]
(Jeremy)>> After we let it flash we'll unmask and hit it with some clear.
(Katie)>> Coming up, it's track time for our sport truck shakedown.
(Jeremy)>> Hey guys, welcome back. We're out here at the Nashville Superspeedway and we're at the C-10 Nationals. Well, we drove this truck here for one reason, and that's to put it on the autocross course. Well since Jimmy's in the driver's seat, he's going to go set the pace.
(Jimmy)>> See you at the starting line. [ engine starting ] [ Music ] [ engine revving ] [ Music ]
(Jimmy)>> This truck flat out rips. I've had quite a few OBS chevy trucks, but nothing that handles quite like this. It feels really tight and stuck to the ground around the turns and stops on a dime. With a little more seat time we could really get this truck dialed in. [ Music ] [ engine revving ] [ Music ] [ engine revving ] [ Music ] [ engine revving ] [ Music ] [ tires squealing ]
(Jimmy)>> We're running pretty good times out on the track and one big reason for that is our Continental tires. We're running their Extreme Contact Sport. This tire has sport plus technology that delivers precise steering for maximum control and provides responsive handling. This dynamic ultra high performance tire comes in four different styles to handle all types of driving. The 335/30 sport tires we're using are the perfect combination for our pro touring truck on and off the course, and these will help us set fast track times we're looking for. [ Music ] Alright dude, that was the most fun I've ever had in a vehicle.
(Jeremy)>> Well you're running like the 32.7.
(Jimmy)>> I feel fast.
(Jeremy)>> Cool, well I want to feel fast too. So, I'm gonna hop in it and see if I can catch you. [ Music ] [ tires squealing ]
(Jeremy)>> This is the first time I've driven the truck since we started this project, and the o-b-s has made a huge transformation from the stock truck with big wheels and a ton of body roll to an absolute animal on and off the track. I ran a bit slower than Jimmy, but with a 33.6 second run I'm right in the mix with the other trucks. [ engine revving ] [ Music ]
(Jeremy)>> We had a bunch of fun out here at the C-10 Nationals and now we get to do what this truck was made to do and that's drive it right back home.
(Jimmy)>> We're right in the mix on the track and now we get to ride home in comfort.
(Jeremy)>> We've got a couple more things that we're going to go check out. So, that wraps it up. If you guys like anything you've seen why don't you go to Powernation t-v dot com.
(Jimmy)>> And be sure to check out our build pages where you can see Project Junk Mail, the Honda Rally Civic, and more of our OBS Chevy.
(Jeremy)>> Let's go for a little cruise.
(Jimmy)>> Everything's loud around here.
(Jeremy)>> But that's so amazing! Our truck's loud too.
(Katie)>> What a great conversion. From the street or the track our guys delivered one performance pickup. Of course you can always catch our other projects right here on Powernation Builds.
Show Full Transcript
[ engine revving ]
(Katie)>> Welcome to Powernation Builds. Today a sport truck transformation is the focus, but the street is not the final destination. Here's Carcass!
(Jeremy)>> Hey guys, welcome to Carcass. Well, the sun is shining and we are not in the shop today cause we are out driving a new project vehicle.
(Jimmy)>> And you probably can't tell from the inside, but we're in a 1989 Chevy C-1500 Pickup. This is what's considered now the OBS Chevy from '88 to '98, and we have some big plans for this thing.
(Jeremy)>> Yeah, this is like a regular cab short box. Guys are starting to call them RCSB's. Obviously for regular cab short box truck. They're super popular. Still a throttle body truck. It's got the whomping 700 R-4, so it's got overdrive. This must have been a little classier model. I don't know who did the conversions on these, but you know it's got the wood grain center console. They're getting not hard to find, but the prices are creeping up on them. With popularity obviously comes some jacked up prices in the market, but you can still find them. And we thought, why not try to put one of these trucks together? It's got 247,821 and a half miles on it as of right now.
(Jimmy)>> And it smokes.
(Jeremy)>> So we need to swing into the gas station. We're going to fill this thing up, throw some fresh gas in it, and then we'll get it back to the shop and throw it on the dyno.
(Jimmy)>> And the a/c doesn't work. So, I want to get out of this damn thing anyways! [ Music ]
(Jeremy)>> Now before we hit the dyno we're gonna fill our truck up with a little better grade fuel and we're going to be adding some Sea Foam Motor Treatment. Now this stuff helps clean dirty injectors and carb jets. It also helps with your intake valves and your combustion areas. [ Music ] Now you can run this stuff in your crank case or in your fuel system, and for cars and trucks that are driven regularly you can put one or two cans of Sea Foam in every 3000 miles. And don't worry if you put too much in. Sea Foam only contains petroleum-based cleaning and lubricating ingredients, and it can't harm your engine or your fuel system. [ Music ] Now we only added about half a can of Sea Foam and a couple of gallons of fuel because we're just going to run this thing on the dyno, and then we're going to tear it completely apart and get ready to swap out the motor. [ Music ]
(Pat)>> Listen to this sweet sound right here.
(Frankie)>> Aww yeah, I forgot how clean this truck is.
(Pat)>> Yeah, I like it.
(Frankie)>> That's going to be cool.
(Pat)>> I'm not sure if it's gonna set the world on fire on the roller here.
(Frankie)>> I've never seen a raked window.
(Pat)>> A what?
(Jeremy)>> Well boys, this ain't the first time you've seen the truck but we're back to pull some numbers now.
(Pat)>> No, I really like this.
(Jeremy)>> Yeah, super straight, throttle body 350. We've gone over this already. You guys have seen it, and we're just pretty much here to see what it's going to make for power. It's got like 247,000 miles on it. I hope I'm in drive, not overdrive. We'll figure it out here shortly. [ engine revving ]
(Pat)>> It stayed together.
(Jeremy)>> It made it through.
(Jimmy)>> What is it?
(Frankie)>> Dang, somebody had a good guess.
(Pat)>> That's not bad, 172!
(Jeremy)>> No way, who said 171? Well Jimmy, we got this thing back out into the shop. It made a whopping 173 horsepower, which is nothing really to write home about, but I think we just kind of dive into this truck and get started.
(Jimmy)>> And with this truck, we're going to be going for a pro touring style build, and with the pro touring movement going on in the last few years, basically that means high performance but also comfortable. Something you can go out and drive. And so with this truck in particular, we're going to be taking out the stock powertrain, putting in the LS that Engine Power built for us matched with a six-speed manual transmission. And up front we're going to be doing a full front suspension kit. And in the rear we're actually going to be doing a custom three link setup with some pretty trick stuff on it that you guys will see later.
(Jeremy)>> And at the end of this we're going to do a little bit of paint work on the side of the truck here to give it a little classier look, and then we're going to dive to the interior and kind of upgrade the seats. So, it's a little more comfortable for Jimmy and I to drive.
(Katie)>> Up next, our '89 Pro Touring pickup gets an upgrade, plus a test fire.
(Jeremy)>> I think it's going to be a whole lot easier if we just kind of ditch the whole front clip. So, let's just get rid of the core support, fenders, and the hood, and we'll get down to that drivetrain. Easier that way, and in the back we'll just get rid of the whole box and we'll just kind of get rolling here.
(Jimmy)>> Alright, let me get some tools. [ drill humming ]
(Jeremy)>> Alright, that should be good.
(Jimmy)>> Ready? [ Music ]
(Jeremy)>> Go behind, there you go. (Jimmy>> We got one more thing. There you go. [ metal clanging ] [ Music ]
(Jeremy)>> I got mine. You keep working on yours. [ metal clanging ]
(Jimmy)>> There we go! [ mechanical humming ] [ Music ]
(Jeremy)>> At least it goes high enough. [ drill humming ]
(Jeremy)>> Alright, so last thing we're going to do before the box off is get rid of the electrical. Gonna undo this ground strap, and then we'll just unplug this connector up here.
(Jimmy)>> Alright, we'll get this thing down and we'll get the bed off.
(Jeremy)>> I'll go get the bed lift and the cherry picker. [ Music ] [ casters squeaking ]
(Jimmy)>> Alright, take it on up. [ hoist clicking ] [ Music ]
(Jeremy)>> Now should be able to roll the truck right out from underneath it. That is simple.
(Jimmy)>> Cool! Let's go! [ Music ]
(Jeremy)>> Hang on, a/c. You know what, Jimmy? This isn't even a 350.
(Jimmy)>> No?
(Jeremy)>> Says it right on the back here. 5.0 liters.
(Jimmy)>> Jeez, so now all the fun work can begin.
(Jeremy)>> And that begins right here with this 406 cubic inch stroked LS that was built by our sister show down in Engine Power. Now this thing laid down almost 600 horsepower and made an impressive 511 pound feet of torque, but this isn't the only upgrade we're doing to the OBS. We've got to add something to the back of this to get all that power down to the ground.
(Jimmy)>> And to do that we're going with this Tremec T-56 Magnum six speed transmission that was provided for us by American Powertrain along with this kit that they put together specifically for our truck. And obviously that includes the transmission itself, bell housing, pressure plate, clutch, reverse light harness, the throw out bearing, and all the hardware needed to do this job right. And the beauty of this kit is that we don't have to cut the floor to put this thing in. We can reuse the stock cross member and this transmission can handle 700 pound feet of torque, which is beyond what our engine makes. So, this is really the best option that we have, and we're going to have so much fun putting this thing in and absolutely roasting the tires off the truck.
(Jeremy)>> We're all set up. Let's get this thing in there.
(Jimmy)>> Let's see it. [ casters squeaking ]
(Jeremy)>> Close-ish, looks pretty center to me.
(Jimmy)>> Yeah, start dropping it down. Go down a little more, maybe not. [ Music ] Ready?
(Jeremy)>> One, two, three! [ Music ]
(Jeremy)>> Alright how's that?
(Jimmy)>> I mean, we've got only, not even an eighth of an inch, but I think we can put some bolts in it. I'm sure the pilot bearing is engaged so. [ ratchet clicking ]
(Jeremy)>> We're not really pulling this together with these bolts. We're just using them to snug this down.
(Jimmy)>> Yeah, and we've done enough of these that the dowels fit pretty tight. It's hard to get it all the way in without…
(Jeremy)>> Just by pushing. Here's the stand. Help you with it and you don't need me. You got this. You don't even need the stand. I'm going to get me a glass of milk and some cookies.
(Jimmy)>> Let me get the cross member.
(Jeremy)>> Let's get this trans mount on first.
(Jimmy)>> Okay, so now we can put the trans cross member in it, and the nice thing is, is that on these chassis there's another series of holes just a little farther back that the cross member will bolt into so we don't have to do any drilling and this transmission will be mounted.
(Katie)>> Coming up, our pickup conversion is getting closer with suspension upgrades and a fresh, clean look.
(Katie)>> Welcome back to Powernation Builds. It's time now to return to Carcass.
(Jeremy)>> So over at the truck we're actually just going to put the battery here for right now because we're not going to put the front clip on this thing. We have entirely too much work to do and we're going to be working on quite a bit of suspension. So, from here we'll put the starter in it, we'll hook up a couple of cables, and then we'll start making some connections. [ Music ] [ drill humming ]
(Jeremy)>> Up next, we'll toss in the starter. [ ratchet clicking ] [ Music ]
(Jimmy)>> That wraps it up on the tank side. Jeremy, how you doing up here?
(Jeremy)>> Well this is the last connection for the plumbing and all the wiring's in it. So, let's see if this thing fires up.
(Jimmy)>> Let's try it. Fuel pump on.
(Jeremy)>> Hear that. [ engine starts ]
(Jimmy)>> Well the guys at Engine Power, they did the hard work and our job was easy.
(Jeremy)>> And it just kind of slid right in here. So, I think that pretty much takes care of it for now though. [ saw buzzing ]
(Jeremy)>> Up inside the frame we have to trim off a couple ears with the cutoff wheel so we can get our new strut assembly installed. Let's do a test fit here. Make sure these holes line up. Yeah, that'll work. So, the next step here is I have to drill the shock hole out to about three quarters of an inch. [ drill humming ] Now we can install the entire coil over assembly. [ Music ] [ drill humming ] After our coil over assembly is installed, we'll install all of our new suspension parts. [ Music ] All of the RideTech suspension utilizes the factory mounting points. Besides, for the little bit of trimming we had to do inside the chassis to mount the coil overs, everything else just bolts right in. [ Music ]
[ drill humming ] [ Music ]
(Jeremy)>> Well that wraps up the front. From here Jimmy and I are gonna tackle the brakes, and then we're headed on to the back.
(Jimmy)>> A three link is relatively simple. There are two lower links and one top link to control the fore and aft location and the rotation of the rear axle, and a pan hard bar locates it side to side. In most cases for street driven vehicles, the top link is solid. This is fine for overall performance and axle control, but here's where ours will differ. Taking a page out of the circle track world, our top link will be a torque link. When power is applied through the drivetrain torque will be absorbed through bushings or springs to help soften the power applied to the ground, providing more forward bite. We've got some of our suspension brackets cut out and welded now. So, at this point we've got to get everything tacked in and mocked up to make sure the suspension is going to work like it's supposed to, and that all starts with cutting up this cross member here to make room for some third link brackets. [ saw buzzing ] [ Music ] [ welder crackling ] [ Music ]
(Jimmy)>> Once we get that tacked in place we'll move on to the cross member and the link brackets. [ welder crackling ]
(Jimmy)>> We've got all the brackets that we need on the chassis. Now I just need to weld the axle brackets. [ Music ] I've got some of the brackets tacked on the axle so we can keep moving forward.
(Jeremy)>> I also took care of these lower links. They're all mocked up so we can put these in as well.
(Jimmy)>> Oh sweet! You want to help me get this thing up here?
(Jeremy)>> Yeah! Get you side up there. There you go.
(Jimmy)>> Cool! [ Music ]
Throw in the coil overs and install the push rods. Oh yeah, we've gotcha. [ Music ]
(Jeremy)>> Dude, this thing looks so amazing, and I can't wait to take it out for a rip.
(Jimmy)>> Yeah me too, and I tried to design everything with adjustability in mind so we can kind of change everything and get it to handle the best that it can. Even like these rocker arms, we can make new ones with different ratios to adjust wheel travel or shock travel. Stuff like that. [ spray gun hissing ]
(Jeremy)>> For our first coat of color we're not trying to change the color. All we're doing is stacking up our paint, and after a couple coats it'll end up looking great. [ spray gun hissing ] [ Music ]
(Jeremy)>> We chose this color because we thought it would really compliment the second color of our two-tone. So, we have the first color laid down and now it's time to tape off for our two-tone color. We're going to be using some eighth inch fine line tape. Then we'll mask this thing off, spray the second color, and then we'll move on to clear. [ Music ]
(Jimmy)>> I haven't painted too much. So, I was a little bit nervous, but anytime I can practice some skills it's always exciting. Just like Jeremy, I'll lay down three coats of gold and then we'll move on to clear. [ spray gun hissing ]
(Jeremy)>> After we let it flash we'll unmask and hit it with some clear.
(Katie)>> Coming up, it's track time for our sport truck shakedown.
(Jeremy)>> Hey guys, welcome back. We're out here at the Nashville Superspeedway and we're at the C-10 Nationals. Well, we drove this truck here for one reason, and that's to put it on the autocross course. Well since Jimmy's in the driver's seat, he's going to go set the pace.
(Jimmy)>> See you at the starting line. [ engine starting ] [ Music ] [ engine revving ] [ Music ]
(Jimmy)>> This truck flat out rips. I've had quite a few OBS chevy trucks, but nothing that handles quite like this. It feels really tight and stuck to the ground around the turns and stops on a dime. With a little more seat time we could really get this truck dialed in. [ Music ] [ engine revving ] [ Music ] [ engine revving ] [ Music ] [ engine revving ] [ Music ] [ tires squealing ]
(Jimmy)>> We're running pretty good times out on the track and one big reason for that is our Continental tires. We're running their Extreme Contact Sport. This tire has sport plus technology that delivers precise steering for maximum control and provides responsive handling. This dynamic ultra high performance tire comes in four different styles to handle all types of driving. The 335/30 sport tires we're using are the perfect combination for our pro touring truck on and off the course, and these will help us set fast track times we're looking for. [ Music ] Alright dude, that was the most fun I've ever had in a vehicle.
(Jeremy)>> Well you're running like the 32.7.
(Jimmy)>> I feel fast.
(Jeremy)>> Cool, well I want to feel fast too. So, I'm gonna hop in it and see if I can catch you. [ Music ] [ tires squealing ]
(Jeremy)>> This is the first time I've driven the truck since we started this project, and the o-b-s has made a huge transformation from the stock truck with big wheels and a ton of body roll to an absolute animal on and off the track. I ran a bit slower than Jimmy, but with a 33.6 second run I'm right in the mix with the other trucks. [ engine revving ] [ Music ]
(Jeremy)>> We had a bunch of fun out here at the C-10 Nationals and now we get to do what this truck was made to do and that's drive it right back home.
(Jimmy)>> We're right in the mix on the track and now we get to ride home in comfort.
(Jeremy)>> We've got a couple more things that we're going to go check out. So, that wraps it up. If you guys like anything you've seen why don't you go to Powernation t-v dot com.
(Jimmy)>> And be sure to check out our build pages where you can see Project Junk Mail, the Honda Rally Civic, and more of our OBS Chevy.
(Jeremy)>> Let's go for a little cruise.
(Jimmy)>> Everything's loud around here.
(Jeremy)>> But that's so amazing! Our truck's loud too.
(Katie)>> What a great conversion. From the street or the track our guys delivered one performance pickup. Of course you can always catch our other projects right here on Powernation Builds.