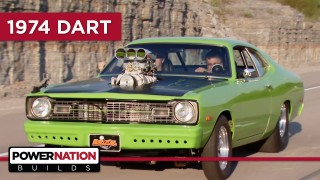
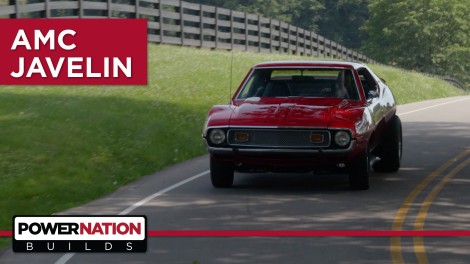
Video Transcript

(Marc)> You're watching Powernation!

[ engines revving ] [ Music ]

(Alli)>> Welcome to Powernation Builds. I'm Alli Walker. Today Detroit Muscle shows us how to transform an odd duck Javelin into a serious piece of muscle.

(Marc)>> Hey folks welcome to Detroit Muscle. Today's an exciting day for us because we're introducing a brand new project car, and this time it's gonna be a pony car. Now when you're talking about pony cars there's been much debate over whether they're muscle cars or not, but if they've got a V-8 under the hood that's good enough for us. We're talking Camaros, Mustangs, Cougars, Firebirds and Trans Ams, Cudas and Challengers, and let's not forget the AMC Javelin.

(Tommy)>> Now love'em or hate'em you cannot deny that this thing is covered up with style, and when we got this thing in we had some pretty big dreams for it.

(Marc)>> And we found what we thought was the perfect candidate down in Alabama. So we headed down there with the truck and the trailer to take a look at it. We did like you'd normally do when you're checking out a used car. We fired it up. [ engine starting ]

(Marc)>> Checked out the interior. I really like this cockpit too. That headliner is wild. You could replace that I guess if you wanted to. I don't want to. And made sure it drove. So we decided we'd pay the man, loaded it on the trailer, and it was ours.

(Tommy)>> Playing off of AMC's undeniable '70's style this ride is begging to be transformed into a muscle machine with fats in the back, skinnies up front, and a raked out stance to show off its back side.

(Marc)>> Its outside appearance is gonna stay red but with an old school scheme.

(Tommy)>> I sure can't wait to get started on this thing because I'm digging what we're fixing to do.

(Marc)>> Absolutely, this is something we both love and this is the perfect car for it. But before we dig into it and get started I want to drive it because I only drove it from where it was parked at the guys house to onto the trailer. Just that little bit like the seat's comfortable, steering feels nice, I like the cockpit, and I've never really driven one of these.

(Tommy)>> I'll get the door for you buddy.

(Marc)>> It's gonna be awesome!

(Tommy)>> Don't forget to pull the choke.

(Marc)>> Oh yeah! [ engine cranking ]

(Marc)>> Come on baby! [ engine cranking ]

(Marc)>> I'll bet Tommy drained the gas. Jokester, there we go.

(Tommy)>> Now we have it strapped to the dyno and we're pretty much ready to see what kind of numbers this thing's gonna make. You fellas ready?

(Pat)>> You don't have a tach in there do you?

(Marc)>> No tach.

(Pat)>> We've got good signal. What are you gonna run it up to?

(Marc)>> Let's go to 5,000 on the first one, see what happens.

(Pat)>> I like the way you think.

(Marc)>> Are we taking predictions on how much it's gonna make?

(Pat)>> Definitely have a 2 in the number.

(Tommy)>> Might, it'll be a 1-2. It won't be a 2 in the first number. [ Music ] [ engine revving ] [ Music ] [ engine revving ] [ Music ]

(Tommy)>> There for a minute I thought I was gonna need a protective vest on.

(Pat)>> I thought I was gonna need a sun dial to time it with.

(Frankie)>> I don't know, that sounded like 100 horse.

(Marc)>> That was a long pull.

(Pat)>> Whoa baby, we were all way off. Are you ready for this? 132 horse!

(Marc)>> What'd it make at peak?

(Pat)>> Peak was somewhere at 3,800. I mean try to get ahead to roll into cause it's kicking down. Try another one. It did make 200 pound feet of torque.

(Marc)>> Yeah I felt that. Here we go!

(Frankie)>> Make sure you push it all the way down this time.

(Marc)>> I had my foot in the carburetor. [ engine revving ] [ Music ]

(Pat)>> We stepped her up, 133!

(Tommy)>> Man we keep doing this 100 times we probably won't get much better.

(Pat)>> 201 pound feet.

(Marc)>> I guess there's no point in me pulling it up that high?

(Tommy)>> Unless you want to replace the engine.

(Pat)>> It's not falling off, it's not cratering, it just doesn't have any power.

(Marc)>> Let's get this thing out of here. You take the hood off?

(Tommy)>> Yeah that'd probably be wise to be the first thing. [ Music ]

[ Music ] Let me get this Ford product out of the way.

(Marc)>> Look at it. That's even a Ford gasket.

(Tommy)>> That's what was restricting this car from making all that power. [ Music ]

(Marc)>> Whoa, whoa, whoa.

(Tommy)>> You wouldn't think that little motor would be that heavy.

(Marc)>> I think it was just stuck in there. Keep coming! [ Music ] Well I'd say we got a lot done today. Introduced the car, showed us picking it up. I took it out for a ride.

(Tommy)>> Joyride, you didn't even let me go with you.

(Marc)>> You had the opportunity, and dyno.

(Tommy)>> Yeah that pop quiz down there at the dyno, we didn't really pass with flying colors.

(Marc)>> No but you know you want to start low that way you've got a big gap.

(Tommy)>> I guess there is some truth to that.

(Alli)>> Coming up, we drop a cherry bomb on the Javelin.

(Alli)>> We're back with more Powernation Builds.

(Tommy)>> Hey guys, welcome to Detroit Muscle. We're in the middle of the reflection rejuvenation on our AMC Javelin. After all the pain staking body work was over it was ready for a quick rub down and a bit of some quality time with an air hose to get it cleaned up. Then we pushed it into the booth, taped her up, and it was finally ready for a coat of sealer. [ spray gun hissing ]

(Tommy)>> For painting products we went to Summit Racing for a full setup and we also brought ourselves in a trigger man, Ted Swann, master painter extraordinaire. Man you ready for this big day?

(Ted)>> I'm ready for this, and today on our Javelin project we're gonna use the entire Summit Racing line. Everything from the cleaners and degreasers up to and including the clear coat. Unlike some of the projects that we've done in the past Tom and I have quite a few more products laid out color selection wise. Do you want to tell them a little about that?

(Tommy)>> Now Summit offers 30 colors that are available in base clear and single stage but they've upped their game. Now available is some pearls, some candies, and even an intermixing clear. This allows you to be plenty creative, and that's exactly what we did with that test panel.

(Ted)>> And that was so much more than a test panel.

(Tommy)>> Doing something like this is always a really good idea because it gives you an opportunity to transfer what's in your head to a canvas, and just doing that sometimes can be a bit complicated.

(Ted)>> And it's a lot more complicated than what we've done in the past. We have Cherry Bomb Blast, which is slightly translucent on top of three other colors here. We also taped this off so that we could demonstrate to ourselves do we actually like each individual color. Sometimes you'll do this. Think of it it's like a feasibility thing, not just a test panel, where this really worked but I didn't like this part of it at all, and that prevents you from getting committed on the real job. We can change our minds at this point.

(Tommy)>> We began with a couple of coats of sealer, followed by some base, followed by some graphics, followed by some candy, and then several coats of clear. None of this is unusual in this situation. [ Music ]

(Daniel)>> What we have here is our newly improved baby V-8, and I bet Tom's statement had you AMC guys a bit worried thing this old Javelin was gonna get LS'ested. So calm down, it's still traditional AMC.

(Tommy)>> We pulled this old greasy thing out and sent it down to the guys in Engine Power. We thought it was bad on the outside.

(Frankie)>> Look at this, nasty!

(Tommy)>> But the inside was even worse.

(Pat)>> We've been getting some doosies.

(Tommy)>> Pat and Frankie stayed after it and then started working their magic. This AMC mill got the works with plenty of machine work and some goodies. They punched it out, installed a bigger bump stick, some aluminum heads, and e-f-i. Then it was time to put their hard work to the test and strap it to the dyno. [ engine revving ]

(Tommy)>> This little thing started out from the factory at 150 horse. With their mods they have more than doubled its power output making 337. [ Music ] You want it to go up if you can. Installing an engine like this it's always good to have a couple of people working on it. Can you come down with the jack a little? [ Music ] And it takes a little bit of some finesse. Let's go back toward the car. [ Music ] Slow down, slow down! It's also a good idea to not get in a hurry. Once you wiggle and jiggle it just right it just falls into place. That's her.

(Daniel)>> In there like flint.

(Tommy)>> Shoot I can't wait to get this red rocket out on the road.

(Alli)>> Coming up, more with our AMC Javelin!

(Alli)>> Welcome back to Powernation Builds where Tommy's bringing some o-e-m parts back to life.

(Tommy)>> Often times on late '60s and early '70s muscle cars you'll have two different brake systems on the same ride. You'll have discs on the front, drums out back. Now drum brakes were the standard up until this point, and yeah they did get the job done. So manufacturers came up with a much better design, disc brakes, and they've got a lot going for them. One is they handle the heat a whole lot better, which equals greater stopping power. Plus they're easier to service. [ drill humming ]

(Tommy)>> When we drove this jewel the brakes would stop the car but when you laid your foot on the brake pedal it had what some would call a small hop to it. The pedal would pulsate just a little bit and the car had a small shake. These round things on both sides, the rotors, is what's causing our issue. They must be warped. This can be fixed and you pretty much have two options. One, you can replace the rotor or two, have it turned. We were already planning to swap the pads out with some EBC Yellow Stuff. So all the brakes was gonna have to come apart. Now we can fix our problem and do an upgrade all at the same go. On our ride with the tire out of the way the next thing to go is the caliper. I like to collapse the piston just a bit using a pry bar to make removal easier. [ Music ] Then with this spindle design of this old AMC the grease cap, cotter pin, and nut has to come off to remove the rotor. On later model stuff the rotor normally slides right off and you don't get nearly as greasy. Shoo, that stuff stinks! Turning a set of rotors can be a cheaper way to go instead of replacing the part. However you can only do this a few times. Each time it gets resurfaced the rotor gets thinner. A rotor also has to dissipate heat as the brakes are being used. If it's too thin the contact surface becomes too hot too fast, which can lead to brake fade and even cracking. This process is to smooth out the brake pad contact surface. If your rotors aren't warped but do have the grooves from the pads this is still a wise decision. As a rule of thumb the rotors should be re-machined every other time the pads are replaced. This will maximize brake pad life and optimize the smoothness of the brake system. [ Music ] Man that looks nice! [ Music ] With everything all shaped up we're just about ready to re-install our rotor. Whenever they were cutting this thing there was metal shavings going every which way and one thing that you don't want those is to get into here. I cleaned all the old grease out before we sent it out to the shop, and now with a quick blast of some air we should be pretty much ready to move on. [ compressed air hissing ]

(Tommy)>> We're gonna clean up our bearings to see what kind of condition they're in. You don't have to have a parts washer to do this. A rag and some cleaner will get the job done as well. Everything on our bearings checked out. We just had to repack them, and remember if you're working on a disc brake application you need to use some high temp grease. [ Music ] On a spindle nut you only need to snug it up. Don't get all He-Man on it, and don't forget your cotter pin. These Yellow Stuff brake pads from EBC are a great way to upgrade your braking system with a simple component swap. They go in the factory locations and use factory hardware. Easy as pie!

(Alli)>> Up next, the Javelin is buttoned up and heading to the dyno.

(Tommy)>> Whenever it comes to working on anything AMC what'll be different isn't hard at all.

(Daniel)>> Boy you got that right buddy. As for the good time part of this project we are finishing it. All we have to do is wrap up the exhaust, shine up that paint, practice rotating the Earth on the dyno, and then cruising it back out on the street.

(Tommy)>> Now do you want to do exhaust or do you want to do some sanding and polishing on it.

(Daniel)>> You don't want me sanding and polishing. So I guess I'll do exhaust.

(Tommy)>> Alrighty! Our goal for today is to take our paint job from pretty good to perfection, and what that's gonna involve is some cutting and buffing. That's where you wet sand your surface and then polish it back out. [ Music ] To do something like this you need to plan on spending a lot of time. It doesn't take a lot of tools. Just some sanding blocks, paper, and a bucket of water. [ Music ] When color sanding you want to be consistent with every stroke. Working in smaller sections helps to ensure your accuracy.

(Daniel)>> Now what we have here is a side pipe kit that we get from Summit Racing. It's gonna help give our old AMC Javelin that mean street machine look we've been going for. This is a 60 inch chrome side exhaust kit made by Patriot. It's got large inlet and outlet pipes that make it a low back pressure system, and six sided louvred core mufflers giving us that tough muscle car sound. It comes with these chrome heat shields that just scream '70's, and that's perfect because it's exactly what we're going for.

(Tommy)>> This kit is pretty much straight forward. It only takes a few minutes to assemble, a couple of U-bolts, and a nut or two and we're off to the races. Now placement is in the eye of the pipe holder. For ours we wanted to make sure we could still see those shiny slapper bars. After marking center we used a step drill for our pilot hole, and finalize the diameter with the proper size drill bit that matches our threaded insert.

(Daniel)>> Alright guys what we've done is we've drilled our thread-sert holes into the rocker panel. Now by doing this we've exposed some bare metal. So what I like to do is I like to put a little strip caulking or some sealant on these thread-serts so we don't cause any rust or any problems in the future.

(Tommy)>> Using inserts like this makes it convenient to mount numerous things. And trust me, with a handy tool like this will make you question how you did things without it. To feed the exhaust Daniel fashioned up a quick 90 to mount to the header and then simply clamped it to our rocker panel tubas. [ drill humming ]

(Daniel)>> Man them some fancy looking twice pipes right there if I do say so myself.

(Tommy)>> Well we got our hood all finished sanded at 2,000 grit and we're pretty much ready to start adding back on all that shine, and to do that we're gonna be using a product from Sonax. It's their Perfect Finish. What's really nice about this setup is it's only one step. It isn't two or three different pads, two or three different products. We're gonna be using a green medium density foam pad with our buffer here, and it's gonna look like a million bucks when we're done. [ Music ] With Perfect Finish you want to start out slow at about 800 r-p-m. That prevents the compound from slinging off the pad and helps keep you much cleaner. Then we'll crank it up to 1,200 r-p-m, and you always want to keep the buffer moving. I'll polish this in small section like I did when sanding. As a conclusion, well that sanding was a little bit labor intensive. Polishing not so much. Our results, they're tremendous.

(Daniel)>> We're down here in Engine Power with Pat and Frankie and we've got our AMC on the dyno. Now this is the first time you guys have seen this car completely assembled. We've got the hood on, the paint's all shined up, and our exhaust are correctly installed thanks to yours truly. [ engine starting ]

(Frankie)>> Go for it! [ engine revving ] [ Music ] [ engine revving down ] [ Music ]

(Pat)>> Alright got a little heat in her right there, 242.

(Daniel)>> Yeah buddy, it's over 100!

(Frankie)>> Yeah 242 and 236. You're finally burning the smoke out of the side pipes too.

(Pat)>> Those pipes are gonna smoke forever.

(Daniel)>> That's part of the effect!

(Pat)>> Where we've already eclipsed the 100 over on the tire.

(Daniel)>> I can't wait to tell Tommy.

(Pat)>> I'm officially impressed.

(Frankie)>>> This thing is sweet. [ engine rumbling ]

(Tommy)>> After finishing up our grub we were heading back to the shop. You know there's something that just feels right whenever you're grabbing some fresh air and sitting behind the wheel of some vintage muscle. [ engine rumbling ] [ Music ] [ engine rumbling ]

(Alli)>> 100 extra horses and a new lease on life! Now that's a winning project. Remember you can check out all of our builds at Powernation TV dot com. I'm Alli Walker, and I'll see you down the road!
Show Full Transcript