Trucks! Builds

Parts Used In This Episode

ARB 4x4 Accessories
COMPACT AIR COMPRESSOR.
Currie Enterprises
FRONT AXLE ASSEMBLY,ARB AIR LOCKER,4.56 GEARS,TJ SUSPENSION BRACKET.
Currie Enterprises
REAR AXLE ASSEMBLY,ARB AIRLOCKER,4.56 GEARS,EXPLORER DISC BRAKE SET,CABLES AND YOKE.
Fabtech
COIL-OVER SUSPENSION LIFT.
Mickey Thompson
20X16 HR-1 WHEEL,33X22.00R20 SPORTSMAN S/R RADIAL.
Pro Comp
TIRE AND WHEEL PACKAGE.
Rusty's Off Road
FRONT AND REAR BUMPERS,FENDER FLARES.
Super Chips
PROGRAMMER FOR FORD EXPLORER.
Video Transcript

Let's go

today. We're taking our 87 YJ out for a little fun

and a little abuse because we know we've added more grunt than our old stock axles can take.

Then we'll drag her back to the shop and add the kind of hardware that'll give our chief the legs to live up to its name YJ redemption.

Hey,

thanks for joining us today on trucks.

Well, we're obviously not in the shop. We're out here at Woolies

off Road Park. We got a resurrected YJ. We're gonna put it through its paces. Yeah, we gave this tub its second life starting with 100 and 80,000 mile worn out. Jeep. That really wasn't all that spectacular from the factory.

So we dragged it home and went to work. We yanked the lane in line six and dropped in a freshened up junkyard 350 backed by a remand Turbo 350 tranny and set it in place with a four wheel drive hardware V8 swap kit.

We finished up the drive train upgrade with a Slip Yoke Eliminator kit. Then we went to work on the stance, installing a trail ready eight inch lift system from Fab Tech and 37 inch tall pro

C mud trains.

Now, the last time you guys saw this thing, it was already on all fours, but we've added a few things like the smitty built tube fenders and these powder coated bumpers front and rear from Rusty's off road products.

Then we stripped off some of the fluff like the fender flares and side steps. We topped off the fluids bled the brakes out, ran in the camp and we are ready to rock and roll. But we told you guys right up front, we didn't think the stock axles would hold up with a new power and much bigger tires and wheels.

So right now, we're gonna go find out exactly how much abuse these things will take before they break. Let's go

that way.

Our

name,

our rebuilt 350 not only sounded awesome,

but with our EF I set up, we had power to spare. Great throttle response and no fuel starvation issues. No sweat man.

Nailed it.

Our eight inch lift kit articulated well and in all but the most hardcore of terrain, it kept all four tires on the ground, which gave us all the traction we needed and helped compensate for our open differential front and rear

you going down the stairs.

But with the new found weight of our 37 inch wheels and tires, the stock power steering pump had trouble keeping up and the belt slip just about all day. Long.

Where is she on?

Sorry, you,

well, who's giving a shot? I'll give it a shot. All right, let's do it.

Well, everything's working great with the YJ. Nothing's broke yet, but we think we finally found the trail that's gonna kill our axles. This is I 65 and just in case you can't tell, I'm telling you this hill is a killer.

Hey. Yeah, let's do it.

Even though the bottom of I 65 is pretty gnarly.

Our YJ walked right up. It,

no problem.

All right, little right, little right

pedal. So as the hill got a little meaner,

we got a little more confident, right?

And we thought we had it licked until

is that in? I don't think so.

Stop. Who broke?

Stop and snap, man.

She, the bolts right off. Boom.

Well, you get 300 horsepower engine spinning off a drive train that's designed for 100 and 12 horsepower the best of the days. Well,

guess what happens? We're going back to work.

Well, now that we're back in the shop, we can see what happened. Now, the first thing you notice when you look under here is this aggressive p

angle is kicked way up. That's definitely not where we had set that. What caused. That is the weld actually broke between the axle tube and the center section. You can see the spot weld popped off here. That failure caused the opinion to twist up and put an enormous amount of stress on the U joint found a weakling.

Now, the UO

held up as did our new drive shaft with these mangled straps and sheared off bolts along with the stock axle housing just weren't up to the stress of our new V8 power and all the extra way to these 30 sevens, not to mention these heavy duty suspension components

in Kevin's right foot.

Now, if you've done much wheeling, you probably found yourself in the same position we're in with some broken parts and some decisions to make. Now, if you're upgrading your axles, you know, there's a lot of options. You got a lot of different ways that you can go. But the one thing we know for sure is that these stalkers, they gotta go away.

Now rebuilding these stock assemblies would only get us so far. We might get stronger axle shafts, steeper gears and there's always braces and guess it so we could weld on to strengthen the tooth, but ultimately, they're just not designed for as much power as we've got pushing them. So an upgrade is definitely in order.

So you've got tons of options with a Jeep, a set of bolt in Dano

40 fours, some junk yard axles, even a 48.8 outback. But we wanted to make sure we had axles that can match our new power and we'll never have to worry about again. Now, Curry introduced the Rock Jock, high opinion axles few years back and put the industry on its ear, but its aluminum center section was geared mainly towards lightweight rock crawlers. But these new iron rock Jocks featured the same high opinion design, still have the strength of the Dana 60 ring gear, but with a super strong nodular iron housing.

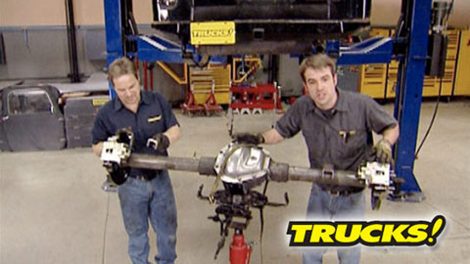
Now, we went with a RB selectable air lockers, front and rear steeper, 456 gears and a Ford Explorer, rear disc brake set up. One other cool feature is that we can swap our knuckles and brakes from our old Dana 30 into our new Curry Dana 60 up front. That combined with fab

flexible lift system makes this a pretty easy axle swap.

When we get back from the break, we'll get our new axles under our jeep. Then sparks are gonna fly when we cut our drive shafts to the right leg. Stick around.

Hey, welcome back. If you're just joining us, we found a cure for our Y J's weak axles which failed miserably out on the trail under the punishment of our new EF I 350

much heavier wheels and tires. Now to take care of that weak link, we're using Curry's new iron Jock axle assemblies front and rear. Now, even though these Dana sixties are the cool high pinion style, we still have to find the correct pinion angle at ride height before we burn these perches in,

make sure you center the axle between the leaf springs So you don't have any tracking issues and you want to make sure that your pin angle is adjusted down a couple of degrees to compensate for the axle rotating up under acceleration.

Now, this fab tech traction bar did a really good job of holding the driver's side axle tube in place. Unfortunately, the factory plug welds weren't up to the task. They failed under load. Well, these won't.

So with our pinion angle set, we can reuse the bracket. We cut off the stock axle tube

reattach our traction bar

up front. We had ordered our Curry Rock Jock 60 for a Jeep TJ instead of a YJ. Because our new lift kit utilizes the T J's control arm mounting points and it bolts right into place.

Our coil overs up front worked great on the trail. They're not going anywhere, but we got to find another place to mount them. So here's where we can kill two birds with one stone. This area here behind the sea could use a little strengthening so we can guess at this

drill it in the front, put a matching Gasset out back and now it becomes a strengthening point plus a shock mount

using a cardboard template. We transferred our pattern to 316 plate field

which is strong enough for a gusset but thin enough to be easy to work with.

Since we're utilizing our factory Dana 30 knuckles on our Dana 60 housing a

stock brake rebuild will be just fine.

Plus these 11 inch rotors will match up nicely with the new disc brakes we've got on the rear,

ok. With our suspension compressed. Now, we can check our drive shafts with our new high pin design of these axles. The pin is longer. So now our drive shaft is too long. It's an easy fix out back. All we got to do is trim off this slip shaft

up front. We didn't get as lucky. We're gonna actually have to cut and reld the front drive shaft at the correct length.

Kevin's right. This is an easy fix for the back, but it's not an easy cut. Shortening. The hardened sl section requires more than just your hacksaw.

Get yourself a powerful abrasive cut off wheel and be prepared to spend some time

when you're finally through. Be sure and deeper the ends of the fly.

Now, Ryan's job was no cakewalk either first grinding away and cutting through the factory. Well, he literally knocked the spline section out of the front drive shaft, but he didn't have to cut them.

The tooth section only needed to be shortened a few inches, but to reattach it to the spine section, he used a homemade set up to check and adjust the run out or the wobble of the drive shaft while he re welded it.

Um

Next up, the articulation ramp is gonna twist our YJ into the right shape to mount our shocks and later we're back on I 65 for a shot at a little sweet revenge. Hang on right next to you. Can you can go? Right?

Oh,

right there. Who,

who?

Hey, welcome back to trucks. We're almost ready to go back out on the trail and tackle the hill that shredded our rear axle. Only this time we're packing a little more heat.

Now, you guys may have noticed we didn't mount our shocks and we underneath the YJ last time, it's because we wanted to use this articulation ramp to flex out the rear suspension and find the best place to mount them.

This put the excellent full droop on one side while fully compressing it on the other and showing us how much travel we have to account for when welding the shocks into place.

Be sure and weld your shock mounting tabs as high up on the axle tube as possible for better ground clearance.

I

our curry axles came loaded with a RB selectable air lockers.

That way we can maximize our traction while off road

with our axles finally buttoned up and installed, we can mount the compressor

route. The airlines hook up a few wires,

air from the compressor activates the A RB locking mechanism, turning our open differentials into locked axles, which is almost a requirement for getting up a trail like I 65.

Now, the ability to lock and unlock a differential at the flip of a switch is good because unlocked. You can drive on the street without the noise and clonking of a traditional locker and out on the trail, an open D

allows you to make tighter turns and reduces stress on steering components.

Now, I know there's some of you guys that are saying

both of you knew the stock axles weren't gonna hold up.

So why didn't you replace them with all the rest of the stuff you've added?

Well, the truth is we kind of wanted to have a little fun and break some stuff, but more than that, we wanted to show you guys what happens if you don't plan your way through all of the aspects of a project build up,

stick around because when we get back, we've got a score to settle with a big old pile of dirt and rock because now we've got something for it.

Hey, welcome back to trucks. Well, we're back out here at Woolies off Road Park and this time we're locked and loaded. Literally, we've got a RB air lockers in our curry iron Jock axle. So now we finally have the drive train to match the newfound power that we stuffed into that YJ Tub. But first, we've got a score to set with a trail called I 65. It got the best of us one time

but not this time,

100 and 50 ft in length with an elevation change of more than 40 ft. This debris field looks more like a war zone than a trail. But revenge is sweet and failure is not an option.

Now, even with your trail scouted a line picked out and all new power, you still have to improvise and think your way through the obstacles.

Ok. Uh

Touch left,

uh, back up and get you.

Ok? You're good. Yeah. Yeah.

Get over here.

Our pro

mud terrains proved their value by giving us the traction we needed and standing up to all the abuse we were putting them through.

No, uh,

right away. It was obviously we finally had the right hardware for this hill.

The engine transmission and tires were all there. And our curry axles with their selectable lockers

proved to be the missing link that gave us the confidence and our YJ, the abilities to claw its way to the top

right next to you. Can, you can go right.

Hell yes.

Hell yes.

Awesome, man.

Hell, yeah. Two good job.

Oh, yeah.

Can they show that on TV? Tore it up a

little tough when we made it

and look, there's no parts down there. That's the best thing

all it takes is to write ammunition. You could kill any hill, lock yourself a lot. Well, after we redeemed ourselves and proved our Y day, we did what anybody would do.

We got back in line and did it again. Hit it, man.

You're good. You're good. You're good.

Hell, yes, you're, you're good. You're fine. Keep going.

Yeah.

Awesome, man. Awesome.

Hell yeah.

Like a pa

T, all right.

What's next?

There's one that way

with I 65 behind us and having suffered minimal damage. It was just more fun.

I

think.

I

know this thing. It's wicked. It's unstoppable, man.

Put the

pedal down.

Hey, guys, check this out. This is something designed for the extreme opposite end of the spectrum from what we used to get up. I 65. This is Mickey Thompson Sportsman sr radio.

This extra wide tire is a modern day version of their classic sportsman tire with their distinct flame pattern tread.

We've got ours wrapped around Mickey Thompson's hr one rotary Forge CNC machine and polished 20 by 16 inch aluminum wheel

and this tire is an unbelievable 22 inches wide.

The Mickey Thompson Sportsman SRS start at 150 for the front and 190 for the rear.

Their hr one wheels 700 up front about 1200 out back and this is a wheel entire combination. You build a truck around.

That might be something we do.

So how do you get more horsepower and torque out of a vehicle without turning a single wrench? Well, it's no big secret that with a late model vehicle, you can upload a performance tune up into it with a programmer and this super chips flash pack can get you an extra 10 horsepower and 13 extra foot pounds of torque in your gas burning vehicle. And just because you don't have a big V8. That doesn't mean you can, you get high performance. Those numbers are for this Ford Explorer with a 4 L V6. You also get increased shift firmness, a higher rev limit and a higher top speed limiter. And if any trouble codes come up on your desk, you can diagnose and clear them.

The super chips flash pack is available at most automotive retailers and mail order outlets. It will cost you about 550 bucks.

Well, since we've been talking a lot about axles today, here's a tip that you can take home. It's not gonna cost you a dime. Say you're working on an axle, either your own or one out in a junkyard and you wanna know what the gear ratio is, but the ID tag is missing. What are you gonna do

now for a locking differential simply mark the 12 o'clock position of the pin and the axle or tire and go ahead and rotate the pin

and count how many turns it takes to rotate the axle one complete revolution. If it takes 3.5 turns, you've got a 3.5 to 1 ratio. What's more commonly known as a 350 gear set.

Now with an open differential like this one, it's pretty much the same thing. Just make sure you turn both sides the same direction at one time and count or lock one side down and then count two revolutions on the one side that's free.

Now, this one takes about 33 quarters turn. So it's probably safe to say we've got a 373 gear set. Now, this will get you in the ballpark, especially if you're out laying in the dirt out of the junkyard.

Hey, thanks for watching trucks. We'll see you guys next week.
Show Full Transcript